How to Enable or Disable the Notification Area System Icons in Vista
This will show you how to enable or disable the Notification Area System Icons for all user account on the computer. These are the Clock, Volume, Network, and Power (battery) icons in the bottom right corner of the Taskbar. When these icons are disabled, they will be grayed out in the Notification Area. When these icons are enabled, they can be checked to show on the Taskbar Notification Area.
If you want to make all Taskbar icons bigger, then increase the Caption Buttons Item Size to a higher number in Advanced Appearance settings. See steps 6A and 6B here: How to Change the Advanced Appearance Settings in Vista
- Make sure the the drivers and devices that go with the system icons are installed and working properly. They will not work if the device or driver does not.
- Sometimes to simply logoff and logon, or restart the computer, will enable the missing notification icons again. You should try that first.
- Sometimes a simple reset of the Notification Icons will clear the problem.
- Sometimes on a laptop, you can shutdown the laptop and remove the battery pack, reconnect it, and power the laptop back up to get the Power (battery) icon back or ungrayed.
 METHOD ONE
NOTE: This will just turn the Notification Area System icons on or off for your user account only. Power will remain grayed out unless your computer is a laptop or has a UPS battery backup connected to it. To create a Power Options shortcut, see: How to Create a Power Options Shortcut in Vista.
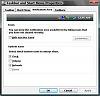
1. Right click on the Taskbar and click on Properties.
2. Click on the Notification Area tab. (See left screenshot below step 3)
3. Check (on) or uncheck (off) the options you want or do not want to show on the Taskbar Notification Area.
- If only one or more of the bottom System icons section are grayed out then do METHOD TWO or METHOD THREE or METHOD FOUR below to enable them. See the WARNING at the top of this tutorial also. (See right screenshot below)
- If the top Icons section is also grayed out and all but the Clock icon is grayed out in the bottom System icons section, then see: How to Show or Hide All Notification Area System Tray Icons in Vista
- If the top Icons section is not grayed out and the icon you want is checked and not grayed out, then check to make sure that the icon is not set to hide. See: How to Show or Hide All Notification Area System Tray Icons in Vista


METHOD TWO NOTE: This method will enable or disable a System icon.
1. Open the all users, specific users or groups, or all users except administrators Local Group Policy Editor for how you want this policy applied.
2. In the left pane, click on User Configuration, Administrative Templates, and Start Menu and Taskbar. (See screenshot below)

3. For the Clock Icon - In the right pane, right click on Remove Clock from the system notification area and click on Properties.
(See screenshot above)
A) To Disable the Clock Icon - Dot Enabled and click on OK. (See screenshot below step 7)
B) To Enable the Clock Icon - Dot Disabled or Not Configured and click on OK.
4. For the Volume Icon - In the right pane, right click on Remove the volume control icon and click on Properties. (See screenshot above)
A) To Disable the Volume Icon - Dot Enabled and click on OK. (See screenshot below step 7)
B) To Enable the Volume Icon - Dot Disabled or Not Configured and click on OK.
5. For the Network Icon - In the right pane, right click on Remove the networking icon and click on Properties. (See screenshot above)
NOTE: To make sure that this icon works properly you should also have the Services Network Connections, Network List Service, Network Location Awareness, and Network Store Interface Service set to Started and Automatic. For how, see: How to Disable or Enable Vista Services with an Advice Guide
A) To Disable the Network Icon - Dot Enabled and click on OK. (See screenshot below step 7)
B) To Enable the Netwok Icon - Dot Disabled or Not Configured and click on OK.
6. For the Power (battery) Icon - In the right pane, right click on Remove the battery meter and click on Properties. (See screenshot above)
NOTE: This will remain grayed out unless your computer is a laptop or has a UPS battery backup connected to it. To create a Power Options shortcut, see: How to Create a Power Options Shortcut in Vista
A) To Disable the Power Icon - Dot Enabled and click on OK. (See screenshot below step 7)
B) To Enable the Power Icon - Dot Disabled or Not Configured and click on OK.
7. Close the Local Group Policy Editor.

METHOD THREE NOTE: This method will enable or disable a System icon.
1. For the Clock Icon -
2. For the Volume Icon -
3. For the Network Icon -
NOTE: To make sure that this icon works properly you should also have the Services Network Connections, Network List Service, Network Location Awareness, and Network Store Interface Service set to Started and Automatic. For how, see: How to Disable or Enable Vista Services with an Advice Guide
4. For the Power (battery) Icon -
NOTE: This will remain grayed out unless your computer is a laptop or has a UPS battery backup connected to it. To create a Power Options shortcut, see: How to Create a Power Options Shortcut in Vista
5. Click on Save, and save the .reg file to the Desktop.
6. Right click on the downloaded .reg file and click on Merge.
7. Click on Run, Continue (UAC), Yes, and then OK when prompted.
8. When done, you can delete the downloaded .reg file if you like.
9. Log off and log on, or restart the computer to apply the changes.
METHOD FOUR NOTE: This method will enable or disable a System icon.
1. Open the Start Menu.
2. In the white line (Start Search) area, type regedit and press Enter.
3. If pompted by UAC, click on Continue.
4. In regedit, go to: (See screenshot below)
NOTE: If Explorer is not there, then right click on Policies in the left pane and click on New and Key. Type Explorer and press Enter.
HKEY_CURRENT_USER\Software\Microsoft\Windows\CurrentVersion\Policies\Explorer
5. To Disable the System Icons - In the right pane of Explorer, right click on a empty area and click on New and DWORD (32-bit) Value.
A) To Disable the Clock Icon - Type HideClock and press Enter.
B) To Disable the Volume Icon - Type HideSCAVolume and press Enter.
C) To Disable the Network Icon - Type HideSCANetwork and press Enter.
D) To Disable the Power (battery) Icon - Type HideSCABattery and press Enter.
E) In the right pane, right click on the one you just typed to disable and click on Modify.

F) Type 1 and click on OK. (See screenshot below)
NOTE: Repeat for each step you did in 5A to D.

6. To Enable the System Icons - (See screenshot below step 5E)
A) To Enable the Clock Icon - Right click on HideClock and click on Delete.
B) To Enable the Volume Icon - Right click on HideSCAVolume and click on Delete.
C) To Enable the Network Icon - Right click on HideSCANetwork and click on Delete.
D) To Enable the Power (battery) Icon - Right click on HideSCABattery and click on Delete.
E) Click on Yes to confirm the delete.
F) In regedit, go to: (See screenshot below)
HKEY_LOCAL_MACHINE\SOFTWARE\Microsoft\Windows\CurrentVersion\Policies\Explorer
G) In the right pane, repeat steps 6A to 6E if they are here to.

7. Close regedit.
8. Log off and log on, or restart the computer to apply the changes.
That's it,Shawn
Related Tutorials
- How to Change How Long a Notification Dialog Box Will Stay Open in Vista
- How to Reset the Notification Area Icons Cache in Windows 7 and Vista
- How to Hide or Show a Notification Icon in Vista
- How to Create a Power Options Shortcut in Vista
- How to Show or Hide All Notification Area System Tray Icons in Vista
Attachments
Last edited by a moderator:


