How to Enable or Disable Lock Computer in Vista
This will show you how to Enable or Disable Lock computer from working, and add or remove it from the Windows Security screen when you press CTRL+ALT+DEL for all user accounts on the computer. Lock is enabled in Vista and is listed in the CTRL+ALT+DEL menu by default.
When the computer is locked, the desktop is hidden and the system cannot be used. Only the user who locked the computer or the system administrator can unlock it with their password (if created).
This will not add or remove Lock from the Start menu. It will only enable or disable Lock from working when clicked on.
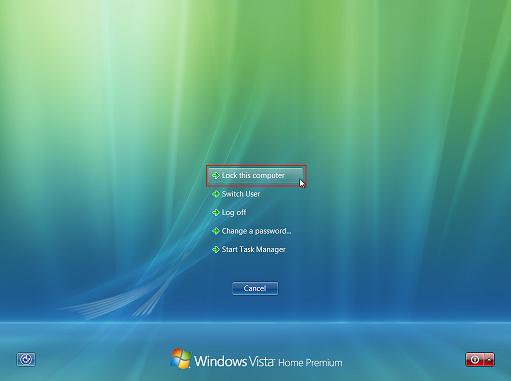
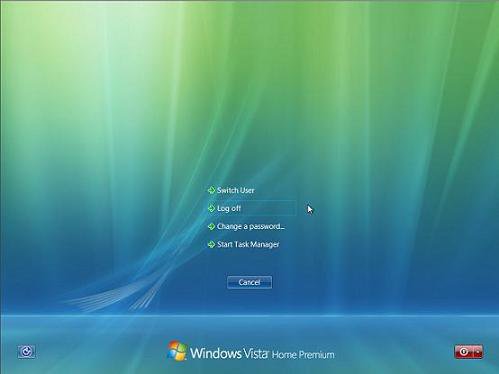
EXAMPLE: Default (Added) and Removed Lock this computer in Ctrl+Alt+Del
 OPTION ONE
NOTE: This option is only available for the Vista Business, Ultimate, and Enterprise editions. See OPTION TWO or OPTION THREE below for the Vista Home Basic and Home Premium editions.
1. Open the all users, specific users or groups, or all users except administrators Local Group Policy Editor for how you want this policy applied.
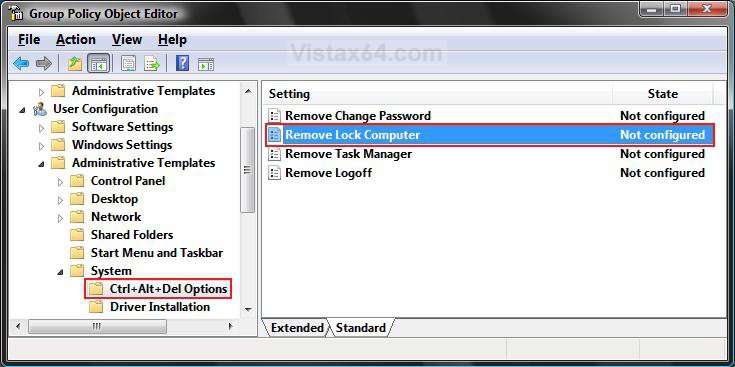
2. In the left pane, click on User Configuration, Administrative Templates, System, and Ctrl+Alt+Del Options. (See screenshot below)
3. In the right pane, right click on Remove Lock Computer and click on Properties. (See screenshot above)
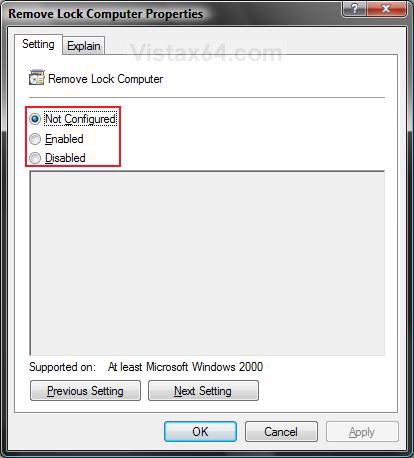
4. To Enable and Add Lock Computer
A) Dot Disabled or Not Configured and click on OK. (See screenshot below step 5A)
B) Go to step 6.
5. To Disable and Remove Lock Computer
A) Dot Enabled and click on OK.
6. Close the Local Group Policy Editor window. Your done.
 OPTION TWO
NOTE: This option will work in all Vista editions.
1. To Enable and Add Lock Computer
A) Click on the Download button below to download the file below.
Add_Enable_Lock_CtrlAltDel.reg
B) Go to step 3.
2. To Disable and Remove Lock Computer
A) Click on the Download button below to download the file below.
Remove_Disable_Lock_CtrlAltDel.reg
3. Click on Save, and save the .reg file to the Desktop.
4. Right click on the downloaded .reg file and click on Merge.
5. Click on Run, Continue (UAC), Yes, and then OK when prompted.
6. Log off and log on, or restart the computer to apply the changes.
7. When done, you can delete the .reg file if you like.
 OPTION THREE
NOTE: This option will work in all Vista editions.
1. Open the Start Menu.
2. In the white line (Start Search) area, type regedit and press Enter.
3. Click on the Continue button in the UAC prompt.
4. In regedit, go to: (See screenshot below step 5C)
NOTE: If you do not have System, then right click on Polices and click on New and Key, then type System and press Enter.
HKEY_CURRENT_USER\Software\Microsoft\Windows\CurrentVersion\Policies\System
5. To Disable and Remove Lock Computer
A) In the right pane, right click on a empty area and click on New and DWORD (32-bit) Value. (See screenshot below step 5C)
B) Type DisableLockWorkstation and press Enter. (See screenshot below step 5C)
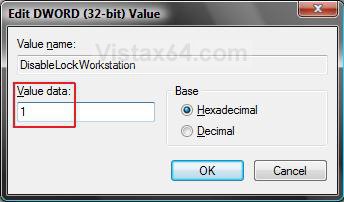
C) Right click on DisableLockWorkstation and click on Modify. (See screenshot below)
D) Type 1 and click on OK. (See screenshot below)
6. To Enable and Add Lock Computer
A) In the right pane, right click on DisableLockWorkstation and click Delete. (See screenshot below step 5C)
B) Click on Yes to confirm the deletion.
7. Close regedit.
That's it,Shawn
Related Tutorials
- How to Shutdown, Restart, Switch User, Log Off, Sleep, or Lock Vista from the Keyboard
- How to Add or Remove Log Off from the Ctrl+Alt+Delete Screen in Vista
- How to Create a Lock Computer Shortcut in Vista
- How to Add or Remove Lock and Switch User from the Start Menu in Vista
- How to Add or Remove Change Password from the Vista Ctrl+Alt+Delete Screen
Attachments
Last edited:

