| How to Add or Remove the Theme Option in Vista Information | | This will show you how to add or remove the Theme option from the Personalize appearance and sounds window for all users on the computer. By default, the Theme option is added. |  | NOTE | | A Desktop Theme is a collection of visual elements and sounds for your computer desktop. These elements consists of the appearance of menus, icons, wallpapers, screen savers, fonts, some computer sounds, mouse pointers, and etc. |  | RELATED LINKS:EXAMPLE: Theme Option Added NOTE: To see this window, right click on a empty space on the desktop and click Personalize.  EXAMPLE: Theme Option Removed NOTE: To see this window, right click on a empty space on the desktop and click Personalize.  | METHOD ONE: |
|---|
| Through the Local Group Policy Editor |
NOTE | | This method is only available for the Vista Business, Ultimate, and Enterprise editions. See Method Two below for the Vista Home Basic and Home Premium editions. |  | 1. Open the Local Group Policy Editor. 
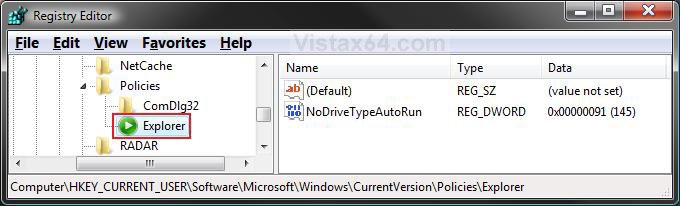
2. In the left pane, click on User Configuration, Administrative Templates, Control Panel, Display, and Desktop Themes. (See screenshot below) 
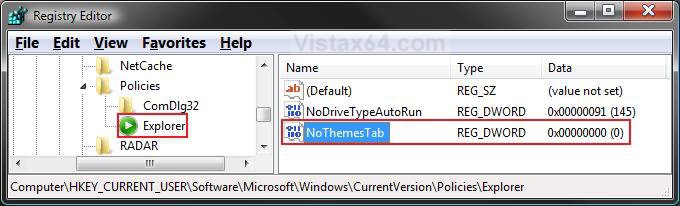
3. In the right pane, right click on Remove Theme option and click on Properties. (See screenshot above) 4. To Add Theme Option - 
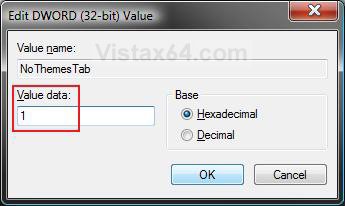
A) Dot Disabled or Not Configured and click on OK. (See screenshot below step 5A)
B) Go to step 6. 5. To Remove Theme Option - A) Dot Enabled and click on OK. 
6. Close the Local Group Policy Editor window. Your done. | METHOD TWO: |
|---|
| Through the Registry |
NOTE | | This will work for all Vista versions. |  | Through a Download:1. To Add Theme Option - A) Click on the download button below to download the Add_Theme_Option.reg file. B) Go to step 3. 2. To Remove Theme Option - A) Click on the download button below to download the Remove_Theme_Option.reg file.
3. Click on Save, and save the .reg file to the Desktop. 4. Right click on the .reg file (on Desktop) and click on Merge. 5. Click on the Run button in the Security Warning pop-up. 6. Click on Continue (UAC), Yes, and then on OK when prompted. 7. When done, you can delete the .reg file (On Desktop). The Manual Way:1. Open the Start Menu. 2. In the white line (Start Search) area, type regedit and press Enter. 3. Click on the Continue button in the UAC prompt. 4. In regedit, go to: (See screenshot below) HKEY_CURRENT_USER\Software\Microsoft\Windows\CurrentVersion\Policies\Explorer 5. To Remove Theme Option -A) In the right pane, right click on a empty area and click on New and on DWORD (32-bit) Value. (See screenshot above)
B) Type NoThemesTab and press Enter.
C) Right click on NoThemesTab and click on Modify. (See screenshot below) 
D) Type 1 and click on OK. (See screenshot below) 
E) The registry will now look like this. (See screenshot below) 
F) Go to step 7. 6. To Add Theme Option - A) In the right pane, right click on NoThemesTab and click on Delete. (See screenshot above) NOTE: If NoThemesTab is at HKEY_LOCAL_MACHINE\SOFTWARE\Microsoft\Windows\CurrentVersion\Policies\Explorer, then delete it there as well.
B) Click on Yes to confirm deletion. 7. Close regedit. That's it,
Shawn |  Published by | | | Administrator Join Date: Apr 2007 Location: Texas, USA
Posts: 23,772
Rep Power: 150 | |
 Tutorial Tools | | |
 Applies to | | All Vista Versions | | 64 Bit & 32 Bit | |
| | |