Solved Installing XP on Vista Hard Drive

Hungrytoheal

New Member
Hey guys,

I was wondering how I would install Windows XP on my harddrive that has Vista on it WITHOUT formatting or uninstalling Vista.

Cheers.
 

My Computer

System One

  • Manufacturer/Model
    Asus
    CPU
    AMD Phenom(tm) 8650 Triple-Core Processor (3 CPUs), ~2.3GH
    Motherboard
    ASUS M2N68-CM Motherboard
    Memory
    4094MB RAM
    Graphics Card(s)
    NVIDIA GeForce 9500 GT
    Sound Card
    Speakers VideoLogic ZXR-550/Microsoft LifeChat LX-3000
    Monitor(s) Displays
    ViewSonic VE700
    Screen Resolution
    1280 x 1024
    Hard Drives
    1TB Samsung
    Case
    ASUS TA-K5
    Cooling
    CPU Funnel
    Keyboard
    Microsoft Digital Media Pro Keyboard
    Mouse
    Microsoft USB IntelliMouse Optical
    Internet Speed
    Dial Up
to do it correctly follow this

Got a Vista PC and want to install XP so you can dual-boot between them? Here's how to do it, in an easy, step-by-step format.

Page 1 - Intro
media_1221353917454.jpg

Scenario: You want to install Vista on your PC alongside your XP installation, on the same drive. You have installed Vista already. (If you have XP installed first, check out our earlier tutorial on how to dual boot Vista and XP with XP installed first.)
Tutorial Summary: We need to shrink the Vista partition on the hard disk and create enough space for an installation of XP. This can be done in three ways - using the GPartEd Live CD, the DISKPART utility on the Vista DVD or the Vista Disk Management GUI - and we'll cover all three. We'll then install XP and install EasyBCD to reinstate the Vista bootloader which will be overwritten during the XP installation, and then use EasyBCD to configure Vista's bootloader to boot the XP partition.
Updated September 2008: This is an updated tutorial, based on our first Windows Vista/XP dual-booting workshop. The main differences are that we are now using Windows Vista SP1 and Windows XP SP3. EasyBCD has also been updated and this makes some of the steps in our first tutorial redundant - the whole process is now easier.
This tutorial has been tested on a VMWare 6 Workstation.
Create Free Space for Windows XP

We assume that before you start this tutorial, you have backed up the drive (partitions and data) that will host the two operating systems.
Your first step will be to modify the Windows Vista system partition to make space for XP using GParted
The GParted Live CD ISO is available here – burn it to CD and boot the system from the disc. The version we used was 0.3.7-7.
When you boot from the GParted LiveCD, depending on your system, you should just need to select the auto-configuration boot option.
Option 1 - Using GPartEd

media_1221356342744.jpg

During boot, press Enter twice when prompted to select the keymap and language settings.
When the main GUI loads, right-click on the main Windows XP NTFS partition (depending on your setup, probably /dev/hda1) and select Resize/Move.
media_1221356452990.jpg

Use the slider to reduce the partition size and free up enough room to install XP (at least 5GB) and click Resize/Move.
media_1221356769983.jpg

The changes haven’t actually been made, they’ve just been scheduled to run. To commit the changes and resize the partition, click Apply. GParted will ask to confirm the changes – hit OK and away you go.
Option 2 - Using DISKPART

media_1221357588118.jpg

Boot the machine from the Vista DVD. Select the appropriate language and then "Install Now".
On the product key page, press SHIFT + F10 to launch a Windows PE 2.0 command window. Then type in DISKPART and press enter to get into the DISKPART utility.
media_1221357637767.jpg

Now type in LIST VOLUME - this gives you a readout of the volumes available on the system. Select the main Windows XP volume by typing in SELECT VOLUME 0 (in most cases it will be Volume 0 - in our lab in was Volume 1).
media_1221357662747.jpg

Now type in SHRINK. Vista will reduce the size the selected Volume by around 50%.
Option 3 - Using Disk Management

Using the Disk Management GUI is really no different to using DISKPART (it's the GUI frontend to the DISKPART utility), but using the GUI does mean that you can make the changes within Vista before rebooting to install XP, without needing to use the Vista DVD.
media_1221359279659.jpg

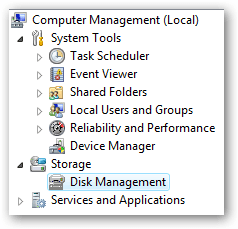
Right-click on Computer and select Manage. In Computer Management, expand Storage and select Disk Management.
media_1221359316129.jpg

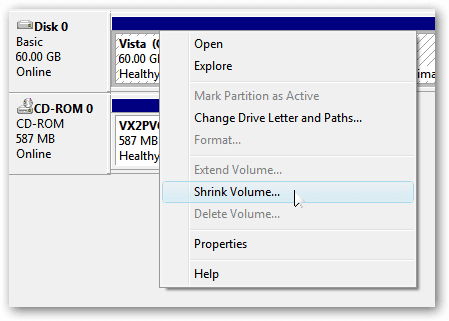
Right-click the primary partition (the one you need to make space on) and select Shrink Volume
media_1221359366711.jpg

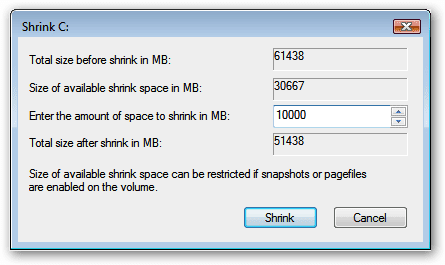
The default values which Vista provides represent a fairly aggressive shrink - as long as the values will give you enough space to install XP, accept the defaults and select Shrink.
Vista will churn away for a moment, and then you'll see the newly-created free space on the primary disk. Now you can reboot and install XP.

Now Install Windows XP

media_1221365347174.jpg

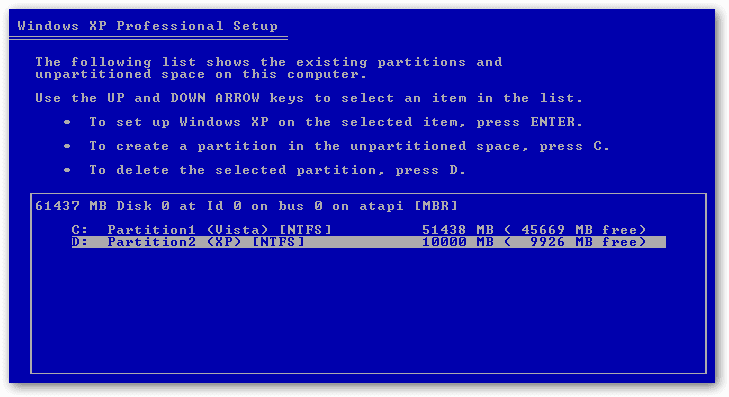
When the Windows XP setup reaches the point where you’re prompted where it is to be installed, you’ll see that while XP can see the space we created earlier, it can also see the partition with Vista on it.
You should be able to see the space you reclaimed on the disk earlier which has become "unallocated space".
Create a second partition using the Windows XP installer screen above by selecting the free space on the drive and pressing "C" to create a partition (if prompted, choose NTFS as the file system.)
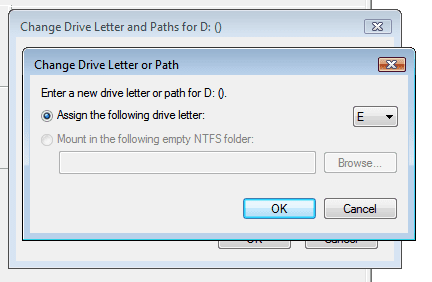
Irritatingly, XP assigns a drive letter to this partition (C:) which means that it will use the next available drive letter after all the other physical drives have been taken into account.
This means that the system drive of the XP installation won’t be C:.
From XP’s perspective this isn’t really a problem – it’s smart enough to figure out where everything should go – but some applications make assumptions about where they should install to, and can’t cope with a non-standard Windows configuration.
This was also the case with our tutorial on dualbooting Ubuntu and XP, where Ubuntu had been installed first. However in that scenario, even though the XP system drive had a non-standard drive letter, it couldn’t read the Linux partitions so there was no danger of the two systems overlapping. This is not the case with Vista/XP.
Nonetheless, install XP as normal – there’s no need to do anything differently.
IMPORTANT NOTE – after the initial file copy, Windows XP reboots and loads up the GUI-based component of the install. You may get the following error: “A disk read error occurred – press Ctrl-Alt-Del to continue”. This is caused by a corrupt bootloader – click here to see how to fix this problem.
When the system reboots it won’t bring up a boot menu. Although XP recognises the Vista partition it doesn’t recognise Vista itself. This is because the Windows XP bootloader gets installed to the MBR, thus overwriting the Vista bootloader and so Vista can no longer boot - the XP bootloader can't be made to recognise Vista.
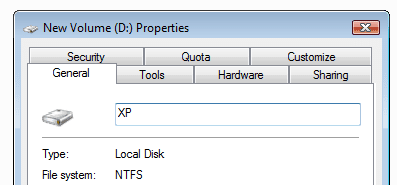
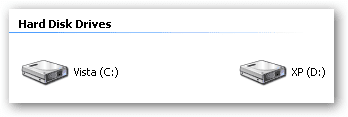
When XP loads, open up Windows Explorer and you’ll see something interesting – a C: and (in this case) an E: drive.
The C: drive contains Windows Vista, and as Windows XP can read NTFS partitions, it can browse and modify Vista’s file structure.
More importantly, applications which have installation paths hard-coded into their install scripts rather than using Windows system parameter variables could easily dump files into C: when they should be installing to E:. This isn’t such a great situation - really the optimal XP/Vista dualboot scenario is to install Vista on a pre-existing XP system.

Restore Vista Bootloader and Enable Dualbooting

media_1221368988747.jpg

We need to restore the Vista bootloader in order to restore Vista functionality and configure Vista/XP dualbooting. In the previous version of this tutorial, we used the Vista DVD to restore the bootloader, and EasyBCD to set up dualbooting.
Since that tutorial was written, EasyBCD has been updated and can now restore the Vista bootloader from within the application. Also, it can be installed on Windows XP, so this means that there's no need for any more reboots or playing with recovery DVDs.
Once the XP system is up and running, download and install Microsoft .NET Framework 2.0, and then download and install EasyBCD (version 1.7.2 at the time of writing).
Launch the application. EasyBCD isn't looking at the XP bootloader - it has found the bootloader on the Vista partition, so this is what you're directly editing.
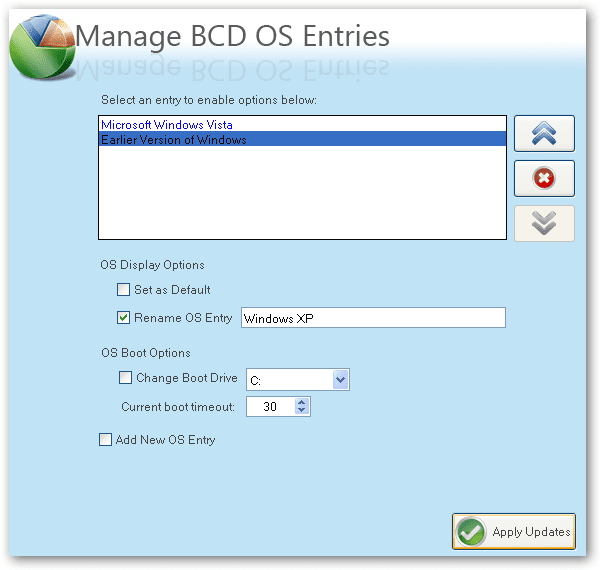
Go to the "Add/Remove Entries" tab. You'll see that there's only one option available in the Vista bootloader at the moment. In the "Add an Entry" section, change the Drive in the dropdown menu from C:\ to E:\. Change Type to "Windows NT/2k/XP/2k3", and the Name to "Microsoft Windows XP". Then click "Add Entry" and "Save".
media_1221369100162.jpg

Then go to the "Manage Bootloader" tab. Make sure that "Reinstall the Vista Bootloader" is selected and then click "Write MBR" and restart the system.
media_1221369153195.jpg

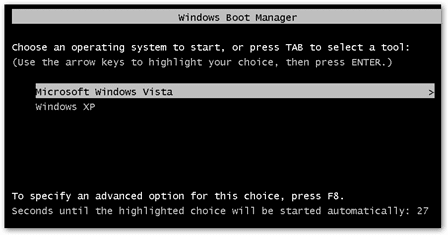
On reboot, the Vista bootloader is now active and you'll see two boot options.


now if you want to remove xp


Removing Windows XP

If you eventually decide that dualbooting XP as the second OS isn’t all it’s cracked up to be, it’s pretty easy to undo the changes made.
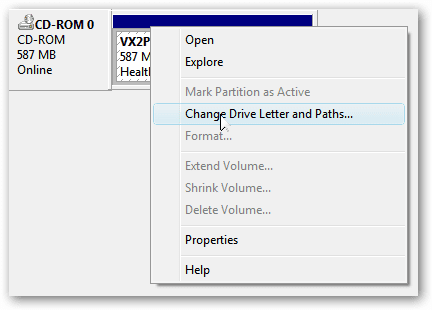
Use EasyBCD to remove the Windows XP boot entry, and then go into Computer Management (right-click on Computer, Manage) and go to Disk Management.
Right-click E: drive (the Windows XP partition) and select Delete Volume.
Right-click the newly-created partition and select Delete Partition.
Then right-click the C: drive (the Vista system partition) and click Extend Volume – this opens up the Extend Volume Wizard.
media_1221370103965.jpg

The wizard gives you a readout on how much space is actually available to extend the partition – enter in how much you want to use and press Next. Vista will extend the system partition to reclaim the disk and Windows is well and truly gone.

Fixing the Corrupt Bootloader

media_1221370630960.jpg

If the Windows XP bootloader corrupts during the install, performing a reinstall won’t fix it, nor will going into the XP Recovery Mode and attempting to repair the MBR.
Luckily, the install was up to the stage where all you need to do is be able to boot from the Windows XP partition, and the install will pick up from where it left off.
To do this you will need to restore the Vista bootloader so that you can then boot into Vista, install EasyBCD and create a boot entry for Windows XP. Once this has been done you can boot into the XP partition and the installation will continue.
media_1221370642395.jpg

Boot from the Vista DVD and on the screen where you’re prompted to “Install now”, select “Repair your computer”.
The next screen searches for local Vista installations – there should only be one, so click Next.
media_1221370656470.jpg

This loads the System Recovery Options screen. Select the first option – Startup Repair. This looks for problems which would prevent Vista from loading (like a missing bootloader) and automatically fixes them.
If you click on “Click here for diagnostic and repair details” and scroll to the bottom of the list, it shows that the problem detected and repaired was a corrupt boot sector (according to Vista, anyway).
Click Close and then Finish, and the system will restart and boot into Vista.
 

My Computer

System One

  • Manufacturer/Model
    CUSTOM BUILT BY ME
    CPU
    AMD PHENOM II X3 710 2.6GHZ Overclocked to 3.25GHZ Stable
    Motherboard
    Ecs Gf8200a Phenom-2 X4 Quad Core Mboard
    Memory
    8BG PC5300 4 x 2GB OCZ
    Graphics Card(s)
    PCI-E ATI HD 4670 1GB Overclocked 4GB Total
    Sound Card
    Onboard 7.1 HD AUDIO
    Monitor(s) Displays
    55" Vizio LCD
    Screen Resolution
    1600 x 1200 HD
    Hard Drives
    1TB Seagate, 1TB Hitachi, 250GB Maxtor, 250GB Seagate
    PSU
    Kingwin ABT-610MM Maximum Power 610 Watt ATX 12V
    Case
    GENERIC
    Cooling
    Zalman CNPS7500-AlCu LED Universal CPU Cooler, 4 CASE FANS
    Keyboard
    MICROSOFT WIRELESS KEYBOARD
    Mouse
    MICROSOFT WIRELESS MOUSE
    Internet Speed
    CABLE 15MBPS
or

Install Windows XP on Your Pre-Installed Windows Vista Computer

The question I am asked most often is “How do I install a dual-boot with Windows XP on my new Windows Vista computer?” The answer is that it’s not that difficult, it’s just very time consuming, and you need to own a copy of Windows XP.
Note that you should not attempt this if you aren’t ready to troubleshoot any problems that might occur.
The first issue we encounter is that computers with pre-installed operating systems take up the entire drive. Luckily Microsoft included the Shrink volume feature in Vista, so we can easily shrink the Vista partition down to make room for XP.
Open the Computer Management panel, which you can find under Administrative tools or by right-clicking the Computer item in the start menu and choosing Manage. Find the Disk Management item in the list and select that.
image12.png

Now we’ll shrink our volume down by right-clicking on the main hard drive and choosing Shrink Volume.
image13.png

Now you can choose the size that you want to shrink, which really means you are choosing the size that you want your XP partition to be. Whatever you do, don’t just use the default. I chose roughly 10gb by entering 10000 into the amount.
image14.png

The next step might be confusing, because we need to change the cd-rom drive that’s invariably taking up D: at the moment, because we want to use D: for the Windows XP partition, but it’s already taken by the cd-rom drive. If you skip this step than XP will install onto the E: drive, which isn’t the end of the world, but it’s not quite as tidy.
Right-click on the cd-rom drive in the list and choose Change Drive Letter and Paths from the menu.
image15.png

Now we’ll change the CD drive to use E: by selecting that in the drop-down.
image16.png

Now we can create a new partition for XP to live on and make sure that the drive letter is set the way we want. If you do not create a partition now the XP install will do so automatically, but it’s easier and cleaner to do it this way.
Right-click on the Unallocated free space area and then select New Simple Volume from the menu.
image17.png

Follow through the wizard and select whatever options you’d like, making sure to use D: as the drive letter.
Now you will need to close out of disk management and reboot your computer. This is because we can’t do the next step until we reboot. (you can try, but it won’t work)
So we’ve come back from rebooting… open up Computer from the start menu and then right-click on the D: drive and select properties. Give your partition a meaningful name like “XP”. It would be wise to name the C: drive to “Vista” at this point as well.
image18.png

Now you’ll want to pop your XP cd into the drive and boot off it. You may have to configure your BIOS to enable booting off the CD drive, or if your computer says something like “Hit Esc for boot menu” you might want to use that.
Once you come to the screen where you can choose the partition to install on, then choose either the unpartitioned space or the new partition you created. Whatever you do, don’t try and install onto your Vista partition! See how much cleaner it is now that we’ve labeled each partition distinctly?
image19.png

We’ll assume XP is completely installed at this point, and you will have lost your ability to boot into Windows Vista, so we’ll need to use the VistaBootPro utility to restore the Vista boot loader.
Update: VistaBootPro is no longer free, but you can still download the free version.
During the install you’ll be forced to install the .NET 2.0 framework. Open up VistaBootPRO and then click on the System Bootloader tab. Check the “Windows Vista Bootloader” and then “All Drives” radio buttons, and then click on the Install Bootloader button.
image20.png

At this point, the Windows Vista bootloader is installed and you’ll only be able to boot into Vista, but we’ll fix that. Instead of manually doing the work, we’ll just click the Diagnostics menu item and then choose Run Diagnostics from the menu.
image21.png

This will scan your computer and then automatically fill in the XP version.. click on the “Manage OS Entries” tab and then click in the textbox for Rename OS Entry, and name it something useful like “Windows XP” or “The Windows That Works”
image22.png

Click the Apply Updates button and then reboot your computer… you should see your shiny new boot manager with both operating systems in the list!
image23.png

If you get an error saying “unable to find ntldr” when trying to boot XP, you’ll need to do the following:

  • Find the hidden files ntldr and ntdetect.com in the root of your Vista drive and copy them to the root of your XP drive.
  • If you can’t find the files there, you can find them in the \i386\ folder on your XP install cd
There’s more information on this forum thread, thanks to nrv1013
This is a critical piece of information: Windows XP will be installed on the D: drive, even in Windows XP… so you’ll need to keep that in mind when tweaking your system.
image24.png

You can share information between the drives, but I wouldn’t recommend messing with the other operating system’s partition too much… it might get angry and bite you. Or screw up your files. What I do recommend is that you store most of your files on a third drive shared between the operating systems… you could call that partition “Data”.
I’m going to write a number of followup articles dealing with all of the issues with dual-boot systems, so subscribe to the feed for updates.
If you have issues with your dual-boot system, I’d recommend creating a new topic in our Vista forum, and we’ll try and help you.
If you have issues with using the shrink volume feature, check this article for some tips.
 

My Computer

System One

  • Manufacturer/Model
    CUSTOM BUILT BY ME
    CPU
    AMD PHENOM II X3 710 2.6GHZ Overclocked to 3.25GHZ Stable
    Motherboard
    Ecs Gf8200a Phenom-2 X4 Quad Core Mboard
    Memory
    8BG PC5300 4 x 2GB OCZ
    Graphics Card(s)
    PCI-E ATI HD 4670 1GB Overclocked 4GB Total
    Sound Card
    Onboard 7.1 HD AUDIO
    Monitor(s) Displays
    55" Vizio LCD
    Screen Resolution
    1600 x 1200 HD
    Hard Drives
    1TB Seagate, 1TB Hitachi, 250GB Maxtor, 250GB Seagate
    PSU
    Kingwin ABT-610MM Maximum Power 610 Watt ATX 12V
    Case
    GENERIC
    Cooling
    Zalman CNPS7500-AlCu LED Universal CPU Cooler, 4 CASE FANS
    Keyboard
    MICROSOFT WIRELESS KEYBOARD
    Mouse
    MICROSOFT WIRELESS MOUSE
    Internet Speed
    CABLE 15MBPS
Wow thanks a lot guys. That helped a lot. :)
 

My Computer

System One

  • Manufacturer/Model
    Asus
    CPU
    AMD Phenom(tm) 8650 Triple-Core Processor (3 CPUs), ~2.3GH
    Motherboard
    ASUS M2N68-CM Motherboard
    Memory
    4094MB RAM
    Graphics Card(s)
    NVIDIA GeForce 9500 GT
    Sound Card
    Speakers VideoLogic ZXR-550/Microsoft LifeChat LX-3000
    Monitor(s) Displays
    ViewSonic VE700
    Screen Resolution
    1280 x 1024
    Hard Drives
    1TB Samsung
    Case
    ASUS TA-K5
    Cooling
    CPU Funnel
    Keyboard
    Microsoft Digital Media Pro Keyboard
    Mouse
    Microsoft USB IntelliMouse Optical
    Internet Speed
    Dial Up
Your Welcome
 

My Computer

System One

  • Manufacturer/Model
    CUSTOM BUILT BY ME
    CPU
    AMD PHENOM II X3 710 2.6GHZ Overclocked to 3.25GHZ Stable
    Motherboard
    Ecs Gf8200a Phenom-2 X4 Quad Core Mboard
    Memory
    8BG PC5300 4 x 2GB OCZ
    Graphics Card(s)
    PCI-E ATI HD 4670 1GB Overclocked 4GB Total
    Sound Card
    Onboard 7.1 HD AUDIO
    Monitor(s) Displays
    55" Vizio LCD
    Screen Resolution
    1600 x 1200 HD
    Hard Drives
    1TB Seagate, 1TB Hitachi, 250GB Maxtor, 250GB Seagate
    PSU
    Kingwin ABT-610MM Maximum Power 610 Watt ATX 12V
    Case
    GENERIC
    Cooling
    Zalman CNPS7500-AlCu LED Universal CPU Cooler, 4 CASE FANS
    Keyboard
    MICROSOFT WIRELESS KEYBOARD
    Mouse
    MICROSOFT WIRELESS MOUSE
    Internet Speed
    CABLE 15MBPS
ALright guys, I've run into a big problem.

Everytime I boot now (after installing XP) I either get one of these errors:
- Error loading operating system (I think it's trying to boot Vista not XP!)
- My PC starts beeping continually until I reset.

Thanks a lot for your support.
 

My Computer

System One

  • Manufacturer/Model
    Asus
    CPU
    AMD Phenom(tm) 8650 Triple-Core Processor (3 CPUs), ~2.3GH
    Motherboard
    ASUS M2N68-CM Motherboard
    Memory
    4094MB RAM
    Graphics Card(s)
    NVIDIA GeForce 9500 GT
    Sound Card
    Speakers VideoLogic ZXR-550/Microsoft LifeChat LX-3000
    Monitor(s) Displays
    ViewSonic VE700
    Screen Resolution
    1280 x 1024
    Hard Drives
    1TB Samsung
    Case
    ASUS TA-K5
    Cooling
    CPU Funnel
    Keyboard
    Microsoft Digital Media Pro Keyboard
    Mouse
    Microsoft USB IntelliMouse Optical
    Internet Speed
    Dial Up
Please, does anyone know why this is happening? It's the beeping thats happening now.
 

My Computer

System One

  • Manufacturer/Model
    Asus
    CPU
    AMD Phenom(tm) 8650 Triple-Core Processor (3 CPUs), ~2.3GH
    Motherboard
    ASUS M2N68-CM Motherboard
    Memory
    4094MB RAM
    Graphics Card(s)
    NVIDIA GeForce 9500 GT
    Sound Card
    Speakers VideoLogic ZXR-550/Microsoft LifeChat LX-3000
    Monitor(s) Displays
    ViewSonic VE700
    Screen Resolution
    1280 x 1024
    Hard Drives
    1TB Samsung
    Case
    ASUS TA-K5
    Cooling
    CPU Funnel
    Keyboard
    Microsoft Digital Media Pro Keyboard
    Mouse
    Microsoft USB IntelliMouse Optical
    Internet Speed
    Dial Up
I'm on ubuntu at the moment, can I fix my vista boot from here?
 

My Computer

System One

  • Manufacturer/Model
    Asus
    CPU
    AMD Phenom(tm) 8650 Triple-Core Processor (3 CPUs), ~2.3GH
    Motherboard
    ASUS M2N68-CM Motherboard
    Memory
    4094MB RAM
    Graphics Card(s)
    NVIDIA GeForce 9500 GT
    Sound Card
    Speakers VideoLogic ZXR-550/Microsoft LifeChat LX-3000
    Monitor(s) Displays
    ViewSonic VE700
    Screen Resolution
    1280 x 1024
    Hard Drives
    1TB Samsung
    Case
    ASUS TA-K5
    Cooling
    CPU Funnel
    Keyboard
    Microsoft Digital Media Pro Keyboard
    Mouse
    Microsoft USB IntelliMouse Optical
    Internet Speed
    Dial Up
not sure if you can fix it from UBUNTU or not never used it.

but if you boot from your vista dvd and go to the command prompt you can type FIX MBR.

Repairing a Damaged MBR
Windows setup CDROM has a tool called the Recovery Console, which is designed to help you repair a damaged master boot record or boot sector. To start the Recovery Console and fix your damaged MBR, follow these steps:

  1. Restart your computer with the Windows XP Setup disk in the CDROM drive.
  2. If you are prompted to press a key to start the computer from CDROM, do so quickly. Otherwise it may try to boot from the hard drive.
  3. After a few minutes, you'll see a prompt to press the R key to start the Recovery Console.
  4. When Recovery Console starts, it will prompt you to enter a number corresponding to the Windows XP installation that you need to repair. In most cases, you'll enter "1" (which will be the only choice). If you press ENTER without typing a number, Recovery Console will quit and restart your computer.
  5. Enter your Administrator password. If you don't enter the correct password, you cannot continue.
  6. At the Recovery Console command prompt, type fixmbr and then verify that you want to proceed.
Your damaged MBR will be replaced with a shiny new one, and you should then be able to boot your system normally. In some cases, you may need to repair the boot sector in addition to the MBR. If your system still doesn't boot properly, repeat the steps above, but issue the fixboot command instead.
NOTE: These procedures assume that you have only one operating system installed. If you are an advanced user and have a multi-boot system with more than one operating system, you may need to do some additional reading about the fixmbr and fixboot commands at the Microsoft website
 

My Computer

System One

  • Manufacturer/Model
    CUSTOM BUILT BY ME
    CPU
    AMD PHENOM II X3 710 2.6GHZ Overclocked to 3.25GHZ Stable
    Motherboard
    Ecs Gf8200a Phenom-2 X4 Quad Core Mboard
    Memory
    8BG PC5300 4 x 2GB OCZ
    Graphics Card(s)
    PCI-E ATI HD 4670 1GB Overclocked 4GB Total
    Sound Card
    Onboard 7.1 HD AUDIO
    Monitor(s) Displays
    55" Vizio LCD
    Screen Resolution
    1600 x 1200 HD
    Hard Drives
    1TB Seagate, 1TB Hitachi, 250GB Maxtor, 250GB Seagate
    PSU
    Kingwin ABT-610MM Maximum Power 610 Watt ATX 12V
    Case
    GENERIC
    Cooling
    Zalman CNPS7500-AlCu LED Universal CPU Cooler, 4 CASE FANS
    Keyboard
    MICROSOFT WIRELESS KEYBOARD
    Mouse
    MICROSOFT WIRELESS MOUSE
    Internet Speed
    CABLE 15MBPS
Back
Top