How to Enable or Disable the Preview Pane in Vista
INFO: The Preview pane allows you to see a preview of the highlighted image, video, or document file in the opened Windows Explorer window without opening it. This will allow you to Add or Remove
Preview Pane from being listed in the
Organize ->
Layout menu option in Windows Explorer windows.
WARNING: 
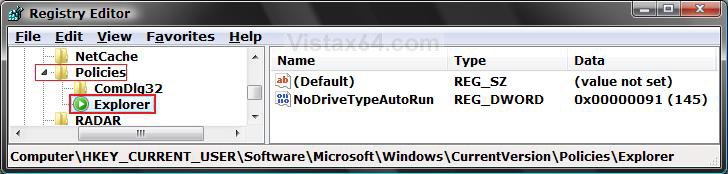
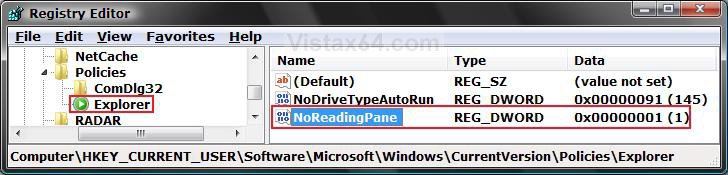
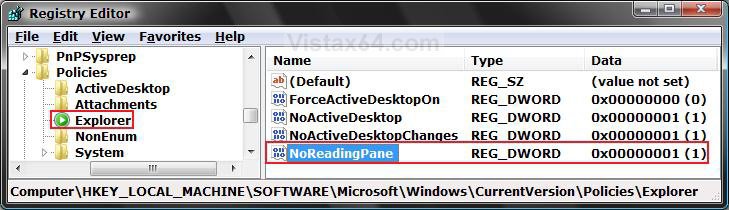
This will be applied to all user accounts on the computer.
NOTE: If you just want to turn the Preview Pane on or off, then see:
How to Turn the Preview Pane On or Off in Vista
RELATED LINKS:
1. How to Turn the Navigation Pane On or Off in Vista
2. How to Change the Open Folder Icon in Vista
3. How to Open and Change Folder Options in Vista
4. How to Enable or Disable the Menu Bar in Vista
5. How to Turn the Preview Pane On or Off in Vista
EXAMPLE: Preview Pane Enabled and Disabled
Enabled.jpgDisabled.jpg
METHOD ONE:
Through the Group Policy Object Editor :
NOTE: This is only available for the Vista Business, Ultimate, and Enterprise versions. See Method Two below for Vista Home Basic and Home Premium versions.
1. Open the Start Menu.
2. In the white line (Start Search) area, type
gpedit.msc and press
Enter.
3. Click
Continue for the UAC prompt.
4. In the left pane, click on
User Configuration,
Administrative Templates,
Windows Components,
Windows Explorer,
Explorer Frame Pane. (See screenshot below)
5. In the right pane, right click on
Turn off Preview Pane and click
Properties.
Group_Policy.jpg
6. To Enable the Preview Pane -
A) Dot
Disabled or
Not Configured and click
OK. (See screenshot below)
7. To Disable the Preview Pane -
A) Dot
Enabled and click
OK.
Properties.jpg
8. Close Group Policy Object Editor window. Your done.
METHOD TWO:
Through the Registry :
NOTE: This will work for all Vista versions.
Through a Download:
1. To Enable the Preview Pane -
A)
Enable_Preview_Pane.reg < CLICK TO DOWNLOAD
2. To Disable the Preview Pane -
A)
Disable_Preview_Pane.reg < CLICK TO DOWNLOAD
3. Click on
Save, and save the
.reg file to the
Desktop.
4. Right click the
.reg (On Desktop) file and click
Merge.
5. Click on the
Run button for Security Warning pop-up.
6. Click on
Continue (UAC),
Yes, and then
OK when prompted.
7. Logoff and logon, or restart the computer to apply the changes.
8. When done, you can delete the
.reg file (On Desktop).
The Manual Way:
1. Open the Start Menu.
2. In the white line (Start Search) area, type
regedit and press
Enter.
3. Click the
Continue button for the UAC prompt.
4. In regedit, go to: (See screenshot below)
HKEY_CURRENT_USER\Software\Microsoft\Windows\CurrentVersion\Policies\Explorer
NOTE: If Explorer is not there, then right click on Policies in the left pane and click New -> Key and type Explorer and press Enter.
Explorer_REG.jpg
5. To Disable the Preview Pane
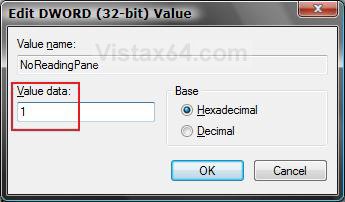
 - (See screenshot below)
A) In the right pane of
Explorer, right click on a empty area and click
New ->
DWORD (32-bit) Value.
B) Type
NoReadingPane and press
Enter.
C) Right click on
NoReadingPane and click
Modify.
NoReadingPane_REG.jpg
D) Type
1 and click
OK. (See screenshot below)
Modify_NoReadingPane.jpg
6. To Enable the Preview Pane -
A) In the right pane, right click on
NoReadingPane and click
Delete. (See screenshot below step 5C)
B) Click
Yes to confirm delete.
C) In regedit, go to: (See screenshot below)
HKEY_LOCAL_MACHINE\SOFTWARE\Microsoft\Windows\CurrentVersion\Policies\Explorer
D) In the right pane, repeat steps 6A and 6B if
NoReadingPane is there to.
HKLM_Reg.jpg
7. Close regedit.
8. Logoff and logon, or restart the computer to apply the changes.
That's it,
Shawn