How to Encrypt or Decrypt a Folder or File in Vista, Windows 7, and Windows 8
Encrypting folders and files on your local internal hard drives is a way to protect them from unwanted access. Encrypting File System (EFS) is a feature of Windows that allows you to store information on your hard disk in an encrypted format. Encryption is the strongest protection that Windows provides to help you keep your information secure.
This feature is only available in the Vista Business, Ultimate, Enterprise, Windows 7 Professional, Ultimate, Enterprise, and Windows 8 Pro and Enterpise editions.
This feature is only available in the Vista Business, Ultimate, Enterprise, Windows 7 Professional, Ultimate, Enterprise, and Windows 8 Pro and Enterpise editions.
Encryption is based on your username. So if you encrypt a file or folder and you try to open the file, the file is automatically decrypted. If you try to open the encrypted file or folder while logged in with another username, then the file or folder remains encrypted and will not open. There is no password to open the files, only your username credentials are used as password.
This will prevent other user accounts from being able to open the encrypted file or folder. Even another Administrator account. If you create a shortcut from the encrypted file, it will not be encrypted by default. The shortcut will still not be able to be read by any other user account or computer since it is linked to a encrypted file.
This will prevent other user accounts from being able to open the encrypted file or folder. Even another Administrator account. If you create a shortcut from the encrypted file, it will not be encrypted by default. The shortcut will still not be able to be read by any other user account or computer since it is linked to a encrypted file.
If you add a encrypted file to a compressed (zipped) folder, the file will be unencrypted (decrypted) when extracted from the ZIP file. This might result in unintentional disclosure of personal or sensitive information.
If you lost your EFS certificate or did not make a backup (step 10 below), then you can use the 30 day free trial program Advanced EFS Data Recovery to decrypt the files.
EXAMPLE: Folder Not Encrypted (Decrypted) and Folder Encrypted
NOTE: Notice that the text is now green to show it is encrypted.
Here's How:
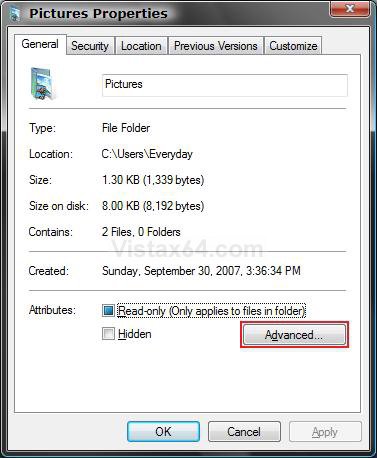
1. Right click on the folder or file you want to encrypt or decrypt, and click on Properties.
NOTE: You will not be able to encrypt a folder or file on a USB drive.
2. Under the General tab, click on the Advanced button. (See screenshot below)
3. To Encrypt a File or Folder
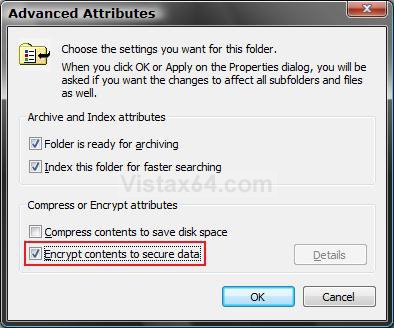
A) Check the Encrypt contents to secure data box and click on OK. (See screenshot below step 4)
NOTE: You will only be able to choose to Encrypt or Compress contents, not both at the same time. If Encrypt contents to secure data is grayed out, then see this link to enable it:How to Disable or Enable Encryption in Vista.
B) Go to step 5.
4. To Decrypt a File or Folder
A) Uncheck the Encrypt contents to secure data box and click on OK.
5. Click on OK. (See screenshot below step 2)
6. For a Folder
NOTE: If the folder is empty, then you will not see the screenshot below. The folder will still be encrypted though, and any file you move into it will become encrypted automatically also.
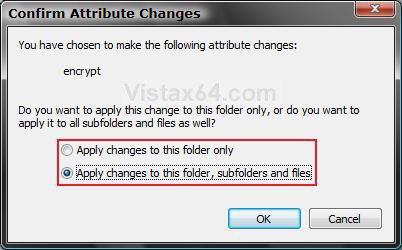
A) Select (dot) if you want to Apply changes to this folder only, or Apply changes to this folder, subfolders and files. (See sceenshot below)
B) Click on OK.
NOTE: It may take a second to encrypt or decrypt the folder and close Properties.
C) Go to step 9.
7. For a File
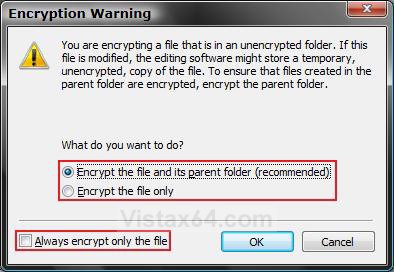
A) Select (dot) if you want to Encrypt the file only, or Encrypt the file and it's parent folder. (See screenshot below)
NOTE: You will not see this if the folder this file is in is already encrypted. It is always best to have the folder the file is in encrypted to for better protection.
B) Leave the Always encrypt only the file box unchecked to always have these options.
C) Click on OK.
NOTE: It may take a second to encrypt or decrypt the file and close Properties.
D) Once a file is encrypted, the Details button will now be active. (See screenshot below step 4)
NOTE: For more about the Details option see step 8 below.
E) Go to step 9.
8. To Change User Access for an Encrypted File
A) Do steps 1 and 2 again.
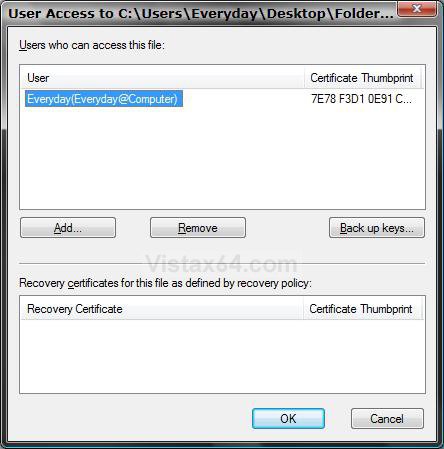
B) Click on the Details button. (See screenshot below step 4)
C) Click on the User you want to change access with to select it. (See screenshot below table)
D) Select the option (see table below) you want to do.
[TABLE=class:-grid,-width:-600][TR][TD]Option
[/TD]
[TD]
Description
[/TD][/TR]
[TR][TD]
Add
[/TD]
[TD]
This will allow you to add a user account's name that can have access to this encrypted file.
[/TD][/TR]
[TR][TD]
Remove
[/TD]
[TD]
This will allow you to remove a user account's name to prevent having access to this encrypted file.
[/TD][/TR]
[TR][TD]
Back up keys
[/TD]
[TD]
Takes you to step 6 here: How to Backup the Encrypted File System (EFS) Certificate in Vista
[/TD][/TR][/TABLE]
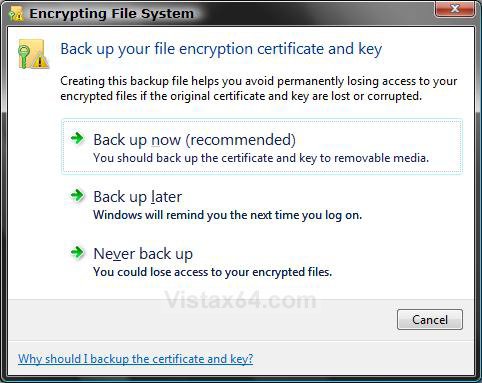
9. The first time you encrypt a folder or file, you will get a notification. (See screenshot below step 10)
NOTE: You will not see this again after the first time you encrypt.
10. Click in the notification message or on the notification icon in the notification area on the taskbar.
11. Choose which option you want to do. (See screeshot below)
WARNING: You should back up your encryption certificate. If your certificate and key are lost or damaged, and you do not have a backup, then you will not be able to have access and use the files that you have encrypted.
That's it,
Shawn
Related Tutorials
- How to Restore Encrypted File System (EFS) Certificate in Vista, Windows 7, and Windows 8
- How to Backup Encrypted File System (EFS) Certificate in Vista, Windows 7, and Windows 8
- How to Add Encrypt and Decrypt to the Context Menu in Vista
- How to Add "Encrypt and Decrypt" to Context Menu in Windows 7 and Windows 8
- How to Disable or Enable Encryption in Vista, Windows 7, and Windows 8
- How to Compress and Decompress a Folder or File with NTFS Compression in Vista and Windows 7
- How to Create an "Encrypting File System" Manager Shortcut in Windows
- How to Find and See a List of All Encrypted Files on All Local Hard Drives
Attachments
Last edited by a moderator:


