Clean Install From Upgrade Vista

How to Do a Clean Install with a Upgrade Version of Vista


information   Information
This will show you how to do a CLEAN install with a Express or Retail Upgrade version of Vista instead of having to install your previous OS (EX: XP) then Vista. This will prevent compatibility issues between the previous OS and Vista.

Note   Note

  • A OEM Recovery installation DVD can only do a clean install. It is just a clone of the hard drive that will set your computer back like it was from day one. The installation process is basically the same though.
  • A Express or Retail Vista can be installed on any one computer at a time for as many times as you like. A OEM Vista may only be able to be installed on the exact same computer as many times as you like. The product key number for the Vista 32 bit version is the same one for it's 64 bit version. You can only have the Product Key activated on one computer and version of 32 bit or 64 bit Vista at a time. See: Microsoft: License Terms for Software Licensed from Microsoft
  • Sometimes people have problems installing Vista with more than 2 GB of RAM installed. If you have this problem, then you should install Vista with a maximum of 2GB of RAM installed and add the rest of the RAM after Vista is fully installed.
Some Common Installation Problems:

Windows Help and Support: KB935806 Troubleshooting Stop error messages that may occur when you try to install Windows Vista

AND


Windows Help and Support: KB929777 Error message when you try to install Windows Vista on a computer that uses more than 3 GB of RAM: "STOP 0x0000000A"

warning   Warning

  • If you do not have a legal copy of XP with your corresponding or better Upgrade Vista, then you have violated the EULA and it is considered theft which you may face prosecution for. For the license terms for Vista, see: Microsoft: License Terms for Software Licensed from Microsoft
  • You can upgrade from your current edition of Microsoft Windows XP to a corresponding or better edition of Windows Vista by purchasing and installing an upgrade copy of Windows Vista. Go to this link for details on corresponding versions: Windows Vista: Upgrade Paths from Previous Versions
Tip   Tip
MINIMUM SYSTEM REQUIREMENTS FOR VISTANOTE: For more information, see: Microsoft Windows Vista: Recommended System Requirements


Vista Home Basic
  • Processor: 1GHz (32 or 64 bit)
  • System Memory (RAM): 512MB
  • Hard Drive: 20GB with 15GB available for Vista
  • Video Card: 32MB Memory and DirectX 9 Support
  • DVD-ROM Drive
Vista Home Premium, Business, or Ultimate
  • Processor: 1GHz (32 or 64 bit)
  • System Memory (RAM): 1GB
  • Hard Drive: 40GB with 15GB available for Vista
  • Video Card: 128MB Memory, DirectX 9 Support with: WDDM Driver, Pixel Shader 2.0, 32bits per pixel
  • DVD-ROM Drive


STEP ONE
FIRST INSTALL


warning   Warning
Before doing this clean install, you should download and save all of your device drivers to a USB flash drive, another HDD\partition, DVD, or some other media, to have them handy to make setting Vista back up easier after installation.

1. Boot the computer from your Vista Upgrade installation DVD.
NOTE: Make sure that the CD/DVD drive is selected first in the boot order in the BIOS.
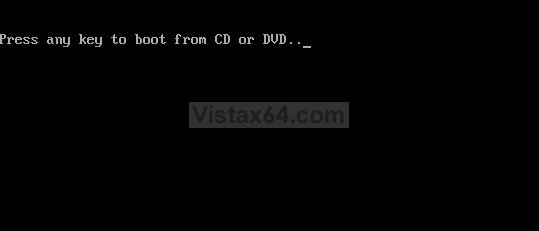
2. When prompted, press any key to start Vista from the installation DVD. (See screenshot below)​
NOTE: You will only have about 8 seconds to press this key. If you miss it, you will have to restart the computer.
boot-from-cd-prompt.jpg

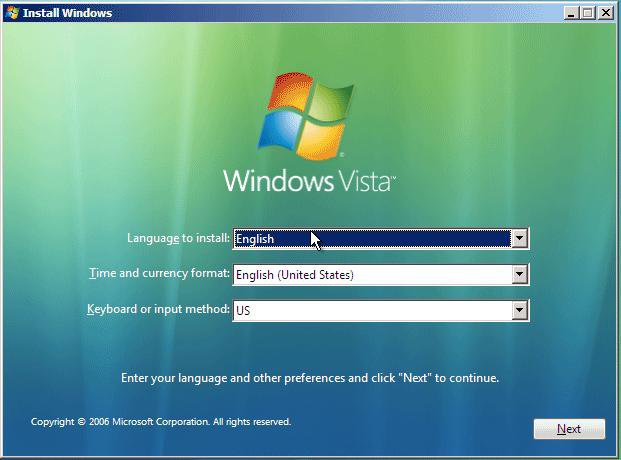
3. Set up your language preferences and click on Next. (See screeshot below).​
Select_Language.jpg

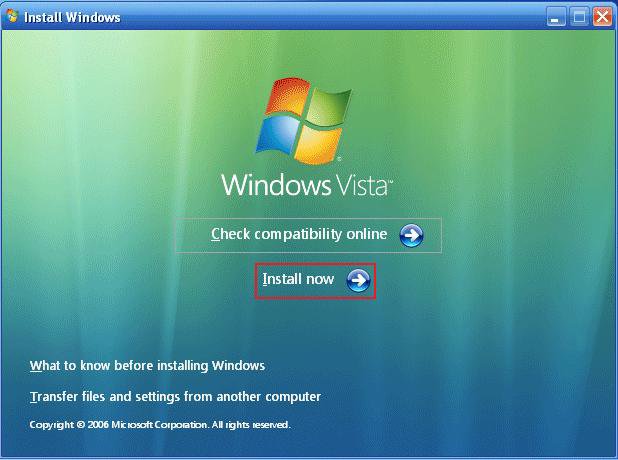
4. Click on Install Now to start the installation. (See screenshot below)​
Install_now.jpg

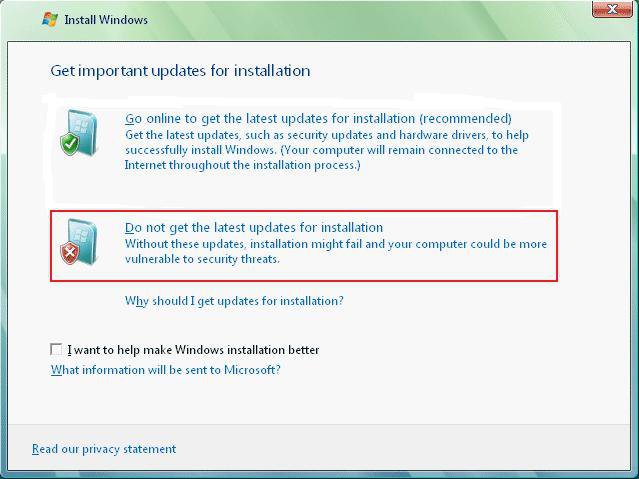
5. Select Do not get the latest updates for installation. (See screenshot below)​
No_Updates.jpg

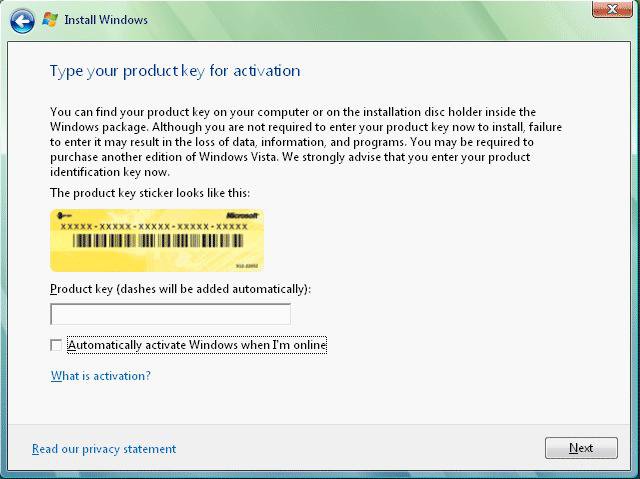
6. Do not type in a product key. (See screenshot below)​
7. Leave the Automatically activate Windows when I'm online box unchecked.​
8. Click on Next.​
Product_Key.jpg

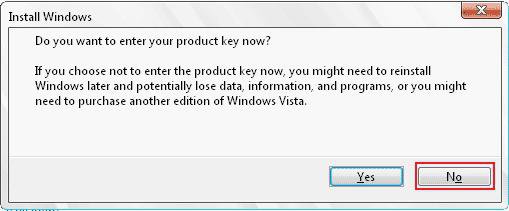
9. Click on the No button for the Do you want to enter your product key now? prompt. (See screenshot below)​
Product_Key_Confirmation.jpg

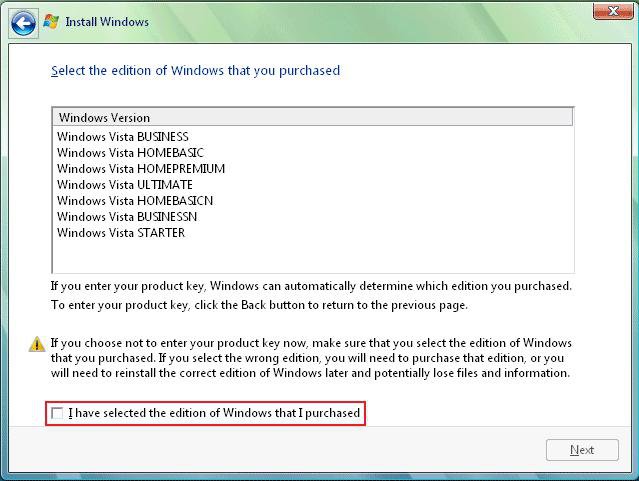
10. Select which version of Vista you have. (See screenshot below)​
11. Check I have selected the edition of Windows that I purchased and click on Next. (See screenshot below)​
Windows_Version.jpg

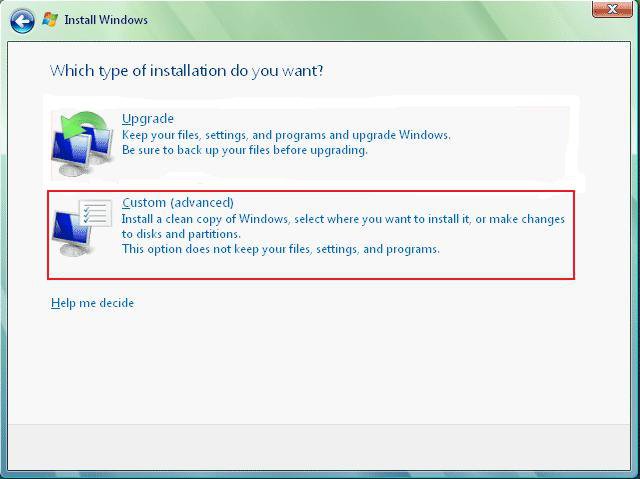
12. Click on Custom (advanced). (See screenshot below)​
Custom_advanced.jpg

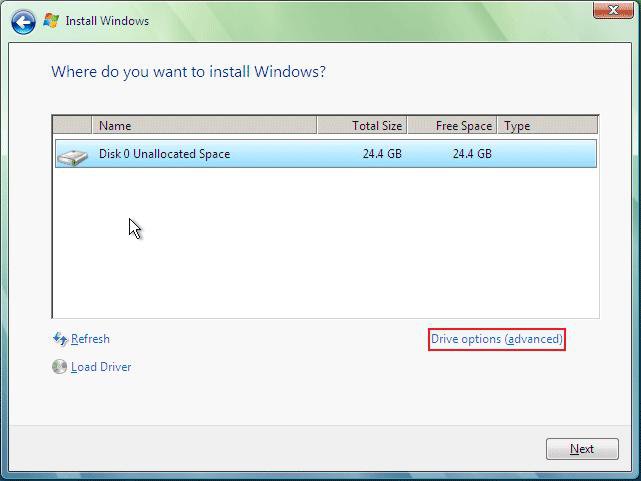
13. Select the hard drive you want to install Vista on and click on Drive Options (advanced). (See screenshot below)​
Drive_Options.jpg

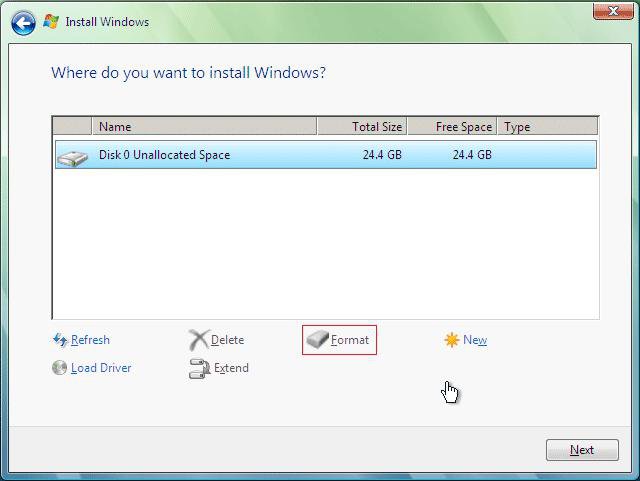
14. Click on Format to format the hard drive. (See screenshot below)​
NOTE: If you have more than one partition on this hard drive and want to get rid of it to make one big drive, then click Delete for each partition. Now click on New and adjust the partition size to what you want, then click on Format.
15. Click on Next when it is done formating the hard drive.​
Format.jpg

16. Follow any instructions left until Vista is finished installing and has rebooted to the final welcome screen on the Vista desktop.​


STEP TWO
SECOND INSTALL

17. When this first install is done, run the Vista Upgrade installation again from within the First Install (STEP ONE) of Vista this time.​
WARNING: Do not boot from the Vista DVD this time. Leave the Vista installation DVD in the CD/DVD drive.
A) Click on Computer in the Start menu.​
B) Click on the DVD drive to open a window with the DVD files.​
C) Click on Setup to start the 2nd install.​
D) Repeat steps 4 and 5 above.​

18. This time, type in your product key for Vista and click Next. (See screenshot below step 8)​
NOTE: If you are upgrading from Vista to another version of Vista, then type in the product key for the new version.
19. Leave the Automatically activate Windows when I'm online box unchecked. (See screenshot below step 8)​
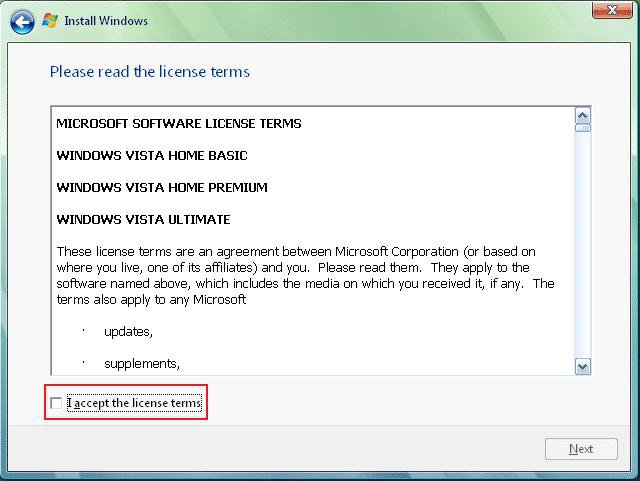
20. Check the I accept the license terms box. (See screenshot below step 21)​
21. Click on Next.​
License_Terms.jpg

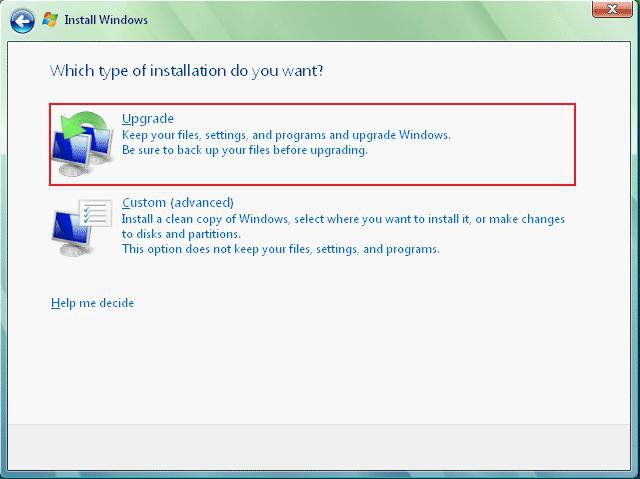
22. This time, click on the Upgrade option. (See screenshot below)​
Upgrade.jpg

23. To setup Vista, see the STEP TWO section here: How to Do a Clean Install with a Full Version of Vista
24. Remove the Vista installation DVD.​
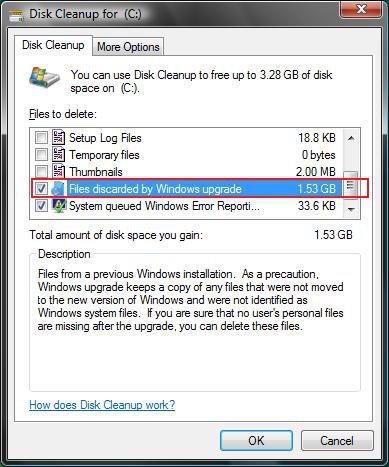
25. Run Disk Cleanup.​
A) Check Files discarded by Windows upgrade. (See screenshot below)​
NOTE: These will be the leftover upgrade files, C:\$INPLACE.~TR and C:\$WINDOWS.~Q, that did not get copied over.
B) Click on OK to delete it.​
Disk_Cleanup.jpg


27. Now all you need to do is to activate Vista.​
A) Right click Computer (Start Menu) and click Properties, or open the Control Panel (Classic View) and click on the System icon.​
B) Scroll down a bit and click: Activate Windows Now. (See screenshot below)​
Activate.jpg


NOTE: Now you have a clean install of the Upgrade version with no remnants of XP, or previous OS, to mess you up later.


That's it,
Shawn


Attachments

  • thumb_vista_install_logo.jpg
    thumb_vista_install_logo.jpg
    2.7 KB · Views: 416
Last edited by a moderator:
Update: I was able to change the boot menu in Vista. I made the default my original XP and then I was able to delete the vista entry. Next I rebooted into XP and formated the hard drive that had vista on it, then rebooted the computer again but still had the vista options in boot menu. So I chose the earlier version of windows which brought me to the boot options for XP media center, from there I chose the recovery console. Once in the recovery console I used fixboot command and then fixmbr. All is back to normal now with only the XP media center options upon boot. So hopefully I will be able to use the Vista upgrade disc on my new build in a couple of weeks.

I did check before I did this and vista said I still had 27 days left to activate. So am I correct in assuming that it is like I never used this disc or do I have to reinstall and activate before 27 days?
 

My Computer

Hi Earnhead,

Looks like you got it all sorted out.

As long as it didn't activate, you'll be fine to use it on another machine whenever you like.

SIW2:D
 

My Computers

System One System Two

  • Operating System
    Vista
    CPU
    Intel E8400
    Motherboard
    ASRock1333-GLAN R2.0
    Memory
    4gb DDR2 800
    Graphics Card(s)
    nvidia 9500GT 1gb
  • Operating System
    win7/vista
    CPU
    intel i5-8400
    Motherboard
    gigabyte b365m ds3h
    Memory
    ballistix 2x8gb 3200
Hi just to say thanks I have tryed a few time to do a clean install from getting my express upgrade but all ways seem to have some thing in the back ground left over from before but sofar so good I am one of them that likes to play about with my pc and end up killing it I like how the advice was esey to follow (must be if I can do it) and seem to do gust whot it sead on the tin thank you.
 

My Computer

System One

  • Manufacturer/Model
    GATEWAY GM5046b
    CPU
    AMD ATHLON 64 D/C 4200+
    Memory
    3GB
    Graphics Card(s)
    NVIDIA GEFORCE 7300EL (TURBO CACHE? DONT LAUGH)
    Sound Card
    REALTEK HD AUDIO
    Monitor(s) Displays
    GATEWAY FPD1975W-UK TFT LCD
    Screen Resolution
    1440X900
    Hard Drives
    250 GB SATA 2
    Keyboard
    SAITEK CYBORG (I LIKE TO WORK IN THE DARK)
    Internet Speed
    2MB
You're welcome PGB1965, and welcome to Vista Forums.

You should be able to use Disk Cleanup to get rid of any left overs from the previous clean installation.

Shawn
 

My Computers

System One System Two

  • Operating System
    Windows 10 Pro 64-bit
    Manufacturer/Model
    Custom
    CPU
    Intel i7-8700K 5 GHz
    Motherboard
    ASUS ROG Maximus XI Formula Z390
    Memory
    64 GB (4x16GB) G.SKILL TridentZ RGB DDR4 3600 MHz (F4-3600C18D-32GTZR)
    Graphics Card(s)
    ASUS ROG-STRIX-GTX1080TI-O11G-GAMING
    Sound Card
    Integrated Digital Audio (S/PDIF)
    Monitor(s) Displays
    2 x Samsung Odyssey G7 27"
    Screen Resolution
    2560x1440
    Hard Drives
    1TB Samsung 990 PRO M.2,
    4TB Samsung 990 PRO PRO M.2,
    8TB WD MyCloudEX2Ultra NAS
    PSU
    Seasonic Prime Titanium 850W
    Case
    Thermaltake Core P3
    Cooling
    Corsair Hydro H115i
    Keyboard
    Logitech wireless K800
    Mouse
    Logitech MX Master 3
    Internet Speed
    1 Gb/s Download and 35 Mb/s Upload
    Other Info
    Logitech Z625 speaker system,
    Logitech BRIO 4K Pro webcam,
    HP Color LaserJet Pro MFP M477fdn,
    APC SMART-UPS RT 1000 XL - SURT1000XLI,
    Galaxy S23 Plus phone
  • Operating System
    Windows 10 Pro
    Manufacturer/Model
    HP Envy Y0F94AV
    CPU
    i7-7500U @ 2.70 GHz
    Memory
    16 GB DDR4-2133
    Graphics card(s)
    NVIDIA GeForce 940MX
    Sound Card
    Conexant ISST Audio
    Monitor(s) Displays
    17.3" UHD IPS touch
    Screen Resolution
    3480 x 2160
    Hard Drives
    512 GB M.2 SSD
Just want to make sure of something, to add V32 as a third option in a multiboot setup that has Win7 & V64 already installed, on the first install when one gets the "Click any key to boot from DVD" hit enter then select a nice empty partition and select that to be the location to install the new version. Then on the second install. Run it from inside the Vista 32 installed os and when the system reboots and says "Click any key to boot from DVD" just wait it out and then the upgrade will proceed correctly?

Sorry for the dumb questions but don't want to screw up anything. ;)
 

My Computer

Not a dumb question at all Bratboy. (See my signature. ;) )

Yes, you have it correct. :)
 

My Computers

System One System Two

  • Operating System
    Windows 10 Pro 64-bit
    Manufacturer/Model
    Custom
    CPU
    Intel i7-8700K 5 GHz
    Motherboard
    ASUS ROG Maximus XI Formula Z390
    Memory
    64 GB (4x16GB) G.SKILL TridentZ RGB DDR4 3600 MHz (F4-3600C18D-32GTZR)
    Graphics Card(s)
    ASUS ROG-STRIX-GTX1080TI-O11G-GAMING
    Sound Card
    Integrated Digital Audio (S/PDIF)
    Monitor(s) Displays
    2 x Samsung Odyssey G7 27"
    Screen Resolution
    2560x1440
    Hard Drives
    1TB Samsung 990 PRO M.2,
    4TB Samsung 990 PRO PRO M.2,
    8TB WD MyCloudEX2Ultra NAS
    PSU
    Seasonic Prime Titanium 850W
    Case
    Thermaltake Core P3
    Cooling
    Corsair Hydro H115i
    Keyboard
    Logitech wireless K800
    Mouse
    Logitech MX Master 3
    Internet Speed
    1 Gb/s Download and 35 Mb/s Upload
    Other Info
    Logitech Z625 speaker system,
    Logitech BRIO 4K Pro webcam,
    HP Color LaserJet Pro MFP M477fdn,
    APC SMART-UPS RT 1000 XL - SURT1000XLI,
    Galaxy S23 Plus phone
  • Operating System
    Windows 10 Pro
    Manufacturer/Model
    HP Envy Y0F94AV
    CPU
    i7-7500U @ 2.70 GHz
    Memory
    16 GB DDR4-2133
    Graphics card(s)
    NVIDIA GeForce 940MX
    Sound Card
    Conexant ISST Audio
    Monitor(s) Displays
    17.3" UHD IPS touch
    Screen Resolution
    3480 x 2160
    Hard Drives
    512 GB M.2 SSD
Okay one more thing. I notice that right now on my system that has Win7 and Vista 64 bit if I go into system properties > Startup & Recovery Tab to look at boot order it simply lists the OS's as:

"Microsoft Windows Vista" (currently x64 bit Version)
and
"Windows 7"

I'm assuming that when I install Vista 32 bit its going to also be listed as "Microsoft Windows Vista" Is there some way to change the name for Vista X64 bit so that I'll be able to tell it apart from the 32 bit version as a boot up option?
 

My Computer

Hi Bratboy,

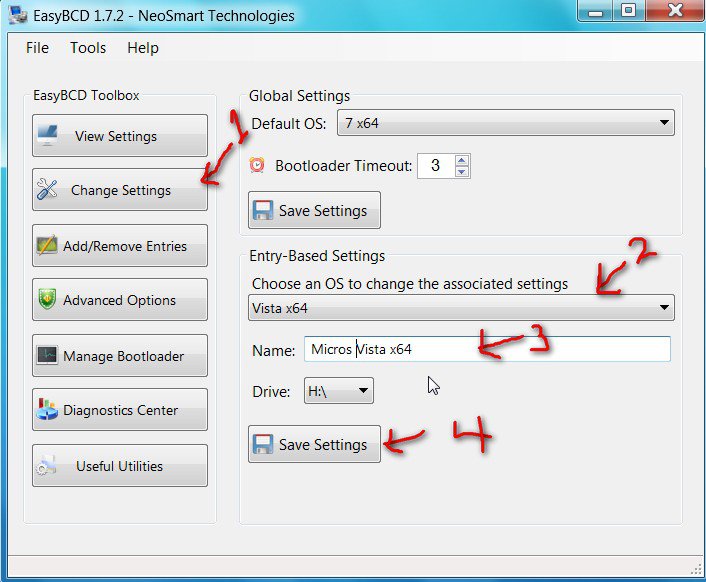
You can rename the o/s using bcdedit. If you are not familiar with the commands, the free Easybcd will do it.

Download EasyBCD 1.7.2 - NeoSmart Technologies


EASYBCD2009-01-23_142941.jpg

1. Click Change Settings.

2. Select the o/s whose name you want to change in the drop down flap.

3. Click where it says Name to put the cursor there, type any name you want.

4. Click Save Settings.

Hope it helps

SIW2
 

My Computers

System One System Two

  • Operating System
    Vista
    CPU
    Intel E8400
    Motherboard
    ASRock1333-GLAN R2.0
    Memory
    4gb DDR2 800
    Graphics Card(s)
    nvidia 9500GT 1gb
  • Operating System
    win7/vista
    CPU
    intel i5-8400
    Motherboard
    gigabyte b365m ds3h
    Memory
    ballistix 2x8gb 3200
The new Vista 32-bit addition will be listed first, and will be you default OS to start with after installation. I believe it may be listed as "Windows Vista" instead, so you may not need to change it.

If you would like to change what OS to start to by default afterwards, then this will help show you how to if needed.

http://www.vistax64.com/tutorials/82664-boot-partition-default.html

Hope this helps,
Shawn
 

My Computers

System One System Two

  • Operating System
    Windows 10 Pro 64-bit
    Manufacturer/Model
    Custom
    CPU
    Intel i7-8700K 5 GHz
    Motherboard
    ASUS ROG Maximus XI Formula Z390
    Memory
    64 GB (4x16GB) G.SKILL TridentZ RGB DDR4 3600 MHz (F4-3600C18D-32GTZR)
    Graphics Card(s)
    ASUS ROG-STRIX-GTX1080TI-O11G-GAMING
    Sound Card
    Integrated Digital Audio (S/PDIF)
    Monitor(s) Displays
    2 x Samsung Odyssey G7 27"
    Screen Resolution
    2560x1440
    Hard Drives
    1TB Samsung 990 PRO M.2,
    4TB Samsung 990 PRO PRO M.2,
    8TB WD MyCloudEX2Ultra NAS
    PSU
    Seasonic Prime Titanium 850W
    Case
    Thermaltake Core P3
    Cooling
    Corsair Hydro H115i
    Keyboard
    Logitech wireless K800
    Mouse
    Logitech MX Master 3
    Internet Speed
    1 Gb/s Download and 35 Mb/s Upload
    Other Info
    Logitech Z625 speaker system,
    Logitech BRIO 4K Pro webcam,
    HP Color LaserJet Pro MFP M477fdn,
    APC SMART-UPS RT 1000 XL - SURT1000XLI,
    Galaxy S23 Plus phone
  • Operating System
    Windows 10 Pro
    Manufacturer/Model
    HP Envy Y0F94AV
    CPU
    i7-7500U @ 2.70 GHz
    Memory
    16 GB DDR4-2133
    Graphics card(s)
    NVIDIA GeForce 940MX
    Sound Card
    Conexant ISST Audio
    Monitor(s) Displays
    17.3" UHD IPS touch
    Screen Resolution
    3480 x 2160
    Hard Drives
    512 GB M.2 SSD
Thanks to both of you. I did a websearch before you answered and found another free app that does the same thing called "VistaBootPro" and so have already changed my current Vista install to "Microsoft Windows Vista X64" so I'll be able to tell them apart after I install the 32 bit version. Kind of a pain in the kester to have to install another version of Vista but certain thing like my DRM remval software and some of my video conversion software is just too fussy and doesn't like to run on X64, even if I set the apps to compatible mode.
 

My Computer

I'm happy to hear that you got it sorted out Bratboy. :)
 

My Computers

System One System Two

  • Operating System
    Windows 10 Pro 64-bit
    Manufacturer/Model
    Custom
    CPU
    Intel i7-8700K 5 GHz
    Motherboard
    ASUS ROG Maximus XI Formula Z390
    Memory
    64 GB (4x16GB) G.SKILL TridentZ RGB DDR4 3600 MHz (F4-3600C18D-32GTZR)
    Graphics Card(s)
    ASUS ROG-STRIX-GTX1080TI-O11G-GAMING
    Sound Card
    Integrated Digital Audio (S/PDIF)
    Monitor(s) Displays
    2 x Samsung Odyssey G7 27"
    Screen Resolution
    2560x1440
    Hard Drives
    1TB Samsung 990 PRO M.2,
    4TB Samsung 990 PRO PRO M.2,
    8TB WD MyCloudEX2Ultra NAS
    PSU
    Seasonic Prime Titanium 850W
    Case
    Thermaltake Core P3
    Cooling
    Corsair Hydro H115i
    Keyboard
    Logitech wireless K800
    Mouse
    Logitech MX Master 3
    Internet Speed
    1 Gb/s Download and 35 Mb/s Upload
    Other Info
    Logitech Z625 speaker system,
    Logitech BRIO 4K Pro webcam,
    HP Color LaserJet Pro MFP M477fdn,
    APC SMART-UPS RT 1000 XL - SURT1000XLI,
    Galaxy S23 Plus phone
  • Operating System
    Windows 10 Pro
    Manufacturer/Model
    HP Envy Y0F94AV
    CPU
    i7-7500U @ 2.70 GHz
    Memory
    16 GB DDR4-2133
    Graphics card(s)
    NVIDIA GeForce 940MX
    Sound Card
    Conexant ISST Audio
    Monitor(s) Displays
    17.3" UHD IPS touch
    Screen Resolution
    3480 x 2160
    Hard Drives
    512 GB M.2 SSD
Grrr, running into a weird snag.

I followed the guide and did the first round of installing with no key, it installed fine and runs. Then I figured before I did the reinstall with the key I'd go ahead and make sure I'd installed all the drivers etc I would need so the upgrade wouldn't need to find them.

I then started the install from within the working x86 install on C:\ , it starts and then complains that another drive, D:\, that nothing is on thats 200 meg in size doesnt have enough space and errors out. I thought okay and shrank the drive next to the D drive but the drive shrank from the other end so Instead of having space after the D drive I could expand to the space is after the drive I shrank so I still can't make the D Drive larger.

I then tried to boot using the install CD, it asks for the key, I input it and then it says you have to run setup from withing the existing OS. This is very fustraiting.

Any suggestions or solutions? Any help would really be appreciated on how I can possibly get around this problem either by moving the F Drive over so the free space is next to the D drive or get around this complaining that there isnt enough space on D when my X86 install is on C which has plenty of spare space.
 

My Computer

Hi Bratboy,

When you installed Vista for the second time, did you select the same C: drive to install is on?
 

My Computers

System One System Two

  • Operating System
    Windows 10 Pro 64-bit
    Manufacturer/Model
    Custom
    CPU
    Intel i7-8700K 5 GHz
    Motherboard
    ASUS ROG Maximus XI Formula Z390
    Memory
    64 GB (4x16GB) G.SKILL TridentZ RGB DDR4 3600 MHz (F4-3600C18D-32GTZR)
    Graphics Card(s)
    ASUS ROG-STRIX-GTX1080TI-O11G-GAMING
    Sound Card
    Integrated Digital Audio (S/PDIF)
    Monitor(s) Displays
    2 x Samsung Odyssey G7 27"
    Screen Resolution
    2560x1440
    Hard Drives
    1TB Samsung 990 PRO M.2,
    4TB Samsung 990 PRO PRO M.2,
    8TB WD MyCloudEX2Ultra NAS
    PSU
    Seasonic Prime Titanium 850W
    Case
    Thermaltake Core P3
    Cooling
    Corsair Hydro H115i
    Keyboard
    Logitech wireless K800
    Mouse
    Logitech MX Master 3
    Internet Speed
    1 Gb/s Download and 35 Mb/s Upload
    Other Info
    Logitech Z625 speaker system,
    Logitech BRIO 4K Pro webcam,
    HP Color LaserJet Pro MFP M477fdn,
    APC SMART-UPS RT 1000 XL - SURT1000XLI,
    Galaxy S23 Plus phone
  • Operating System
    Windows 10 Pro
    Manufacturer/Model
    HP Envy Y0F94AV
    CPU
    i7-7500U @ 2.70 GHz
    Memory
    16 GB DDR4-2133
    Graphics card(s)
    NVIDIA GeForce 940MX
    Sound Card
    Conexant ISST Audio
    Monitor(s) Displays
    17.3" UHD IPS touch
    Screen Resolution
    3480 x 2160
    Hard Drives
    512 GB M.2 SSD
When I run the install from within The first install I don't even get an option.

I click setup get the first window where you select Install now, click that and things sort of close then I get the mssg about the other drive not having enough space and the install goes back to the main install window.

Will try again in a sec and make sure to write down the error mssg it gives. be just a moment
 

My Computer

Okay here you go I'm on my C: drive that has VX86 installed.
1. Run setup off the DVD from within Vx86.

2. Start up window opens.

3. Click the "Install Now" button.

After a few seconds I get the following mssg and error number:

"The system partition (D:) does not have enough space. Windows install needs at least 448 megabytes (MB) of space on this partition. To install Windows freeenough space and restart install

Error Code 0x80070070"

I don't even get an option to select a drive to install to. And if I start the second install from bootup then I get as far as entering the key and am told I must run setup from within Windows. Its a vicious circle. Am about to the point of trying to find a hack because I really don't want to go thru the hell of deleting all the partitions and then one at a time creating partitions and reinstalling each OS again. I suppose In the alternative I could just delet both the partitions that have V86 and Windows installed so that there is only a partition holding Vx64 and then creat a part & install VX86 then reboot and create a second part and install Win 7 but its a pain.

Then again I dont really even play with Win7 so I suppose the other alternatives are to either delete Winx86 and Win 7 parts from within Vx64 ithen just reboot to the DVD of x86 and create new partitions when I get to the drive window. Then my Main drive would only have 2 , or 3 if I decide I still want W7, partitions period. The only thing is since I'm in a multi boot config now would that screw up my Vx86 install?
 

My Computer

Hi bratboy,

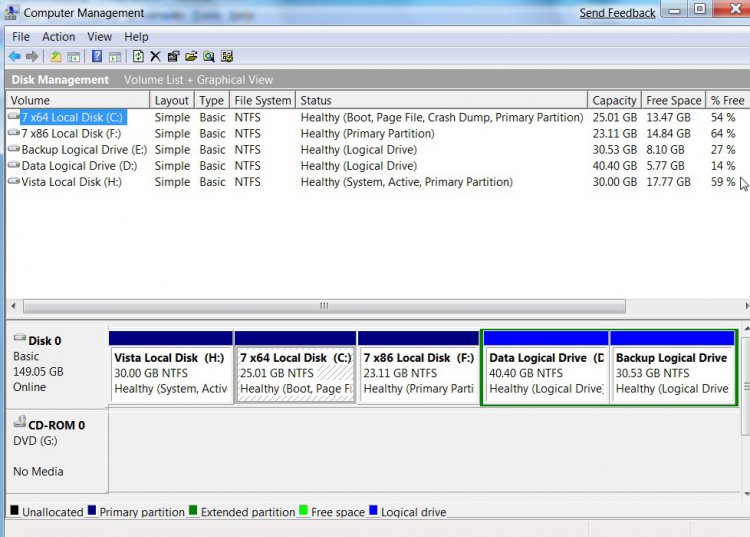
Please post a screenshot of the Disk Management window, like this

DISKMANAGEMENT2009-02-04_031947.jpg

Thanks
 

My Computers

System One System Two

  • Operating System
    Vista
    CPU
    Intel E8400
    Motherboard
    ASRock1333-GLAN R2.0
    Memory
    4gb DDR2 800
    Graphics Card(s)
    nvidia 9500GT 1gb
  • Operating System
    win7/vista
    CPU
    intel i5-8400
    Motherboard
    gigabyte b365m ds3h
    Memory
    ballistix 2x8gb 3200
When did you get the 200mb system partition - the one on the left?

In what order did you install Vx64 and Win7 ?
 

My Computers

System One System Two

  • Operating System
    Vista
    CPU
    Intel E8400
    Motherboard
    ASRock1333-GLAN R2.0
    Memory
    4gb DDR2 800
    Graphics Card(s)
    nvidia 9500GT 1gb
  • Operating System
    win7/vista
    CPU
    intel i5-8400
    Motherboard
    gigabyte b365m ds3h
    Memory
    ballistix 2x8gb 3200
Just turned up back when I first tried to partition the drive. I thought manybe deleting it might help but was afraid it would screw up the other drives

Actually back when I had my other MB I had problems getting my system up and running between new drives and hardware then and first OS I had luck getting to install was Win7 then when I got a new MB by Asus I was able to install Vista X64

Beginning to think the only way I'll fix things is to back up everything off my Vista x64 drive to another drive. Then start by installing V32 and during the disk partitioning step just deleting all the parts and then redividing the drive into 3 equal partitions, finish getting a clean install from upgrade DVD of V32 on then install V64 to the 2nd Part and then Win7 to the third. just a pain having toreinstall everything and all because of one stupid DRM removal app I really like that wont work with anything higher than V32. I've tried running it in every compatability mode out of V64 and no go.
 

My Computer

Hi,

7 likes to make that 200mb partition - if you don't already have an Active partition on the hd.

It is the System partition as it contains the boot files thru which all your o/s boot up.

You can't delete it from within windows.

You are the first person I have seen try this combination and order of installs.

Presumably, VX64 just installed clean by booting from the dvd and pointing it at ( what was at the time ) the third partition.

You don't have 448mb on the 200mb System partition obviously - only seems to be a problem when doing the upgrade install.

Do you want all 3 o/s installed?

If so, you could install 7 again and stop it from making that 200mb partition.

Why not use the key you got with your 64 bit dvd - presumably that's not an upgrade key.

SIW2
 
Last edited:

My Computers

System One System Two

  • Operating System
    Vista
    CPU
    Intel E8400
    Motherboard
    ASRock1333-GLAN R2.0
    Memory
    4gb DDR2 800
    Graphics Card(s)
    nvidia 9500GT 1gb
  • Operating System
    win7/vista
    CPU
    intel i5-8400
    Motherboard
    gigabyte b365m ds3h
    Memory
    ballistix 2x8gb 3200
Back
Top