How to Use the Snipping Tool in Vista

How to Use the Snipping Tool in Vista and Windows 7

information   Information
This tutorial will show you how to use the 'Snipping Tool' to select an area of an on-screen image for use in other programs and applications.


1) In this tutorial, I will show you how to use the 'Vista Snipping Tool' to select an area of an on-screen image for use in other programs and applications. The image I have chosen for this example is found in the 'Sample Pictures' folder, and is the 'Toco Toucan'. The first image shows the full picture, and this example will show you how to select the Toucan from the picture. For details on how this image was inserted into the tutorial, refer to the footnote at the end.


Initial Image.jpg


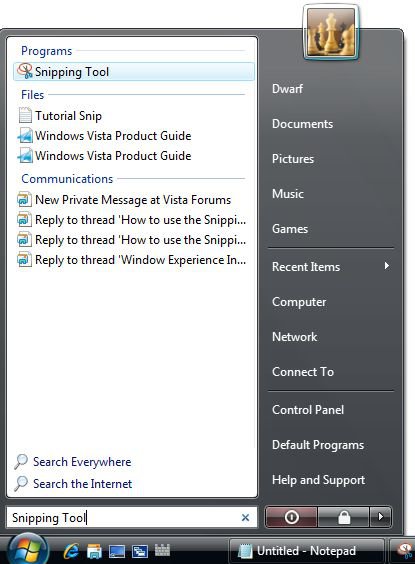
2) With the screen showing the image from which you wish to make your selection, you need to invoke the 'Snipping Tool'. To do this, click the start orb and type 'Snipping Tool' into the search box.
NOTE: The Snipping Tool is not available in the Vista Home Basic edition. This is a part of the Tablet PC Optional Components in Vista only, and is turned on in Windows Features by default in Vista.
Capture1.JPG

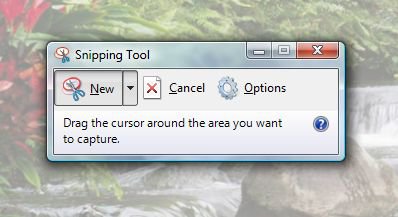
3) In the 'Programs' section of the results panel, click this item and the initial tool will appear. Note that you can move this tool around the screen so that it does not obstruct the area you are interested in. Note also that the rest of the screen is dimmed. This image shows the tool over a section of the 'Waterfall', another image from the 'Sample Pictures' folder. I chose that image here because I felt that the 'Toco Toucan' image was too green to show the effect of the dimmed screen.
Capture2.JPG

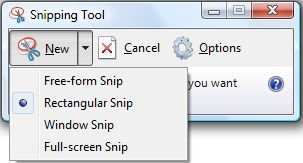
4) You may change the type of snip by clicking on the downward pointing arrow on the 'New' button. Here I have selected the 'Rectangular Snip'.
Capture3.JPG

information   Information
If you want to take a screen capture of just a single window, use the the Window Snip selection to automatically pick a window to get snipped.

Snipping Tool Window Snip.PNG

Snipping Tool Window Snip - example.PNG

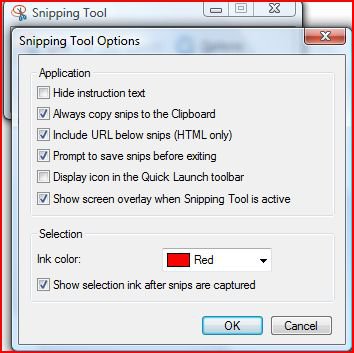
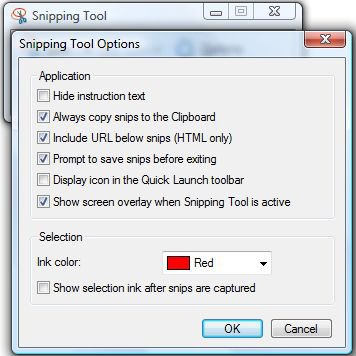
5) The default setting for the 'Snipping Tool' is to have a red band around the snip (you can change the colour of this band if you wish). I have turned this option off for this tutorial, but to illustrate this option, the next 2 images show this effect, firstly enabled and secondly disabled. Note that it still appears whilst you are selecting the snip so that you know what you are selecting. This option is found under 'Snipping Tools Options (click the 'Options' button to open this dialogue box. The option you require is 'Show selection ink after snips are captured'.
Capture3b.JPGCapture3a.JPG

6) Next, click on the image and drag the red band so that it encompasses the section of the image that you are interested in. Note that this portion of the image will be highlighted. When you release the mouse button, the following screen will appear.
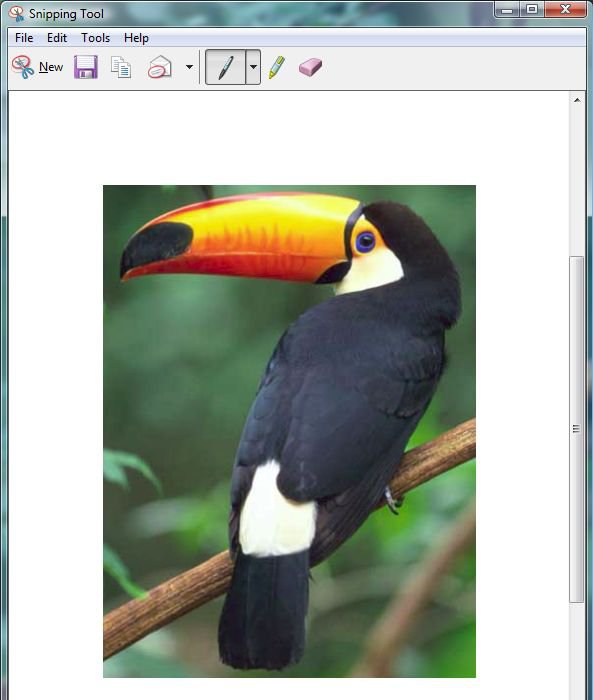
Intermediate.JPG

7) Click on the save icon (the picture of a floppy disk) and select a file name and location for the file. You can then use the image created for whatever purpose you require. The rest of this tutorial will show you how to attach this image to a post for submitting to the forums.

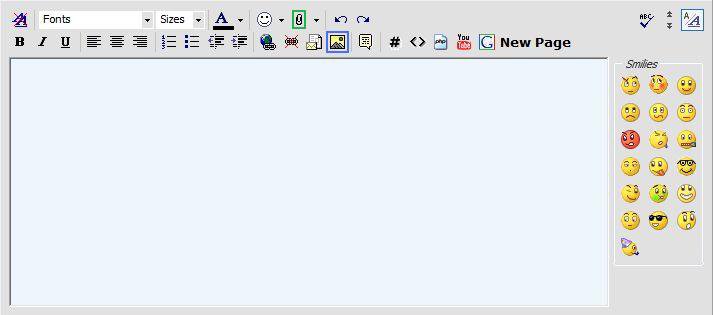
8) When you submit a post to the forums, you do so by entering the text of your post into the message box.
Capture4.JPG

9) If you look at the toolbar in this image, you will see an icon in the form of a paperclip (highlighted in green above). It is this option that you select in order to manage images. This is the initial display of this screen before images are added.
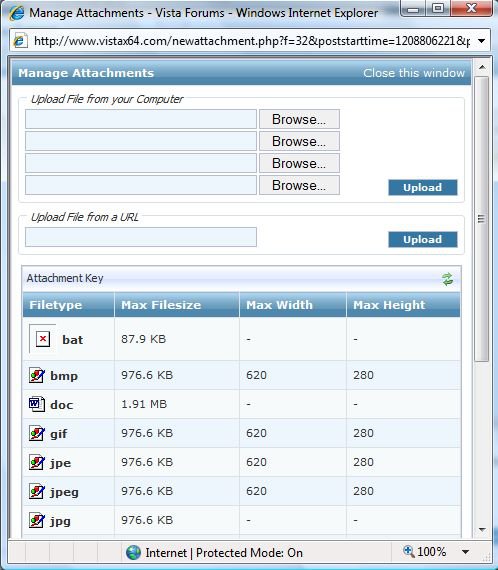
Capture5.JPG

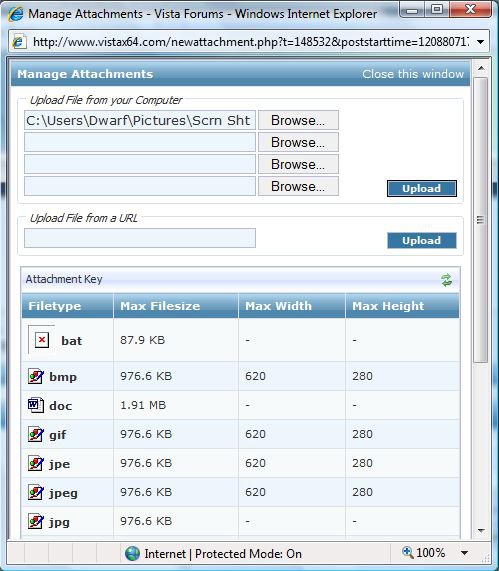
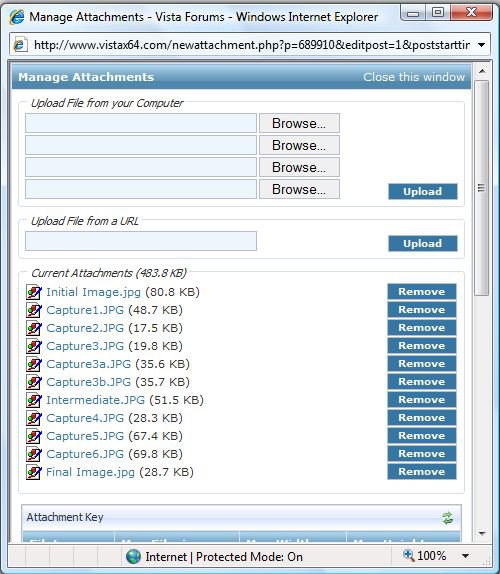
10) In the section 'Upload File from your Computer', click 'Browse...' next to the first available slot and locate the required file. This file will appear in the address box as illustrated by the first of the next two images. Although this example shows just a single file, you can browse and locate up to 4 files at a time. When you have done, click 'Upload' to transfer these files to the forum servers, the result of which is indicated in the second of these two images. You can then repeat the procedure to add more files if needed. Obviously, your list of files will be different to mine.
Capture6.JPGCapture7.JPG

11) When you have finished uploading files, click on 'Close this window' to return to the main message box.

12) When you wish to insert an uploaded image into your post, click on the paperclip again and select the required image from the drop down list. The image will be inserted at the current cursor position, and will be shown as

""

where 'XXXX' is a unique reference number allocated to your image by the forum servers. As this tutorial is about selecting the Toucan, the final image shows the result.

Final Image.jpg

information   Information
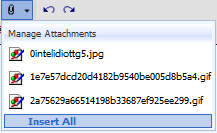
If you upload a lot of attachments and want to them to all appear in a row, then you can use the Insert All link at the bottom of the attachments

Vista x64 Attachment Insert All.PNG

FOOTNOTE: This section shows how the original image was inserted in to this Tutorial.

13) Upload your image files as described above. Notice the list of 'Current Attachments' in the 2nd image at step 10. Right-click on the required attachment and select 'Copy Shortcut' from the menu that appears.

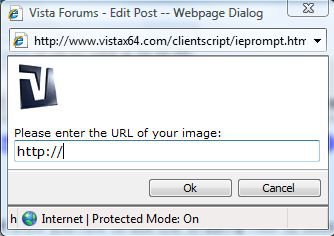
14) Referring to the image in step 8, click on the 'Insert Image' icon (highlighted in blue). The following dialogue box appears.
Capture8.JPG

15) Delete the contents of the text box ("http://"), and in its place paste the shortcut created in step 13.

16) When you wish to insert this image into your post, it is a similar procedure to inserting normal attachments as described in step 12, except that you click on the 'Insert Image' icon instead. Again, the image will be inserted at the current cursor position, and will be shown as "
", where 'ADDRESS' is the shortcut to the image created in steps 13 to 15.

17) This resizes the image so that it fits the post, but when the image is clicked on the full image is shown. Click and hold to move the image, click and release to return to the post.
 

Attachments

  • thumb_SnippingTool.exe_I00a5_0409.png
    thumb_SnippingTool.exe_I00a5_0409.png
    11.6 KB · Views: 422
Last edited by a moderator:
Hi Ilya,

You need to have the Tablet PC service running to access the snipping tool.

You may have turned it off as it's a big program (731mb).
Try checking under Control Panel>Uninstall a program>Turn Windows Features on or off.

If you do not wish to have the Tablet PC program installed and running just to use the snipping tool, you could try Faststone Capture53 - it's free and in my opinion, better than the snipping tool - it's only 1.4mb.

FastStone Capture 5.3 - eSnips, share anything

Hope it helps

SIW2


Thanx for the link. How do you check weather its installed or not??
Is this progrram as just as good as Snipping Tool??
 

My Computer

Hi Silverhair,

Once Fastone is installed, click on the shortcut and a rectangular menu appears at the top right of your screen.

Click the third icon from the right on the menu ( a dotted rectangle) - a cross appears - click one corner of what you are trying to capture, then drag the cross to the opposite corner of your target and click again.

The area you have selected immediately appears in a new window - click Save at the top right, Browse to the location you want to save it in ( your pictures folder, for example ).

Give it an name if you wish ( where it says Object name), and if you wish , choose whether to save it as any of the image types available in the drop down menu ( default is jpeg, which is fine for most uses). Then click Save.

There are lots of other things it can do if you explore the various options.

Hope it helps

SIW2
 

My Computers

System One System Two

  • Operating System
    Vista
    CPU
    Intel E8400
    Motherboard
    ASRock1333-GLAN R2.0
    Memory
    4gb DDR2 800
    Graphics Card(s)
    nvidia 9500GT 1gb
  • Operating System
    win7/vista
    CPU
    intel i5-8400
    Motherboard
    gigabyte b365m ds3h
    Memory
    ballistix 2x8gb 3200
Hi Ilya,

It's in a zip file, so you need to right click it and click "extract all"

Then right click and select run as administrator on the setup.exe file.

When it has installed , it will create a desktop shortcut and an entry in the All Programs list in your Start menu.

You can just run it from the shortcut like any program.

I much prefer it to the the snipping tool - when you use it for a while, it's surprising what it can do for such a small program.

I use it a lot, so I dragged the desktop shortcut to the quick launch bar.

There is a tutorial here, I just found out what it did by trial and error

http://www.faststone.org/FSCTutorial.htm

SIW2
 

My Computers

System One System Two

  • Operating System
    Vista
    CPU
    Intel E8400
    Motherboard
    ASRock1333-GLAN R2.0
    Memory
    4gb DDR2 800
    Graphics Card(s)
    nvidia 9500GT 1gb
  • Operating System
    win7/vista
    CPU
    intel i5-8400
    Motherboard
    gigabyte b365m ds3h
    Memory
    ballistix 2x8gb 3200
Hi Ilya,

It's in a zip file, so you need to right click it and click "extract all"

Then right click and select run as administrator on the setup.exe file.

When it has installed , it will create a desktop shortcut and an entry in the All Programs list in your Start menu.

You can just run it from the shortcut like any program.

I much prefer it to the the snipping tool - when you use it for a while, it's surprising what it can do for such a small program.

I use it a lot, so I dragged the desktop shortcut to the quick launch bar.

SIW2
I meant the "Snipping Tool"?
 

My Computer

I meant the "Snipping Tool"?


  • Left click on Windows Start Orb
  • Left click All Programs
  • Left Click Accessories Folder
  • Right click 'Snipping Tool'
You can then make your choice of where you want to access it from;

  • Open
  • Add to Quick Launch
  • Send to Desk Top
  • Pin to Start Menu
Your choice....
 

My Computer

System One

  • Manufacturer/Model
    Acer Aspire Notebook 5633WLMi.[5630 Series]
    CPU
    Intel Centrino Duo Processor - Intel Core 2 CPU.
    Memory
    4GB DDR2 [3.07GB maximum real available]
    Graphics Card(s)
    nVidia GeForce Go 7300, 128MB
    Sound Card
    Realtek HD Audio, Ver. 6.0.1.5717, 2.08MB
    Monitor(s) Displays
    Acer Aspire Notebook - 15.4"; Acer LCD Monitor X223Wsd - 22".
    Screen Resolution
    1280x800x60Hertz [max.]
    Hard Drives
    Notebook - Samsung HM320JI 320GB HD installed 07 August 2009.
    External HDs [4];Maxtor One Touch4 - 500GB External HD [Drive M:\].Western Digital WDXMS1200TA - 120GB External HD [Drive G:\ - Windows Defender Backup Files only]. Two x LaCie 320GB Mobi
    Mouse
    Logitech Wireless V320 for Notebooks - Model M/N: M-RCD125
    Internet Speed
    Down 20000kb/sec / Up 1000kb/sec [Bigpond-Aus]
    Other Info
    Brother MFC-465CN; PC to Fax/Scan/Copy/Photo MFC. Epson Perfection V300 Photo Scanner. Siemens Speedstream 6520 Router. Wacom 'Bamboo Fun' CTE-650 PC Tablet, Stylus and Mouse. UAC - On;Activated. Browsers; [1] FireFox v3.6[2] IE8. Honorary R.S.M. to the 4th [Assault Pioneer] Troop Pune Sepoys , and 3rd Troop Jodhpur Bengali Lancers.
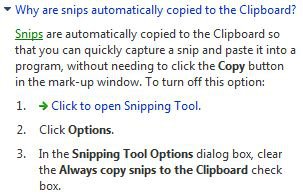
Thanks Dwarf.. but how do you use the "copy" function in Snipping.. I thought you could do a copy and paste.

Please give me an example of how the copy function is used

thanks, Ken
 

My Computer

Hi Ken,

The following should explain the use of this button:
Capture.JPG
Obviously, to turn this option back on, you will need to check the above mentioned option.
 

My Computer

System One

  • Manufacturer/Model
    Dwarf Dwf/11/2012 r09/2013
    CPU
    Intel Core-i5-3570K 4-core @ 3.4GHz (Ivy Bridge) (OC 4.2GHz)
    Motherboard
    ASRock Z77 Extreme4-M
    Memory
    4 x 4GB DDR3-1600 Corsair Vengeance CMZ8GX3M2A1600C9B (16GB)
    Graphics Card(s)
    MSI GeForce GTX770 Gaming OC 2GB
    Sound Card
    Realtek High Definition on board solution (ALC 898)
    Monitor(s) Displays
    ViewSonic VA1912w Widescreen
    Screen Resolution
    1440x900
    Hard Drives
    OCZ Agility 3 120GB SATA III x2 (RAID 0)
    Samsung HD501LJ 500GB SATA II x2
    Hitachi HDS721010CLA332 1TB SATA II
    Iomega 1.5TB Ext USB 2.0
    WD 2.0TB Ext USB 3.0
    PSU
    XFX Pro Series 850W Semi-Modular
    Case
    Gigabyte IF233
    Cooling
    1 x 120mm Front Inlet 1 x 120mm Rear Exhaust
    Keyboard
    Microsoft Comfort Curve Keyboard 3000 (USB)
    Mouse
    Microsoft Comfort Mouse 3000 for Business (USB)
    Internet Speed
    NetGear DG834Gv3 ADSL Modem/Router (Ethernet) ~4.0 Mb/s (O2)
    Other Info
    Optical Drive: HL-DT-ST BD-RE BH10LS30 SATA Bluray
    Lexmark S305 Printer/Scanner/Copier (USB)
    WEI Score: 8.1/8.1/8.5/8.5/8.25
    Asus Eee PC 1011PX Netbook (Windows 7 x86 Starter)
Well done, so simple.

siberian-tigers-snow.jpg
 

My Computer

System One

  • CPU
    INTEL QUAD 6600
    Motherboard
    Gigabyte EP35-DS4
    Memory
    4 gb
    Graphics Card(s)
    GeForce 8800gt
    Monitor(s) Displays
    24" ACER
    Screen Resolution
    1440 X 900
    Hard Drives
    500 GB
    320GB
    PSU
    700WATT
    Cooling
    ARCTIC
    Internet Speed
    Av.MTH, Download 8.27, Upoad 0.91
Hi Ken,

The following should explain the use of this button:
View attachment 9609
Obviously, to turn this option back on, you will need to check the above mentioned option.


Hi Dwarf and Ken,

I've never used Clipboard, indeed I can't seem to find it.

Here's what I do;

*Open Snipping Tool.[I have mine sitting in >>'Quick Launch'].
*Drag the cursor to create the 'capture'.
*Click on the 'Save as' Icon.[I usually save as JPEG to Documents].
*Hit TAB Bar to clear file name space[usually shows highlighted 'Capture'].
*Enter your choice of File Name.Jpg.
*Add Tags if you want.
*Save as JPEG File.
*Click on 'Save' button.

That's it.:sleepy:

*
 

My Computer

System One

  • Manufacturer/Model
    Acer Aspire Notebook 5633WLMi.[5630 Series]
    CPU
    Intel Centrino Duo Processor - Intel Core 2 CPU.
    Memory
    4GB DDR2 [3.07GB maximum real available]
    Graphics Card(s)
    nVidia GeForce Go 7300, 128MB
    Sound Card
    Realtek HD Audio, Ver. 6.0.1.5717, 2.08MB
    Monitor(s) Displays
    Acer Aspire Notebook - 15.4"; Acer LCD Monitor X223Wsd - 22".
    Screen Resolution
    1280x800x60Hertz [max.]
    Hard Drives
    Notebook - Samsung HM320JI 320GB HD installed 07 August 2009.
    External HDs [4];Maxtor One Touch4 - 500GB External HD [Drive M:\].Western Digital WDXMS1200TA - 120GB External HD [Drive G:\ - Windows Defender Backup Files only]. Two x LaCie 320GB Mobi
    Mouse
    Logitech Wireless V320 for Notebooks - Model M/N: M-RCD125
    Internet Speed
    Down 20000kb/sec / Up 1000kb/sec [Bigpond-Aus]
    Other Info
    Brother MFC-465CN; PC to Fax/Scan/Copy/Photo MFC. Epson Perfection V300 Photo Scanner. Siemens Speedstream 6520 Router. Wacom 'Bamboo Fun' CTE-650 PC Tablet, Stylus and Mouse. UAC - On;Activated. Browsers; [1] FireFox v3.6[2] IE8. Honorary R.S.M. to the 4th [Assault Pioneer] Troop Pune Sepoys , and 3rd Troop Jodhpur Bengali Lancers.
Hi GradeAbra,

See section 5 of the tutorial for details on how to turn this feature on or off. You can change the colour of this border if you wish.
 

My Computer

System One

  • Manufacturer/Model
    Dwarf Dwf/11/2012 r09/2013
    CPU
    Intel Core-i5-3570K 4-core @ 3.4GHz (Ivy Bridge) (OC 4.2GHz)
    Motherboard
    ASRock Z77 Extreme4-M
    Memory
    4 x 4GB DDR3-1600 Corsair Vengeance CMZ8GX3M2A1600C9B (16GB)
    Graphics Card(s)
    MSI GeForce GTX770 Gaming OC 2GB
    Sound Card
    Realtek High Definition on board solution (ALC 898)
    Monitor(s) Displays
    ViewSonic VA1912w Widescreen
    Screen Resolution
    1440x900
    Hard Drives
    OCZ Agility 3 120GB SATA III x2 (RAID 0)
    Samsung HD501LJ 500GB SATA II x2
    Hitachi HDS721010CLA332 1TB SATA II
    Iomega 1.5TB Ext USB 2.0
    WD 2.0TB Ext USB 3.0
    PSU
    XFX Pro Series 850W Semi-Modular
    Case
    Gigabyte IF233
    Cooling
    1 x 120mm Front Inlet 1 x 120mm Rear Exhaust
    Keyboard
    Microsoft Comfort Curve Keyboard 3000 (USB)
    Mouse
    Microsoft Comfort Mouse 3000 for Business (USB)
    Internet Speed
    NetGear DG834Gv3 ADSL Modem/Router (Ethernet) ~4.0 Mb/s (O2)
    Other Info
    Optical Drive: HL-DT-ST BD-RE BH10LS30 SATA Bluray
    Lexmark S305 Printer/Scanner/Copier (USB)
    WEI Score: 8.1/8.1/8.5/8.5/8.25
    Asus Eee PC 1011PX Netbook (Windows 7 x86 Starter)
Hi GradeAbra,

I don't think that you can port this tool over to XP from Vista, however have a look at this for XP Snippy
 

My Computer

System One

  • Manufacturer/Model
    Dwarf Dwf/11/2012 r09/2013
    CPU
    Intel Core-i5-3570K 4-core @ 3.4GHz (Ivy Bridge) (OC 4.2GHz)
    Motherboard
    ASRock Z77 Extreme4-M
    Memory
    4 x 4GB DDR3-1600 Corsair Vengeance CMZ8GX3M2A1600C9B (16GB)
    Graphics Card(s)
    MSI GeForce GTX770 Gaming OC 2GB
    Sound Card
    Realtek High Definition on board solution (ALC 898)
    Monitor(s) Displays
    ViewSonic VA1912w Widescreen
    Screen Resolution
    1440x900
    Hard Drives
    OCZ Agility 3 120GB SATA III x2 (RAID 0)
    Samsung HD501LJ 500GB SATA II x2
    Hitachi HDS721010CLA332 1TB SATA II
    Iomega 1.5TB Ext USB 2.0
    WD 2.0TB Ext USB 3.0
    PSU
    XFX Pro Series 850W Semi-Modular
    Case
    Gigabyte IF233
    Cooling
    1 x 120mm Front Inlet 1 x 120mm Rear Exhaust
    Keyboard
    Microsoft Comfort Curve Keyboard 3000 (USB)
    Mouse
    Microsoft Comfort Mouse 3000 for Business (USB)
    Internet Speed
    NetGear DG834Gv3 ADSL Modem/Router (Ethernet) ~4.0 Mb/s (O2)
    Other Info
    Optical Drive: HL-DT-ST BD-RE BH10LS30 SATA Bluray
    Lexmark S305 Printer/Scanner/Copier (USB)
    WEI Score: 8.1/8.1/8.5/8.5/8.25
    Asus Eee PC 1011PX Netbook (Windows 7 x86 Starter)
Hi Gradeabra,

You might prefer this free app. I use it on Vista and Win 7 in preference to the snipping tool.

Features

  • A small floating Capture Panel that can be dragged anywhere or minimized to the Windows tray area
  • Resource friendly - uses a very small amount of memory, especially when minimized to the Windows tray area
  • Global hotkeys to activate the program's capture capabilities anytime, anywhere
  • Efficient tools to capture windows, objects, full screen, rectangle/freehand-selected regions and scrolling areas
  • Capture web pages in Microsoft Internet Explorer, FireFox and Opera
  • Option to specify destination (internal editor, clipboard, file or printer) where the captured image will be sent
  • Text/Arrowed line/Highlight/Watermark annotation
  • Drop-shadow, torn-edge effects
  • Add caption
  • Resize, crop, zoom in/out
  • Undo/Redo
  • Save as BMP, JPEG, JPEG2000, PNG, GIF, TIFF, TGA and PDF
  • Send e-mails
  • Screen magnifier, Screen color picker
  • Multi-monitor support
  • Option to run when Windows starts
  • And many more ...

FastStone Capture 5.3 free download. FastStone Capture is powerful, flexible and intuitive screen-capture utility.

http://www.faststone.org/DN/FSCaptureSetup53.exe

Hope it helps

SIW2
 

My Computers

System One System Two

  • Operating System
    Vista
    CPU
    Intel E8400
    Motherboard
    ASRock1333-GLAN R2.0
    Memory
    4gb DDR2 800
    Graphics Card(s)
    nvidia 9500GT 1gb
  • Operating System
    win7/vista
    CPU
    intel i5-8400
    Motherboard
    gigabyte b365m ds3h
    Memory
    ballistix 2x8gb 3200
Hello Dwarf, I just want to say thank you so much, your article on Snipping Tool is a great help, very informative, even though the term snipping tool is a sissy phrase. Your a real hero, thanks bro, robert, San Fran.
 

My Computer

I must be missing something. I am using Vista 64-bit and have PC Tablet turned on, but can not find snipping tool. Where did I go wrong?
 

My Computer

My Computer

System One

  • Manufacturer/Model
    Dell
    CPU
    Q6600
    Memory
    4GB
    Monitor(s) Displays
    HP w2207h
    Hard Drives
    2x250GB HDDs
    1x60GB OCZ SSD
    6 external disks 60 to 640GBs
    Other Info
    Also 1xHP desktop, 1xHP laptop, 1xGateway laptop
Thanks for the tip. It's weird that I can not find snipping tool on my laptop but it appears on my desktop. Both are using Vista 64-bit.
 

My Computer

Back
Top