How to Mount or Dismount a Drive or Partition to a Folder in Vista
A mounted drive or partion is mapped (mounted) to an empty folder on another drive or partition that has been formated with the NTFS file system. A mounted drive is also known as a mounted folder because of this. This will show you how to mount or dismount a drive or partion to that folder.
Mounted drives or partitions are typically assigned a label or name instead of a drive letter, but you can add or remove a drive letter to the mounted drive or partition if you like though. They can be useful if you need to share partitions or drives with many users. If the mounted drive or partition has a drive letter, then it can be accessed from Computer and from the folder. If the mounted drive or partition only has a name or label and no drive letter, then it can only be accessed from the mounted folder.
Mounted drives or partitions let you extend the storage capacity of a drive or partition that the folder is on since the folder contents is stored on the mounted drive or partition instead. Mounted drives or partitions have an advantage over shortcuts because you can move the mounted drives without having to update the folder that the drive is mounted to.
Mounted drives or partitions let you extend the storage capacity of a drive or partition that the folder is on since the folder contents is stored on the mounted drive or partition instead. Mounted drives or partitions have an advantage over shortcuts because you can move the mounted drives without having to update the folder that the drive is mounted to.
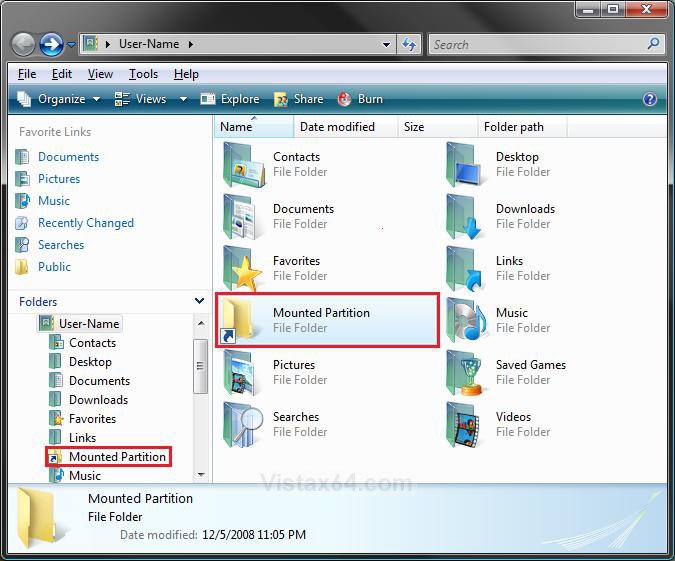
EXAMPLE: A Drive or Partition Mounted to a FolderNOTE: You can have the mounted folder at any location you like.
 OPTION ONE
1. Mount with a New Unallocated Partition without a Drive Letter
A) Shrink a partition to create a new unallocated partition.
NOTE: Only do the STEP ONE section at that link.
B) Right click on the unallocated partition, and click on New Simple Volume. (See screenshot below)
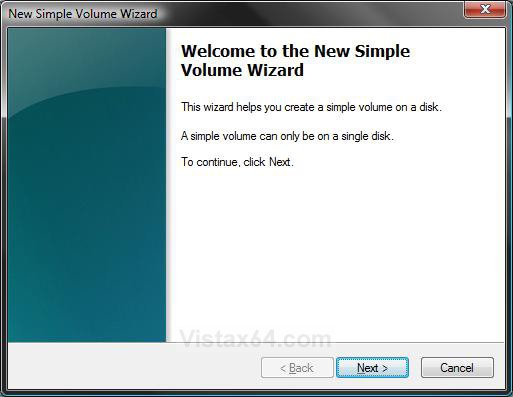
C) Click on the Next button. (See screenshot below)
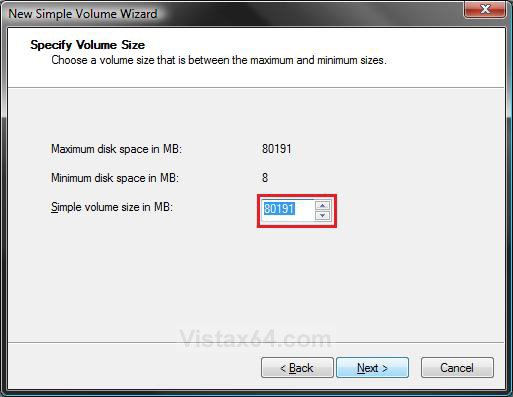
D) Select how much space you want of the maximum disk space available for the partition, and click on the Next button. (See screenshot below)
NOTE: Normally you will select all of the available space unless you wanted to create another partition with the left over maximum disk space.
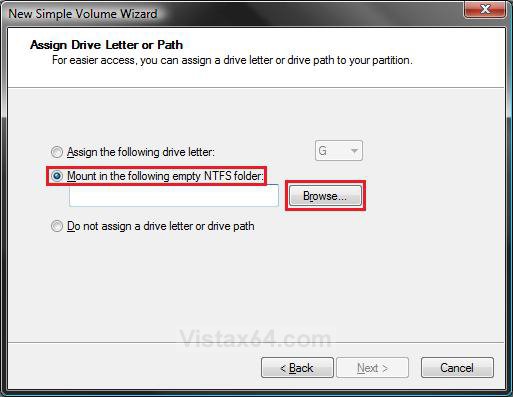
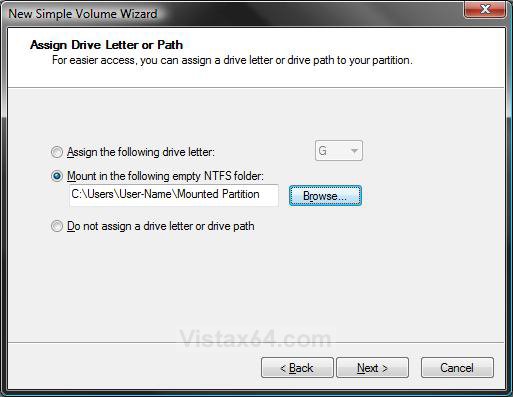
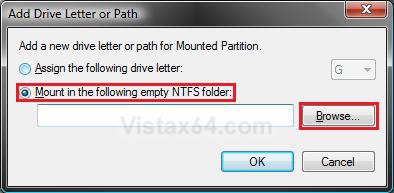
E) Select (dot) Mount in the following empty NTFS folder option, and click on the Browse button. (See screenshot below)
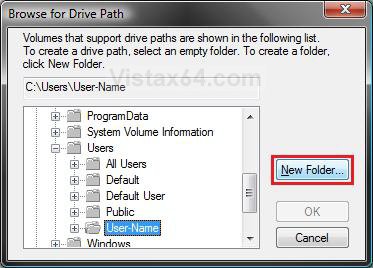
F) Navigate to the location you want to place the empty New Folder that will be mounted (mapped) to the partition, then click on the New Folder button. (See screenshot below)
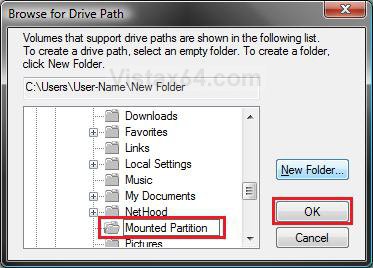
G) Type in a name for the folder to describe the mounted partition, and click on OK. (See screenshot below)
H) Click on the Next button. (See screenshot below)
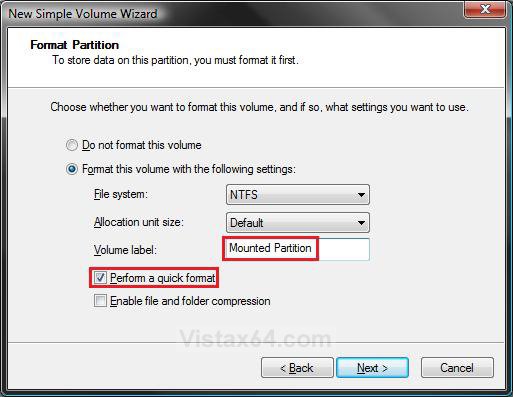
I) Type in a name (label) for the mounted partition. Check the Peform a quick format option box, then click on the Next button. (See screenshot below)
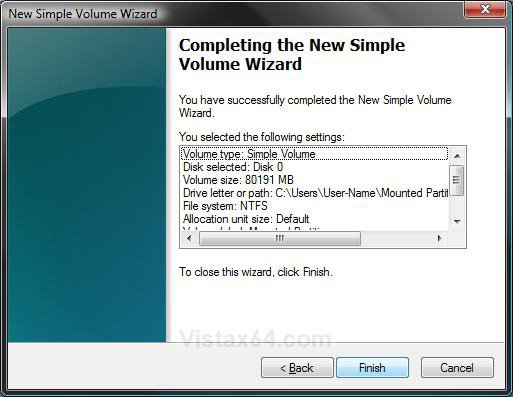
J) Click on the Finish button. (See screenshot below)
K) You now have a new mounted partition. (See screenshot below)
L) You now have a new partition that is mounted to the folder at the location you selected in step 1F. (See the example at the top of the tutorial)
2. Mount with an Existing Drive or Partiton without a Drive Letter
A) Open the Control Panel (Classic View) and click on the Administrative Tools icon and on Computer Management.
B) Click on Continue in the UAC prompt.
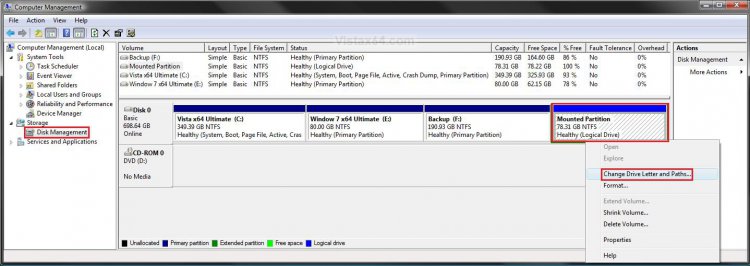
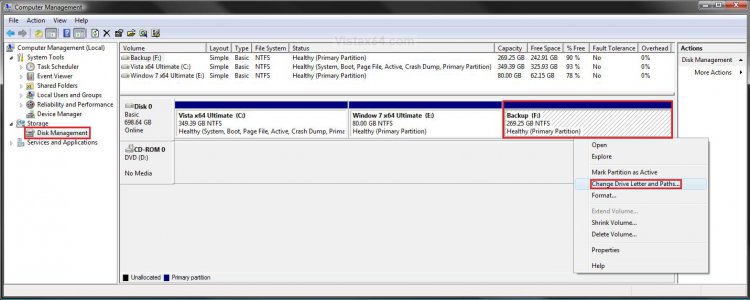
C) In the left pane, expand Storage and click on Disk Management. In the middle pane, right click on the drive or partition that you want to mount, and click on Change Drive Letter and Paths. (See screenshot below)
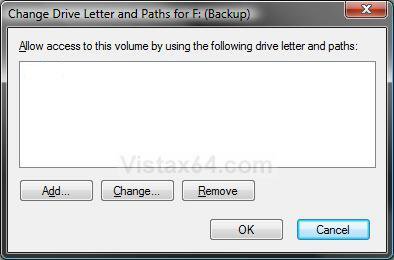
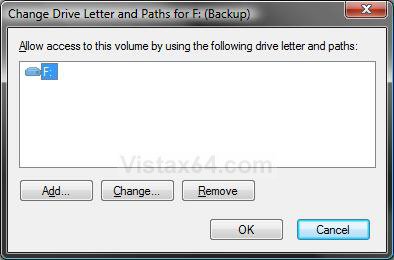
D) Click on the Add button. (See screenshot below)
E) Select (dot) Mount in the following empty NTFS folder option, and click on the Browse button. (See screenshot below)
F) Repeat steps 1F to 1G above.
G) You now have a new partition that is mounted to the folder at the location you selected in step 1F. (See the example at the top of the tutorial)
3. Mount with an Existing Drive or Partiton with a Drive Letter
A) Open the Control Panel (Classic View) and click on the Administrative Tools icon and on Computer Management.
B) Click on Continue in the UAC prompt.
C) In the left pane, expand Storage and click on Disk Management. In the middle pane, right click on the drive or partition that you want to mount, and click on Change Drive Letter and Paths. (See screenshot below)
D) Click on the Add button. (See screenshot below)
E) Repeat steps 2E to 2F above.
F) You now have a new partition that is mounted to the folder at the location you selected in step 1F. (See the example at the top of the tutorial)
 OPTION TWO
NOTE: This is the same for a drive and partition with or without a drive letter.
1. Open the Control Panel (Classic View) and click on the Administrative Tools icon and on Computer Management.
2. If prompted by UAC, click on Continue.
3. In the left pane, expand Storage and click on Disk Management. In the middle pane, right click on the drive or partition that you want to mount, and click on Change Drive Letter and Paths. (See screenshots below steps 2C and 3C)
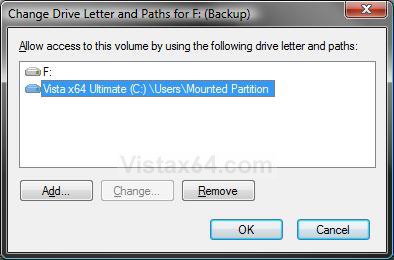
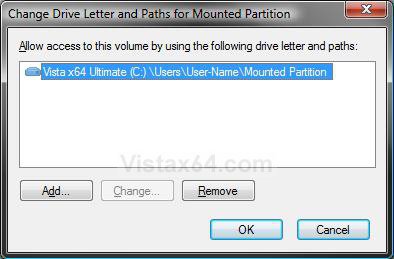
4. Select the location of the mounted folder that you want to remove and click on the Remove button. (See screenshots below)
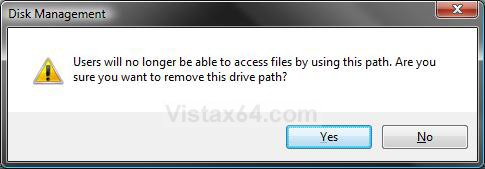
5. Click on Yes to confirm. (See screenshot below)
6. Navigate to the now unmounted folder location (step 1F), and delete the folder. (See the example at the top of the tutorial)
That's it,Shawn
Related Tutorials
- How to Shrink and Create a Partition with Disk Management in Vista
- How to Delete and Extend a Partition with Disk Management in Vista
- How to Add, Change, or Remove a Drive Letter in Vista
- How to Change a Drive Icon in Vista
- How to Hide or Show Drive Letters in Vista, Windows 7, and Windows 8
- How to Rename a Drive in Vista
- How to Disable or Enable Low Disk Space Warning in Vista
- How to Increase Hard Drive Performance in Vista
- How to Remove or Show Drives in the Vista and Windows 7 "Send To" Context Menu
- How to Restrict or Unrestict Drive Access in Vista
- How to Hide or Unhide a Drive in Vista
- How to Create a Drive Shortcut in Vista
- How to Convert a FAT or FAT32 Volume to NTFS in Vista
Attachments
Last edited:

