How to Change Recycle Bin Maximum Storage Size in Vista, Windows 7, and Windows 8
The Recycle Bin provides a safety net when deleting files or folders. When you delete any of these items from your hard disk, Windows places it in the Recycle Bin and the Recycle Bin icon changes from empty to full.
This will show you how to change the maximum storage size for the Recycle Bin of a drive to store deleted items to what you want it to be before it starts automatically deleting them permanently.
This will show you how to change the maximum storage size for the Recycle Bin of a drive to store deleted items to what you want it to be before it starts automatically deleting them permanently.
If you set the available storage size to use for the Recycle Bin to low, then the Recycle Bin will start permanently deleting files when new ones are added to it when it runs out of the set storage space. This can cause you to lose files that you may not have meant to delete, and will not be able to restore them.
Here's How:
1. Right click or press and hold on the Recycle Bin icon on the desktop, and click/tap on Properties.
2. If you have more than one hard drive, then select the hard drive that you wish to change the maximum storage size of it's Recycle Bin.
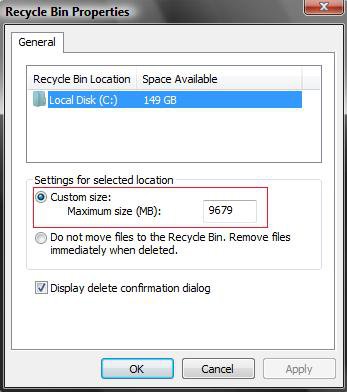
3. Select (dot) Custom size, type in how many MBs (1024 MB = 1 GB) you want the recycle bin to hold before permanently deleting older deleted items to make room for newer deleted items, and click/type on Apply. (see screenshot below)
4. When finished, click/tap on OK.
That's it,Shawn
Related Tutorials
- How to Replace Delete in the Recycle Bin Context Menu in Vista
- How to Set Recycle Bin to Permanently Delete a Item Immediately in Vista
- How to Enable or Disable the Recycle Bin Delete Confirmation Dialog in Vista
- How to Customize the Recycle Bin Context Menu in Vista
- How to Fix the Recycle Bin Icon Not Refreshing When Emptied
- How to Restore and Change a Desktop Icon in Vista
- How to Restore Previous Versions of a File and Folder in Vista
- How to Fix a Corrupted Recycle Bin in Vista
- How to Restore the Recycle Bin back to the Desktop in Vista
- How to Empty Recycle Bin in Windows 8 and 8.1
Attachments
Last edited by a moderator:


