Security Center Specific Alert Notification

How to Disable or Enable a Specific Security Center Alert Notification in Vista

information   Information
This will show you how to enable or disable the Security Center Alert Warning Notification for only UAC turned off, Firewall programs, Antivirus programs, and/or AntiSpyware (Ex: Windows Defender) programs. These are all enabled by default in Vista.
Tip   Tip
To enable or disable all Security Center Alert Warning Notifications, see: How to Disable or Enable the Security Center Alert Warning Notification in Vista instead.
Note   Note
This can be helpful if you would like to keep Security Center and the Security Center Alert Notifications enabled, but one of your security programs is giving you false alerts and you want to disable just that one alert.
warning   Warning
If you disable the Security Center Alert Notifications for any one these type of programs, then you will not be alerted if it is out of date, turned off, or disabled. This tutorial will need to be done from within an administrator account to be able to do it.

EXAMPLE: Security Center Alert Warning Notification
Alert_Warning.jpg


OPTION ONE
For UAC Security Center Alerts

NOTE: This will enable or disable the Security Center alert when you turn off the UAC or elevate the administrator accounts UAC privilege level.
Using A REG File Download:
2. To Disable Only the UAC Alert
A) Click on the Download button below to download the file below.​
Disable_UAC_SecurityCenter_Alert.reg
download

B) Go to step 3.​

2. To Enable Only the UAC Alert
NOTE: This is the default setting.​
A) Click on the Download button below to download the file below.​
Enable_UAC_SecurityCenter_Alert.reg
download

B) Go to step 3.​

3. Click on Save, and save the .reg file to the Desktop.​
4. Right click on the downloaded .reg file and click on Merge.​
5. Click on Run, Continue (UAC), Yes, and then OK when prompted.​
6. Log off and log on, or restart the computer to apply the changes.​
7. When done, you can delete the downloaded .reg file if you like.​

Manually in Registry Editor:
1. Open the Start Menu.​
2. In the white line (Start Search) area, type regedit and press Enter.​
3. Click on the Continue button in the UAC prompt.​
4. In regedit, go to: (See screenshot below step 5C)​
HKEY_LOCAL_MACHINE\SOFTWARE\Microsoft\Security Center

5. To Disable Only the UAC Alert
A) In the right pane, right click on a empty area and click on New and DWORD (32-but) Value. (See screenshot below)​
B) Type UacDisableNotify and press Enter.​
C) Right click on UacDisableNotify and click on Modify.​
UAC_Reg1.jpg

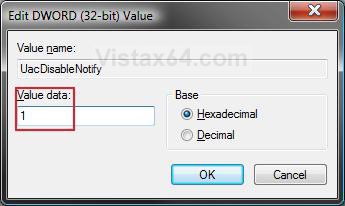
D) Type 1 and click on OK. (See screenshot below)​
UAC_Modify.jpg

E) The registry will now look like this. (See screenshot below)​
UAC_Reg.jpg

F) Go to step 7.​

6. To Enable Only the UAC Alert
NOTE: This is the default setting.​
A) In the right pane, right click on UacDisableNotify and click on Delete. (See screenshot above)​
B) Click on Yes to confirm deletion.​

7. Close Regedit.​
8. Log off and log on, or restart the computer to apply changes.​


OPTION TWO
For AntiSpyware, Antivirus, and Firewall Security Center Alerts

1. Open the Start Menu.​
2. In the white line (Start Search) area, type regedit and press Enter.​
3. Click on Continue in the UAC prompt.​
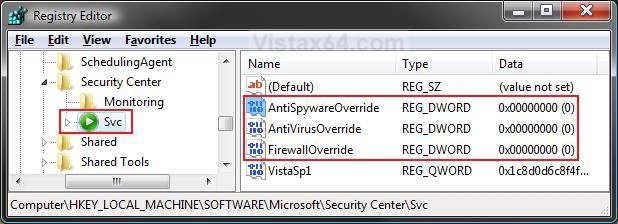
4. In regedit, go to: (See screenshot below)​
HKEY_LOCAL_MACHINE\SOFTWARE\Microsoft\Security Center\Svc
Reg1.jpg

5. In the left pane, right click on Svc and click Permissions. (See screenshot above)​
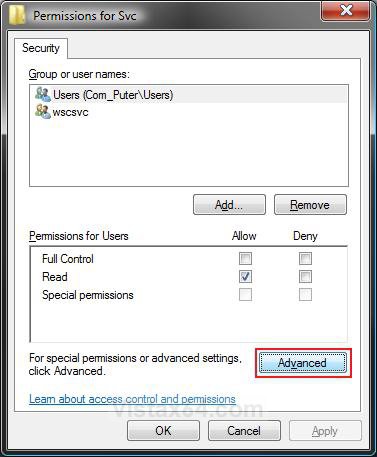
6. Click on the Advanced button. (See screenshot below)​
Step1.jpg

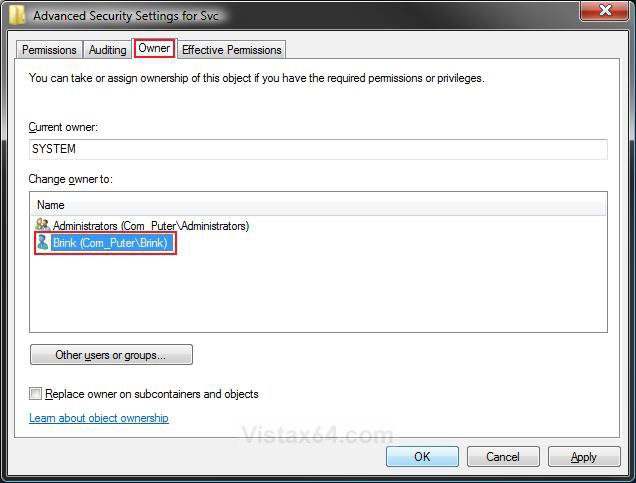
7. Click on the Owner tab and click on your user account name listed under Change owner to to highlight it. Click on OK. (See screenshot below)​
NOTE: This is to take ownership of the Svc registry key by your user account to allow changes to made to the Svc key.​
Step2.jpg

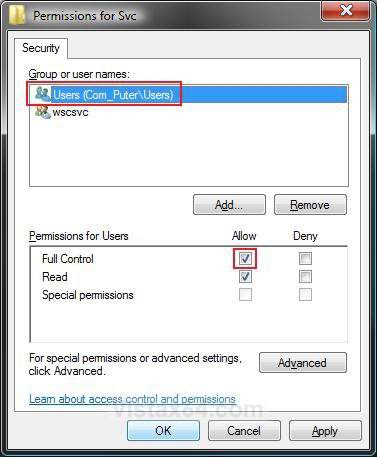
8. Click on Users (your computer name) , at the top to highlight it, and check the Allow box for Full Control. Click on OK. (See screenshot below)​
NOTE: To see what your computer name is, see: How to Change the Computer Name in Vista.​
Step3.jpg

9. For AntiSpyware Programs Alerts
NOTE: This is Windows Defender by default in Vista, and any other installed 3rd party antispyware program that adds itself to the Security Center.​
A) In the right pane of Svc, right click on AntiSpywareOverride and click on Modify. (See screenshot below step 4)​
B) Go to step 12.​

10. For Antivirus Programs Alerts
NOTE: This will be any installed 3rd party antivirus program (Ex: Avast) that adds itself to the Security Center.​
A) In the right pane of Svc, right click on AntiVirusOverride and click on Modify. (See screenshot below step 4)​
B) Go to step 12.​

11. For Firewall Programs Alerts
NOTE: This is Windows Firewall by default in Vista, or any other installed 3rd party firewall program used instead that adds itself to the Security Center.​
A) In the right pane of Svc, right click on FirewallOverride and click on Modify. (See screenshot below step 4)​

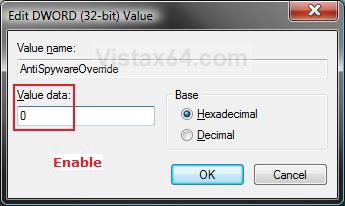
12. To Enable the Security Center Alert
NOTE: For the type of program you selected in step 9, 10, or 11 above.​
A) Type 0 (number zero) and click on OK. (See screenshot below)​
B) Go to step 14.​
Modify_0.jpg

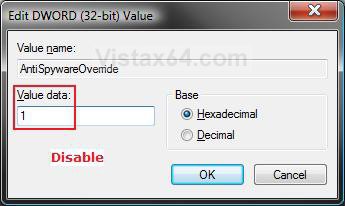
13. To Disable the Security Center Alert
NOTE: For the type of program you selected in step 9, 10, or 11 above.​
A) Type 1 and click on OK. (See screenshot below)​
Modify_1.jpg

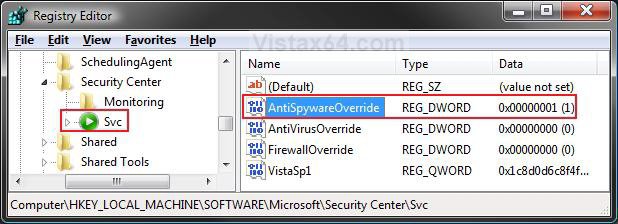
14. The registry will now look similar to this. (See screensot below)​
NOTE: I used AntiSpyware (step 9) programs for this example.​
Reg2.jpg

15. Go back to step 9, 10, or 11 to enable or disable another Security Center Alert Notification for a program type.​
16. In the left pane, right click on Svc and click Permissions. (See screenshot below step 4)​
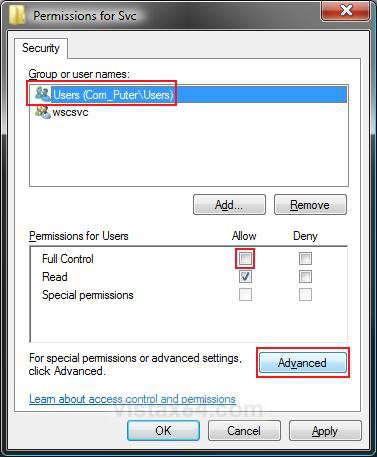
17. Click on Users (your computer name) , at the top to highlight it, and uncheck the Allow box for Full Control. Click on Apply, then on the Advanced button. (See screenshot below)​
Step4.jpg

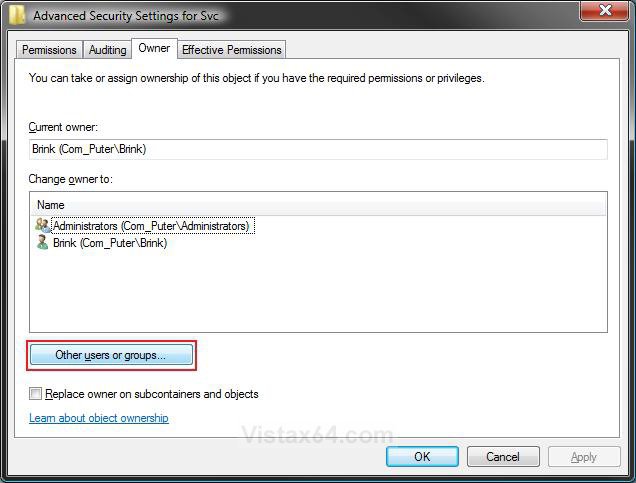
18. Click on the Owner tab and click on the Other users or groups button. (See screenshot below)​
Step5.jpg

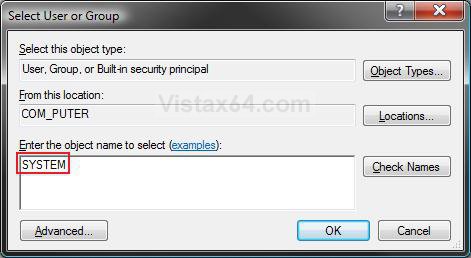
19. Type SYSTEM in the white box and click on OK. (See screenshot below)​
NOTE: This is the default owner of the Svc key in the registry.​
Step6.jpg

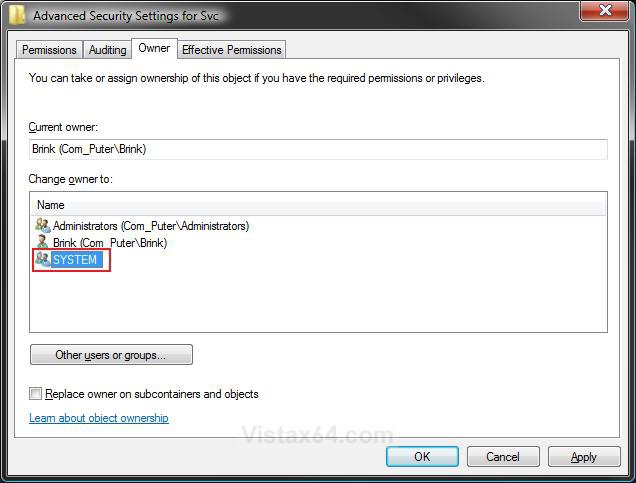
20. Under Change owner to, click on SYSTEM to highlight it and click on OK. (See screenshot below)​
Step7.jpg

21. Click on OK. (See screenshot below step 16)​
22. Close regedit.​
23. Log off and log on, or restart the computer to apply the changes.​
That's it,
Shawn


Attachments

  • Disable_UAC_SecurityCenter_Alert.reg
    278 bytes · Views: 6,929
  • Enable_UAC_SecurityCenter_Alert.reg
    252 bytes · Views: 1,834
  • Security.png
    Security.png
    72.6 KB · Views: 421
Last edited:
hi shawn..
i've tried what you said
but the warning just wont go off:cry:

and by the way, my windows became no sound!
help me...


:(

taskbar.jpg


i've tried your *other* tutorials but it just wont work...

and by the way..after i've tried the tutorial above... (and restarted)
my system became muted...
very confused now..
 

My Computer

System One

  • CPU
    T7250 2.0GHz
    Memory
    2GB
    Graphics Card(s)
    Intel GMA
    Hard Drives
    120GB Hitachi
Hi Vectorman,

What specific Security Center alert did you want to disable?

You can disable all of the Security Center alerts with this tutorial:
(Is this the other one you have tried already?)

http://www.vistax64.com/tutorials/90525-security-center-alert-warning-notification.html


This has nothing to do with your audio being muted though. Click on the speaker icon in the right corner of the taskbar and check to make sure that the Mute button under the slider does not have a red circle with a slash in it. If it does, just click on it again to unmute it. Check to make sure the volume slider is up high enough to hear. If none of this applied, then you may need to reinstall your audio driver.

Hope this helps,
Shawn
 

My Computers

System One System Two

  • Operating System
    Windows 10 Pro 64-bit
    Manufacturer/Model
    Custom
    CPU
    Intel i7-8700K 5 GHz
    Motherboard
    ASUS ROG Maximus XI Formula Z390
    Memory
    64 GB (4x16GB) G.SKILL TridentZ RGB DDR4 3600 MHz (F4-3600C18D-32GTZR)
    Graphics Card(s)
    ASUS ROG-STRIX-GTX1080TI-O11G-GAMING
    Sound Card
    Integrated Digital Audio (S/PDIF)
    Monitor(s) Displays
    2 x Samsung Odyssey G7 27"
    Screen Resolution
    2560x1440
    Hard Drives
    1TB Samsung 990 PRO M.2,
    4TB Samsung 990 PRO PRO M.2,
    8TB WD MyCloudEX2Ultra NAS
    PSU
    Seasonic Prime Titanium 850W
    Case
    Thermaltake Core P3
    Cooling
    Corsair Hydro H115i
    Keyboard
    Logitech wireless K800
    Mouse
    Logitech MX Master 3
    Internet Speed
    1 Gb/s Download and 35 Mb/s Upload
    Other Info
    Logitech Z625 speaker system,
    Logitech BRIO 4K Pro webcam,
    HP Color LaserJet Pro MFP M477fdn,
    APC SMART-UPS RT 1000 XL - SURT1000XLI,
    Galaxy S23 Plus phone
  • Operating System
    Windows 10 Pro
    Manufacturer/Model
    HP Envy Y0F94AV
    CPU
    i7-7500U @ 2.70 GHz
    Memory
    16 GB DDR4-2133
    Graphics card(s)
    NVIDIA GeForce 940MX
    Sound Card
    Conexant ISST Audio
    Monitor(s) Displays
    17.3" UHD IPS touch
    Screen Resolution
    3480 x 2160
    Hard Drives
    512 GB M.2 SSD
the above works great for the current user logged on. But I'm trying to disable security balloon pop-up for all users who log on after.
 

My Computer

Hi Noanker,

Since the changes are in the HKLM key in the registry, it should apply to all users. You may need to restart the computer after applying the change in the registry for the other accounts to affected though.
 

My Computers

System One System Two

  • Operating System
    Windows 10 Pro 64-bit
    Manufacturer/Model
    Custom
    CPU
    Intel i7-8700K 5 GHz
    Motherboard
    ASUS ROG Maximus XI Formula Z390
    Memory
    64 GB (4x16GB) G.SKILL TridentZ RGB DDR4 3600 MHz (F4-3600C18D-32GTZR)
    Graphics Card(s)
    ASUS ROG-STRIX-GTX1080TI-O11G-GAMING
    Sound Card
    Integrated Digital Audio (S/PDIF)
    Monitor(s) Displays
    2 x Samsung Odyssey G7 27"
    Screen Resolution
    2560x1440
    Hard Drives
    1TB Samsung 990 PRO M.2,
    4TB Samsung 990 PRO PRO M.2,
    8TB WD MyCloudEX2Ultra NAS
    PSU
    Seasonic Prime Titanium 850W
    Case
    Thermaltake Core P3
    Cooling
    Corsair Hydro H115i
    Keyboard
    Logitech wireless K800
    Mouse
    Logitech MX Master 3
    Internet Speed
    1 Gb/s Download and 35 Mb/s Upload
    Other Info
    Logitech Z625 speaker system,
    Logitech BRIO 4K Pro webcam,
    HP Color LaserJet Pro MFP M477fdn,
    APC SMART-UPS RT 1000 XL - SURT1000XLI,
    Galaxy S23 Plus phone
  • Operating System
    Windows 10 Pro
    Manufacturer/Model
    HP Envy Y0F94AV
    CPU
    i7-7500U @ 2.70 GHz
    Memory
    16 GB DDR4-2133
    Graphics card(s)
    NVIDIA GeForce 940MX
    Sound Card
    Conexant ISST Audio
    Monitor(s) Displays
    17.3" UHD IPS touch
    Screen Resolution
    3480 x 2160
    Hard Drives
    512 GB M.2 SSD
I appreciate the tutorial, very helpful for the most part, but it doesn't say anything about disabiling notifications for Automatic Updates. I do of course run Windows Update manually regularly to keep updated but I prefer to do it manually so I have Automatic Updates turned off and thus want to keep Security Center from warning me all the time that Automatic Updates are turned off.

Thank you!
 

My Computer

Hello Clh, and welcome to Vista Forums.

I found that the only easy way of doing this was to check the Check for updates but let me choose whether to download and install them option in the Windows Update settings. This way Windows Updates will not automatically install, and you will not get a Security Center warning.

Hope this helps,
Shawn
 

My Computers

System One System Two

  • Operating System
    Windows 10 Pro 64-bit
    Manufacturer/Model
    Custom
    CPU
    Intel i7-8700K 5 GHz
    Motherboard
    ASUS ROG Maximus XI Formula Z390
    Memory
    64 GB (4x16GB) G.SKILL TridentZ RGB DDR4 3600 MHz (F4-3600C18D-32GTZR)
    Graphics Card(s)
    ASUS ROG-STRIX-GTX1080TI-O11G-GAMING
    Sound Card
    Integrated Digital Audio (S/PDIF)
    Monitor(s) Displays
    2 x Samsung Odyssey G7 27"
    Screen Resolution
    2560x1440
    Hard Drives
    1TB Samsung 990 PRO M.2,
    4TB Samsung 990 PRO PRO M.2,
    8TB WD MyCloudEX2Ultra NAS
    PSU
    Seasonic Prime Titanium 850W
    Case
    Thermaltake Core P3
    Cooling
    Corsair Hydro H115i
    Keyboard
    Logitech wireless K800
    Mouse
    Logitech MX Master 3
    Internet Speed
    1 Gb/s Download and 35 Mb/s Upload
    Other Info
    Logitech Z625 speaker system,
    Logitech BRIO 4K Pro webcam,
    HP Color LaserJet Pro MFP M477fdn,
    APC SMART-UPS RT 1000 XL - SURT1000XLI,
    Galaxy S23 Plus phone
  • Operating System
    Windows 10 Pro
    Manufacturer/Model
    HP Envy Y0F94AV
    CPU
    i7-7500U @ 2.70 GHz
    Memory
    16 GB DDR4-2133
    Graphics card(s)
    NVIDIA GeForce 940MX
    Sound Card
    Conexant ISST Audio
    Monitor(s) Displays
    17.3" UHD IPS touch
    Screen Resolution
    3480 x 2160
    Hard Drives
    512 GB M.2 SSD
Back
Top