Thumbnail Previews - Change Border

How to Change the Border for Thumbnail Previews in Vista

information   Information
This will show you how to change the border for all Windows Explorer thumbnail preview images in Vista to either have a drop shadow, photo, video sprockets, or no border.
Note   Note
You will need to click on View or Views, on Windows Explorer window Menu bar, and have it set to either Medium Icons, Large Icons, or Extra Large Icons to see a thumbnail preview of the file image as the icon.


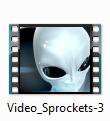
EXAMPLE: Available Thumbnail Preview Image Borders
NOTE:
The default border for thumbnails in Windows Explorer is the Photo_Border-2 image below.

0.jpg1.jpg2.jpg3.jpg


OPTION ONE
To Use a REG File Download

1. For No Border
A) Click on the download button below to download the file below.​
No_Border-0.reg
download

B) Go to step 5.​

2. For a Drop Shadow Border
A) Click on the download button below to download the file below.​
Drop_Shadow-1.reg
download

B) Go to step 5.​

3. For a Photo Shadow Border
A) Click on the download button below to download the file below.​
Photo_Border-2.reg
download

B) Go to step 5.​

4. For a Video Sprockets Border -
A) Click on the download button below to download the file below.​
Video_Sprockets-3.reg
download

5. Click on Save, and save the .reg file to the Desktop.​
6. Right click on the downloaded .reg file and click on Merge.​
7. Click on Run, Continue (UAC), Yes, and then OK when prompted.​
8. When done, you can delete the downloaded .reg file if you like.​
9. You may need to refresh (F5) the window or desktop to see the border change.​


OPTION TWO
Through Registry Editor

1. Open the Start Menu.​
2. In the white line (Start Search) area, type regedit and press Enter.​
3. If prompted by UAC, then click on Continue.​
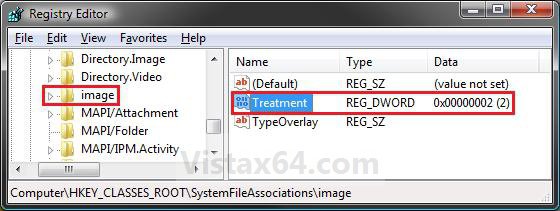
4. In regedit, navigate to the locaton below. (See screenshot below)​
HKEY_CLASSES_ROOT\SystemFileAssociations\image
reg.jpg

5. In the right pane of the registry, right click on Treatment and click on Modify. (See screenshot above)​
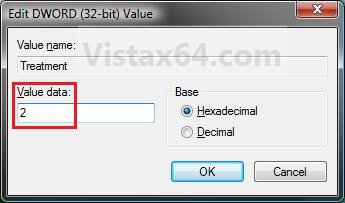
6. Type in the value data number in the table below for the border that you want for all Windows Explorer thumbnail images to have, then click on OK. (See screenshot below table)​
Note   Note
See the example at the top of the tutorial to see what each border looks like.
Note   Note


Number

Border

0

No Border

1

Drop Shadow

2

Photo

3

Video Sprockets


Modify.jpg

7. Close regedit.​
8. You may need to refresh (F5) the window or desktop to see the border change.​
That's it,
Shawn


Attachments

  • No_Border-0.reg
    250 bytes · Views: 937
  • Drop_Shadow-1.reg
    250 bytes · Views: 888
  • Photo_Border-2.reg
    250 bytes · Views: 790
  • Video_Sprockets-3.reg
    250 bytes · Views: 822
  • thumb_Display.png
    thumb_Display.png
    11.9 KB · Views: 365
Last edited by a moderator:
Neat one Shawn, I never knew you could do this.
 

My Computer

System One

  • Manufacturer/Model
    Airbot 2.0
    CPU
    Core i7 920 (D0) @ 4Ghz, 26c idle- 65c full load on air
    Motherboard
    Asus P6X58D Premium -Sata 6Gb/s - USB 3.0
    Memory
    12GB Corsair Dominator -CMD12GX3M6A1600C8
    Graphics Card(s)
    EVGA Nvidia GTX 480 -Fermi
    Sound Card
    ASUS Xonar D2X
    Monitor(s) Displays
    LG 24" Flatron W2453V-PF Full HD 1080p 2ms response time
    Screen Resolution
    1920x1080@60hz
    Hard Drives
    1 OCZ Vertex2 180GB SSD
    1 TB Samsung Spinpoint F1 7200RPM 32MB cache
    2 500GB WD Caviar Blacks 7200RPM 32MB cache (WD5001AALS)

    Pioneer DVD Burner DVR-S18M
    PSU
    Corsair HX1000W
    Case
    Cooler Master HAF 932
    Cooling
    Case Fans -3 230mm, 1 140mm/CPU - Tuniq Tower 120 Extreme
    Keyboard
    Logitech Wireless MK700
    Mouse
    Logitech Wireless MK700
    Internet Speed
    100 MBPS DL 30.17Mbps UL 0.98Mbps
    Other Info
    Windows 7
    Processor-7.7 RAM- 7.9 Graphics-7.9 Gaming Graphics- 7.9 HDD- 7.8

    W.E.I final score= 7.7

    Windows Vista=5.9
Neither did I. It was a nice surprise when I stumbled across it. :)
 

My Computers

System One System Two

  • Operating System
    Windows 10 Pro 64-bit
    Manufacturer/Model
    Custom
    CPU
    Intel i7-8700K 5 GHz
    Motherboard
    ASUS ROG Maximus XI Formula Z390
    Memory
    64 GB (4x16GB) G.SKILL TridentZ RGB DDR4 3600 MHz (F4-3600C18D-32GTZR)
    Graphics Card(s)
    ASUS ROG-STRIX-GTX1080TI-O11G-GAMING
    Sound Card
    Integrated Digital Audio (S/PDIF)
    Monitor(s) Displays
    2 x Samsung Odyssey G7 27"
    Screen Resolution
    2560x1440
    Hard Drives
    1TB Samsung 990 PRO M.2,
    4TB Samsung 990 PRO PRO M.2,
    8TB WD MyCloudEX2Ultra NAS
    PSU
    Seasonic Prime Titanium 850W
    Case
    Thermaltake Core P3
    Cooling
    Corsair Hydro H115i
    Keyboard
    Logitech wireless K800
    Mouse
    Logitech MX Master 3
    Internet Speed
    1 Gb/s Download and 35 Mb/s Upload
    Other Info
    Logitech Z625 speaker system,
    Logitech BRIO 4K Pro webcam,
    HP Color LaserJet Pro MFP M477fdn,
    APC SMART-UPS RT 1000 XL - SURT1000XLI,
    Galaxy S23 Plus phone
  • Operating System
    Windows 10 Pro
    Manufacturer/Model
    HP Envy Y0F94AV
    CPU
    i7-7500U @ 2.70 GHz
    Memory
    16 GB DDR4-2133
    Graphics card(s)
    NVIDIA GeForce 940MX
    Sound Card
    Conexant ISST Audio
    Monitor(s) Displays
    17.3" UHD IPS touch
    Screen Resolution
    3480 x 2160
    Hard Drives
    512 GB M.2 SSD
This is koooooool :)

-----------------------
I'm surfing this tut from time to time cause I always find something I haven't stumble on yet. I'm also trying to find hacks here and there.


Peace
Ghis
 
Last edited by a moderator:

My Computer

Back
Top