How to Set Windows Defender Automatic Scanning Schedule in Vista
This will show you how to set Windows Defender automatic scanning schedule options and how to allow Windows Defender to wakeup the computer to run the scheduled scan, or run the scan the next time you start or wakeup the computer.
Obviously Windows Defender will need to be turned on to allow automatic scanning. 

 STEP ONE
1. Open the Control Panel. (Classic View)
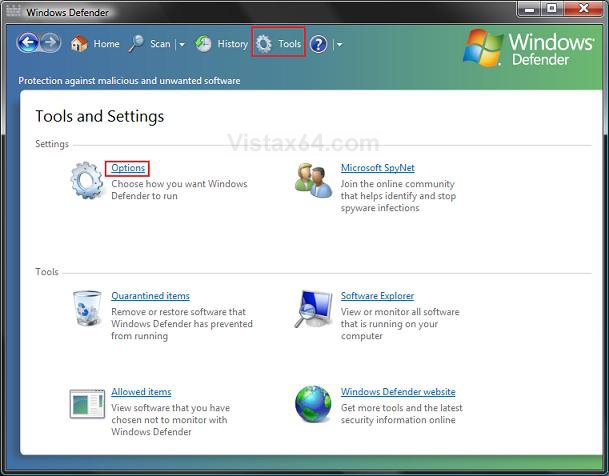
2. Click on the Windows Defender icon.
3. Click on Tools at the top. (See screenshot below)
4. Click on Options in the main window.
5. To Turn Off Automatic Scanning
NOTE: If you turn off automatic scanning, then you will have to manually run Windows Defender scan.
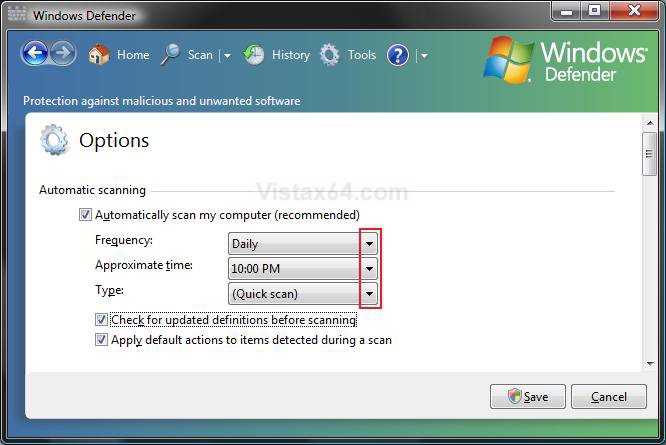
A) Uncheck Automatically scan my computer. (See screenshot below step 6)
B) Go to step 7.
6. To Turn On Automatic Scanning
NOTE: You will need to turn on automatic scanning if you would like Windows Defender to scan your computer automatically for you.
A) Check Automatically scan my computer. (See screenshot below)
B) Adjust the schedule setting to what Frequency, Approximate time, and Type of scan you want.
C) Decide if you would like Windows Defender to check for updates before scanning.
NOTE: It is recommended that you check this to run a updated scan.
D) Decide if you would like Windows Defender to apply default actions if it finds something in a scan.
NOTE: This can be useful if you have the scan run when you are not at the computer. Usually the Default action settings (definition-based) do a great job.
7. Click on Save. (See screenshot above)
NOTE: If you turned off automatic scanning, then your done. The options below only apply if you have automatic scanning turned on.
 STEP TWO
You must have automatic scanning turned on in STEP ONE above.[/Option]
 Option One
  Set Windows Defender Scan to Wake Up the Computer to Run
 Note
Note
 Option Two
  Set Windows Defender Scan to Run the Next Time when Missed
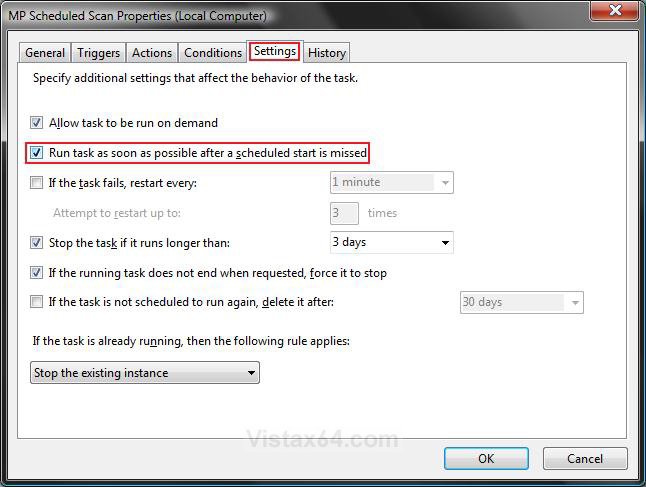
10. Click on the Settings tab. (See screenshot below)
 STEP THREE
  Finishing Up
Shawn
1. Open the Start Menu.
A) In the white line (Start Search) area, type taskschd.msc and press Enter.
B) Go to step 3.
OR
2. Open the Control Panel (Classic view).
A) Click on the Administrative Tools Icon.
B) Click on Task Scheduler.
3. Click on Continue in the UAC prompt.
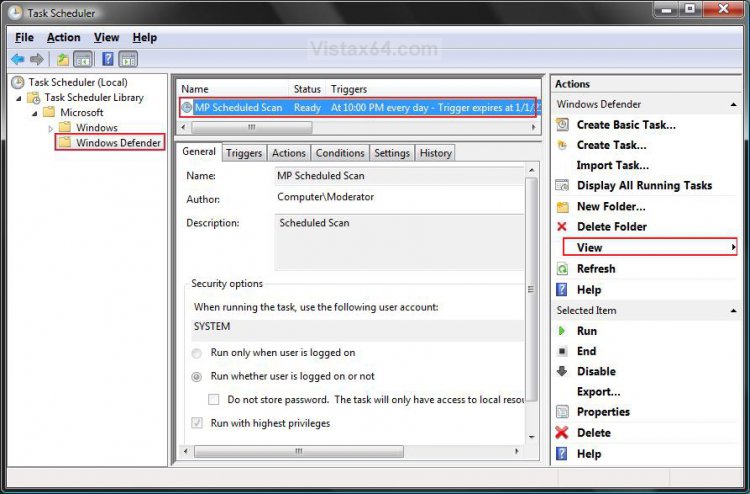
4. In the right pane, click on View and click on Show Hidden Tasks to check it. (See screenshot below step 7)
5. In the left pane, click on the arrow on the Task Scheduler Library folder and Microsoft folder to expand them.
6. Click on the Windows Defender folder.
7. In the middle pane, right click on the listed MP Scheduled Scan and click on Properties.
8. Decide if you would like to do OPTION ONE or OPTION TWO below.
NOTE: You could do both if you like in case the scan cannot wakeup the computer for some reason.
 Option One
You must have automatic scanning turned on in STEP ONE above. This will allow Windows Defender to run the scheduled scan to run even if the computer is in sleep mode.
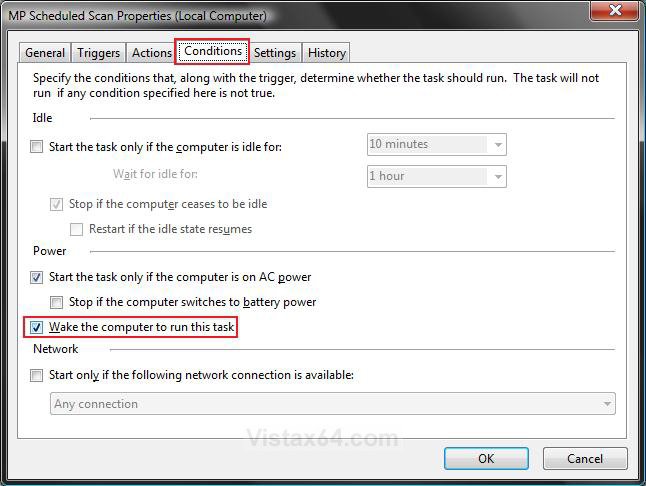
9. Click on the Conditions tab. (See screenshot below)
A) Check the Wake the computer to run this task box.
 Option Two
A) Check the Run task as soon as possible after a scheduled start is missed box.
NOTE: This will allow Windows Defender to run the scheduled scan the next time you have the computer running if the scan was missed due to it not being able to run at it's scheduled time.
B) Check the If the task fails, restart every box.
C) Select how often and how many times you want the task to attempt to run again if it failed to run when scheduled for some reason.
 STEP THREE
11. Click OK. (See screenshots below steps 9 and 10)
12. Close Task Scheduler.
That's it,Shawn
Attachments
Last edited by a moderator:

