How to Enable or Disable the Context Menu in Vista
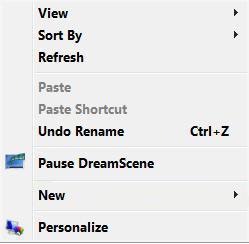
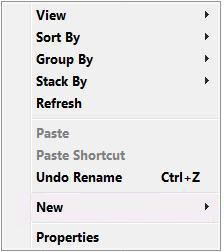
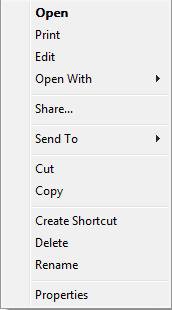
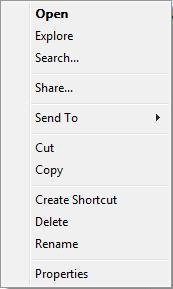
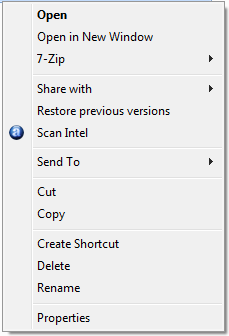
This will show you how to enable or disable the right click Context menu (see example below) for Windows Explorer, Desktop, and the All Programs section of the Start menu. This will affect all user accounts on the computer.
By default the context menu is enabled in Vista. If you disable the context menu, then it will no longer be available for the above areas.
The keyboard shortcut to open the context menu for the currently opened window is: Shift + F10
EXAMPLE: The Desktop, Windows Explorer, File, and Folder Context Menus
NOTE: These are the context menus that will be enabled or disabled.
 OPTION ONE
1. To Disable the Context Menu
A) Click on the Download button below to download the file below.
Disable_Context_Menu.reg
B) Go to step 3.
2. To Enable the Context Menu
A) Click on the Download button below to download the file below.
Enable_Context_Menu.reg
3. Click on Save, and save the .reg file to the Desktop.
4. Right click on the downloaded .reg file and click on Merge.
5. Click on Run, Continue (UAC), Yes, and then OK when prompted.
6. Log off and log on, or restart the computer to apply the changes.
7. When done, you can delete the downloaded .reg file if you like.
 OPTION TWO
1. Open the Start Menu, then type regedit in the search box and press Enter.
2. If prompted by UAC, then click on Continue.
3. In regedit, go to: (See screenshot below)
NOTE: If you do not have Explorer, then right click on Polices and click on New and Key. Type Explorer and press Enter.
HKEY_Current_User\Software\Microsoft\Windows\CurrentVersion\Policies\Explorer
4. To Disable the Context Menu
A) In the right pane, right click on a empty area and click New and click DWORD (32 bit) Value. (See screenshot above)
B) Type NoViewContextMenu and press Enter. (See screenshot below)
C) Right click on NoViewContextMenu and click on Modify.
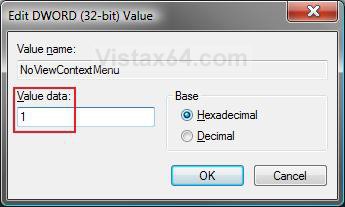
D) Type 1 and click on OK. (See screenshot below)
E) The registry should now look like this. (See screenshot below)
F) Go to step 6.
5. To Enable the Context Menu
A) Right click on NoViewContextMenu and click on Delete. (See screenshot above)
NOTE: You can also double left click on NoViewContextMenu and type 0 (number zero) and click on OK instead.
B) Click on Yes to confirm the delete.
C) In regedit, go to the location below. If you see NoViewContextMenu here as well, then right click on it and click on Delete and Yes to confirm.
HKEY_Current_MACHINE\SOFTWARE\Microsoft\Windows\CurrentVersion\Policies\Explorer
6. Close regedit.
7. Log off and log on, or restart the computer to apply the changes.
That's it,Shawn
Related Tutorials
- How to Add COPY TO FOLDER and MOVE TO FOLDER to the Context Menu in Vista
- How to Customize the Context Menu for the Start Menu in Vista
- How to Customize the Send To Context Menu in Vista
- How to Customize the Recycle Bin Context Menu in Vista
- How to Add Encrypt and Decrypt to the Context Menu in Vista
- How to Add and Remove a New Menu Item in Vista
- How to Add Take Ownership to the Context Menu in Vista
- How to Copy the Full Path of a File or Folder in Vista
- How to Restore the Search Context Menu Item after Installing the Vista SP1
- How to Add Flip 3D to the Context Menu in Vista
- How to Use Open Command Prompt Window Here in Vista
- How to Restore or Remove New from the Context Menu in Vista
- How to Expand the Context (Shortcuts) Menu in Vista
- How to Remove or Show Drives in the Vista and Windows 7 "Send To" Context Menu
- How to Add View and Print File Directory to the Context Menu in Vista
- How to Add or Remove Copy as Path from the Vista Context Menu
- How to Add or Remove Send To from the Vista Context Menu
- How to Add or Remove Turn Aero On or Off from the Vista Context Menu
- How to Add System Properties to Computer Context Menu in Vista
- How to Restore or Remove "Restore Previous Versions" from the Vista Context Menu
- How to Fix the New Shortcut Context Menu Item in Vista
- How to Add Empty Folder and Subfolders to the Vista Context Menu
- How to Disable or Enable "Context Menus" and "Dragging and Dropping" in the Start Menu
Attachments
Last edited:

