Boot Screen - Change

How to Change the Default Boot Screen in Vista

information   Information
The boot screen is the screen that displays during the bootup (startup) of Vista before the logon screen (welcome screen) and the desktop.
Tip   Tip
Running the sfc/ scannow command will reset the boot screen back to default.
warning   Warning
If you wanted to run chkdsk at startup or the Memory Diagnostic Tool and you have changed the default boot screen, then you will need to temporarily change the boot screen back to the default boot screen to be able to see what is happening first to be able to see what is happening when they run at startup.

EXAMPLE: Default Vista boot screen
Default_Boot_Screen.jpg


OPTION ONE
Using Stardock BootSkins

NOTE: This free program will let you replace the default Vista boot screen with any free skin that you have downloaded from WinCustomize BootSkins. You cannot create a BootSkin with any image that you like with the free version of BootSkins though.
1. Download and install the Vista version of Stardock BootSkin.​
NOTE: You will need to right click on the bootskinvista_public.exe installation file and click on Run as administrator to install this program properly.​
2. Download a BootSkin that you would like to use as your boot sceeen, and save it somewhere you would like to keep it at.​
4. Run BootSkin. (See screenshot below)​
BootSkin.jpg

3. To Add a BootSkin
NOTE: This will add a downloaded BootSkin to the bottom to have to select from.​
A) Click on the Add New BootSkin option, then browse to where you have saved the downloaded BootSkin and select it.​

4. To Delete a BootSkin
NOTE: This will delete and remove the currently selected BootSkin from the bottom.
5. To Apply a BootSkin as the Vista Boot Screen
A) Select a BootSkin from the bottom so that it appears in the larger preview window.​
B) Click on the Apply This BootSkin option.​

6. Restart the computer to see the changed boot screen.​


OPTION TWO
Using Vista Visual Master

NOTE: This free program will allow you to replace the default Vista boot screen with any .bmp, .jpg, .png, or .gif image of your choice instead.
1. Download and install the free program Vista Visual Master.​
warning   Warning
If you get a "cannot find en-CA" type error while running this program, then open the Control Panel, and go into Regional and Language Options. Change the default input language format to the folder that you have in your C:\Windows\System32\Boot folder. For example, en-CA (Canada), en-US (United States), etc....
2. Use Compatibility Mode on the Vista Visual Master shortcut, and check the Run this program as an administrator box (see step 8 at link).​
3. Click on the Vista Visual Master shortcut to run the program.​
4. Click on Allow in the UAC prompt.​
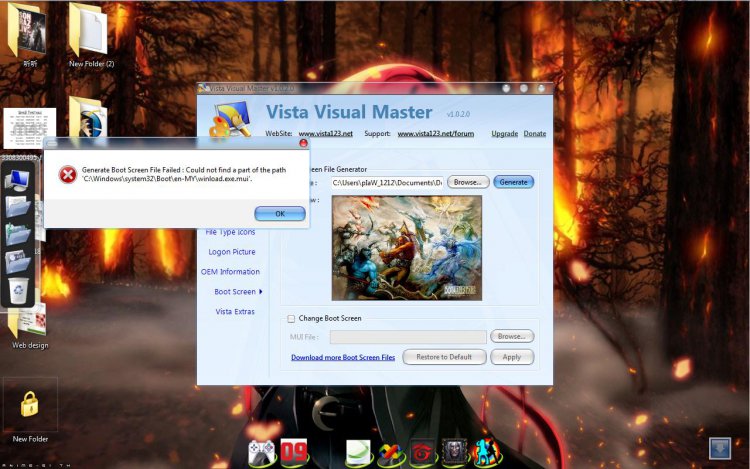
5. Click on the Boot Screen option. (See screenshot below)​
Vista_Visual_Master_1.jpg

6. To Change the Default Boot Screen
A) Click on Browse button and navigate to and select the .bmp, .jpg, .png, or .gif image you want for as the new boot screen. (See screenshot above)​
B) Click on the Generate button and save the winload.exe.mui file to use as the new boot screen. (See screenshot below step 6E)​
WARNING: The generated file must be named winload.exe.mui and remain on the computer for it to be able to be used at boot.​
C) Click on OK in the success pop-up. (See screenshot below)​
Generate_Success.jpg

D) Check the Change Boot Screen box. (See screenshot below step 6E)​
NOTE: If the location of the winload.exe.mui file you want to use is not correct, then click on Browse and navigate to where you saved it in step 6B.​
E) Click on the Apply button. (See screenshot below)​
Vista_Visual_Master_2.jpg

F) Click on OK in the success pop-up. (See screenshot below)​
Updated_Success.jpg

G) Go to step 8.​

7. To Restore the Default Boot Screen
A) Check the Change Boot Screen box. (See screenshot below step 5)​
B) Click on the Restore to Default button. (See screenshot below step 5)​
C) Click on OK in the success pop-up. (See screenshot below)​
Restore_Success.jpg


8. Close the Vista Visual Master window.​
9. Restart the computer to see the changed boot screen.​
That's it,
Shawn


Last edited by a moderator:
Hello Akuanauta,

I have not tested if it would still work without SP1 installed, but SP1 should be available in Windows Updates after installing all of the other Windows Updates first.

If not, then you can download the 32-bit standalone SP1 installer from Microsoft.

Hope this helps,
Shawn
 

My Computers

System One System Two

  • Operating System
    Windows 10 Pro 64-bit
    Manufacturer/Model
    Custom
    CPU
    Intel i7-8700K 5 GHz
    Motherboard
    ASUS ROG Maximus XI Formula Z390
    Memory
    64 GB (4x16GB) G.SKILL TridentZ RGB DDR4 3600 MHz (F4-3600C18D-32GTZR)
    Graphics Card(s)
    ASUS ROG-STRIX-GTX1080TI-O11G-GAMING
    Sound Card
    Integrated Digital Audio (S/PDIF)
    Monitor(s) Displays
    2 x Samsung Odyssey G7 27"
    Screen Resolution
    2560x1440
    Hard Drives
    1TB Samsung 990 PRO M.2,
    4TB Samsung 990 PRO PRO M.2,
    8TB WD MyCloudEX2Ultra NAS
    PSU
    Seasonic Prime Titanium 850W
    Case
    Thermaltake Core P3
    Cooling
    Corsair Hydro H115i
    Keyboard
    Logitech wireless K800
    Mouse
    Logitech MX Master 3
    Internet Speed
    1 Gb/s Download and 35 Mb/s Upload
    Other Info
    Logitech Z625 speaker system,
    Logitech BRIO 4K Pro webcam,
    HP Color LaserJet Pro MFP M477fdn,
    APC SMART-UPS RT 1000 XL - SURT1000XLI,
    Galaxy S23 Plus phone
  • Operating System
    Windows 10 Pro
    Manufacturer/Model
    HP Envy Y0F94AV
    CPU
    i7-7500U @ 2.70 GHz
    Memory
    16 GB DDR4-2133
    Graphics card(s)
    NVIDIA GeForce 940MX
    Sound Card
    Conexant ISST Audio
    Monitor(s) Displays
    17.3" UHD IPS touch
    Screen Resolution
    3480 x 2160
    Hard Drives
    512 GB M.2 SSD
It worked well in boot screen, but i can't change the logon screen, it said:
"get file acess failed.administrative authority needed"
I can't go ahead.

Need help please.
 

My Computer

Akuanauta, did you use this tutorial for the logon screen?

You will need to do this while logged on to an administrator account. If you are, then right click on the program's shortcut and click on Run as administrator to see if that helps.

Hope this helps,
Shawn
 

My Computers

System One System Two

  • Operating System
    Windows 10 Pro 64-bit
    Manufacturer/Model
    Custom
    CPU
    Intel i7-8700K 5 GHz
    Motherboard
    ASUS ROG Maximus XI Formula Z390
    Memory
    64 GB (4x16GB) G.SKILL TridentZ RGB DDR4 3600 MHz (F4-3600C18D-32GTZR)
    Graphics Card(s)
    ASUS ROG-STRIX-GTX1080TI-O11G-GAMING
    Sound Card
    Integrated Digital Audio (S/PDIF)
    Monitor(s) Displays
    2 x Samsung Odyssey G7 27"
    Screen Resolution
    2560x1440
    Hard Drives
    1TB Samsung 990 PRO M.2,
    4TB Samsung 990 PRO PRO M.2,
    8TB WD MyCloudEX2Ultra NAS
    PSU
    Seasonic Prime Titanium 850W
    Case
    Thermaltake Core P3
    Cooling
    Corsair Hydro H115i
    Keyboard
    Logitech wireless K800
    Mouse
    Logitech MX Master 3
    Internet Speed
    1 Gb/s Download and 35 Mb/s Upload
    Other Info
    Logitech Z625 speaker system,
    Logitech BRIO 4K Pro webcam,
    HP Color LaserJet Pro MFP M477fdn,
    APC SMART-UPS RT 1000 XL - SURT1000XLI,
    Galaxy S23 Plus phone
  • Operating System
    Windows 10 Pro
    Manufacturer/Model
    HP Envy Y0F94AV
    CPU
    i7-7500U @ 2.70 GHz
    Memory
    16 GB DDR4-2133
    Graphics card(s)
    NVIDIA GeForce 940MX
    Sound Card
    Conexant ISST Audio
    Monitor(s) Displays
    17.3" UHD IPS touch
    Screen Resolution
    3480 x 2160
    Hard Drives
    512 GB M.2 SSD
You're welcome Akuanauta.
 

My Computers

System One System Two

  • Operating System
    Windows 10 Pro 64-bit
    Manufacturer/Model
    Custom
    CPU
    Intel i7-8700K 5 GHz
    Motherboard
    ASUS ROG Maximus XI Formula Z390
    Memory
    64 GB (4x16GB) G.SKILL TridentZ RGB DDR4 3600 MHz (F4-3600C18D-32GTZR)
    Graphics Card(s)
    ASUS ROG-STRIX-GTX1080TI-O11G-GAMING
    Sound Card
    Integrated Digital Audio (S/PDIF)
    Monitor(s) Displays
    2 x Samsung Odyssey G7 27"
    Screen Resolution
    2560x1440
    Hard Drives
    1TB Samsung 990 PRO M.2,
    4TB Samsung 990 PRO PRO M.2,
    8TB WD MyCloudEX2Ultra NAS
    PSU
    Seasonic Prime Titanium 850W
    Case
    Thermaltake Core P3
    Cooling
    Corsair Hydro H115i
    Keyboard
    Logitech wireless K800
    Mouse
    Logitech MX Master 3
    Internet Speed
    1 Gb/s Download and 35 Mb/s Upload
    Other Info
    Logitech Z625 speaker system,
    Logitech BRIO 4K Pro webcam,
    HP Color LaserJet Pro MFP M477fdn,
    APC SMART-UPS RT 1000 XL - SURT1000XLI,
    Galaxy S23 Plus phone
  • Operating System
    Windows 10 Pro
    Manufacturer/Model
    HP Envy Y0F94AV
    CPU
    i7-7500U @ 2.70 GHz
    Memory
    16 GB DDR4-2133
    Graphics card(s)
    NVIDIA GeForce 940MX
    Sound Card
    Conexant ISST Audio
    Monitor(s) Displays
    17.3" UHD IPS touch
    Screen Resolution
    3480 x 2160
    Hard Drives
    512 GB M.2 SSD
Hey all, I'm completely new here and became very interested in this particular tut.

However, I read through the first few pages of problems and am wondering if this is something I really want to go through with if I have no modding experience whatsoever. Would anybody recommend this to a nub like myself?

Thanks.
 

My Computer

Hello TheRealOneEye, and welcome to Vista Forums.

It's up to you, but as long as you follow the tutorial step by step it shouldn't be difficult to do at all. As a precaution, you can create a restore point before doing this to use if for some reason you cannot restore your default boot screen.

Hope this helps,
Shawn
 

My Computers

System One System Two

  • Operating System
    Windows 10 Pro 64-bit
    Manufacturer/Model
    Custom
    CPU
    Intel i7-8700K 5 GHz
    Motherboard
    ASUS ROG Maximus XI Formula Z390
    Memory
    64 GB (4x16GB) G.SKILL TridentZ RGB DDR4 3600 MHz (F4-3600C18D-32GTZR)
    Graphics Card(s)
    ASUS ROG-STRIX-GTX1080TI-O11G-GAMING
    Sound Card
    Integrated Digital Audio (S/PDIF)
    Monitor(s) Displays
    2 x Samsung Odyssey G7 27"
    Screen Resolution
    2560x1440
    Hard Drives
    1TB Samsung 990 PRO M.2,
    4TB Samsung 990 PRO PRO M.2,
    8TB WD MyCloudEX2Ultra NAS
    PSU
    Seasonic Prime Titanium 850W
    Case
    Thermaltake Core P3
    Cooling
    Corsair Hydro H115i
    Keyboard
    Logitech wireless K800
    Mouse
    Logitech MX Master 3
    Internet Speed
    1 Gb/s Download and 35 Mb/s Upload
    Other Info
    Logitech Z625 speaker system,
    Logitech BRIO 4K Pro webcam,
    HP Color LaserJet Pro MFP M477fdn,
    APC SMART-UPS RT 1000 XL - SURT1000XLI,
    Galaxy S23 Plus phone
  • Operating System
    Windows 10 Pro
    Manufacturer/Model
    HP Envy Y0F94AV
    CPU
    i7-7500U @ 2.70 GHz
    Memory
    16 GB DDR4-2133
    Graphics card(s)
    NVIDIA GeForce 940MX
    Sound Card
    Conexant ISST Audio
    Monitor(s) Displays
    17.3" UHD IPS touch
    Screen Resolution
    3480 x 2160
    Hard Drives
    512 GB M.2 SSD
Thanks for the suggestion Brink, I've looked into System Properties and think I understand how that all works now. I feel better about fiddling with the boot skin now :)
 

My Computer

You're welcome TheRealOneEye. If you run into any questions about this, be sure to ask away. :)
 

My Computers

System One System Two

  • Operating System
    Windows 10 Pro 64-bit
    Manufacturer/Model
    Custom
    CPU
    Intel i7-8700K 5 GHz
    Motherboard
    ASUS ROG Maximus XI Formula Z390
    Memory
    64 GB (4x16GB) G.SKILL TridentZ RGB DDR4 3600 MHz (F4-3600C18D-32GTZR)
    Graphics Card(s)
    ASUS ROG-STRIX-GTX1080TI-O11G-GAMING
    Sound Card
    Integrated Digital Audio (S/PDIF)
    Monitor(s) Displays
    2 x Samsung Odyssey G7 27"
    Screen Resolution
    2560x1440
    Hard Drives
    1TB Samsung 990 PRO M.2,
    4TB Samsung 990 PRO PRO M.2,
    8TB WD MyCloudEX2Ultra NAS
    PSU
    Seasonic Prime Titanium 850W
    Case
    Thermaltake Core P3
    Cooling
    Corsair Hydro H115i
    Keyboard
    Logitech wireless K800
    Mouse
    Logitech MX Master 3
    Internet Speed
    1 Gb/s Download and 35 Mb/s Upload
    Other Info
    Logitech Z625 speaker system,
    Logitech BRIO 4K Pro webcam,
    HP Color LaserJet Pro MFP M477fdn,
    APC SMART-UPS RT 1000 XL - SURT1000XLI,
    Galaxy S23 Plus phone
  • Operating System
    Windows 10 Pro
    Manufacturer/Model
    HP Envy Y0F94AV
    CPU
    i7-7500U @ 2.70 GHz
    Memory
    16 GB DDR4-2133
    Graphics card(s)
    NVIDIA GeForce 940MX
    Sound Card
    Conexant ISST Audio
    Monitor(s) Displays
    17.3" UHD IPS touch
    Screen Resolution
    3480 x 2160
    Hard Drives
    512 GB M.2 SSD
Sorry for the repost, but if you use a pic like the one you use in the tut, will the progress bar still show up on top of the pic in its usual spot? I haven't tried it yet, so I don't know, and I've seen a ton of pics on deviantART: where ART meets application! that have the progress bar already in them which leads me to believe that they are programmed in?
 

My Computer

The RealOneEye,

Sorry, but no the progress bar will not be in the new boot screen. It will only be whatever still image you select instead. :(
 

My Computers

System One System Two

  • Operating System
    Windows 10 Pro 64-bit
    Manufacturer/Model
    Custom
    CPU
    Intel i7-8700K 5 GHz
    Motherboard
    ASUS ROG Maximus XI Formula Z390
    Memory
    64 GB (4x16GB) G.SKILL TridentZ RGB DDR4 3600 MHz (F4-3600C18D-32GTZR)
    Graphics Card(s)
    ASUS ROG-STRIX-GTX1080TI-O11G-GAMING
    Sound Card
    Integrated Digital Audio (S/PDIF)
    Monitor(s) Displays
    2 x Samsung Odyssey G7 27"
    Screen Resolution
    2560x1440
    Hard Drives
    1TB Samsung 990 PRO M.2,
    4TB Samsung 990 PRO PRO M.2,
    8TB WD MyCloudEX2Ultra NAS
    PSU
    Seasonic Prime Titanium 850W
    Case
    Thermaltake Core P3
    Cooling
    Corsair Hydro H115i
    Keyboard
    Logitech wireless K800
    Mouse
    Logitech MX Master 3
    Internet Speed
    1 Gb/s Download and 35 Mb/s Upload
    Other Info
    Logitech Z625 speaker system,
    Logitech BRIO 4K Pro webcam,
    HP Color LaserJet Pro MFP M477fdn,
    APC SMART-UPS RT 1000 XL - SURT1000XLI,
    Galaxy S23 Plus phone
  • Operating System
    Windows 10 Pro
    Manufacturer/Model
    HP Envy Y0F94AV
    CPU
    i7-7500U @ 2.70 GHz
    Memory
    16 GB DDR4-2133
    Graphics card(s)
    NVIDIA GeForce 940MX
    Sound Card
    Conexant ISST Audio
    Monitor(s) Displays
    17.3" UHD IPS touch
    Screen Resolution
    3480 x 2160
    Hard Drives
    512 GB M.2 SSD
Okay, thanks.

I'm currently trying the program "Tuneup Utilities" which I heard on DevArt works better with actual programmed bootskins than some other apps do, so when I get that up and running I'll let you know how it goes.
 

My Computer

Ok, I'll be looking forward to hearing your results. :)
 

My Computers

System One System Two

  • Operating System
    Windows 10 Pro 64-bit
    Manufacturer/Model
    Custom
    CPU
    Intel i7-8700K 5 GHz
    Motherboard
    ASUS ROG Maximus XI Formula Z390
    Memory
    64 GB (4x16GB) G.SKILL TridentZ RGB DDR4 3600 MHz (F4-3600C18D-32GTZR)
    Graphics Card(s)
    ASUS ROG-STRIX-GTX1080TI-O11G-GAMING
    Sound Card
    Integrated Digital Audio (S/PDIF)
    Monitor(s) Displays
    2 x Samsung Odyssey G7 27"
    Screen Resolution
    2560x1440
    Hard Drives
    1TB Samsung 990 PRO M.2,
    4TB Samsung 990 PRO PRO M.2,
    8TB WD MyCloudEX2Ultra NAS
    PSU
    Seasonic Prime Titanium 850W
    Case
    Thermaltake Core P3
    Cooling
    Corsair Hydro H115i
    Keyboard
    Logitech wireless K800
    Mouse
    Logitech MX Master 3
    Internet Speed
    1 Gb/s Download and 35 Mb/s Upload
    Other Info
    Logitech Z625 speaker system,
    Logitech BRIO 4K Pro webcam,
    HP Color LaserJet Pro MFP M477fdn,
    APC SMART-UPS RT 1000 XL - SURT1000XLI,
    Galaxy S23 Plus phone
  • Operating System
    Windows 10 Pro
    Manufacturer/Model
    HP Envy Y0F94AV
    CPU
    i7-7500U @ 2.70 GHz
    Memory
    16 GB DDR4-2133
    Graphics card(s)
    NVIDIA GeForce 940MX
    Sound Card
    Conexant ISST Audio
    Monitor(s) Displays
    17.3" UHD IPS touch
    Screen Resolution
    3480 x 2160
    Hard Drives
    512 GB M.2 SSD
Okay, thanks.

I'm currently trying the program "Tuneup Utilities" which I heard on DevArt works better with actual programmed bootskins than some other apps do, so when I get that up and running I'll let you know how it goes.

I was just about to post that Tune-Up Utilities 2008 DOES in fact work extremely good for this. (also fully vista x86 and x64 compatible) It's also 1st on my list of essential apps to keep PCs running fresh (just ahead of O&O defrag pro)

***NOTE:
When XP boot screens are changed, you do get the option of choosing your progress bar location and colour

When VISTA boot screens are changed, there is no more progress bar


Hope this helps,
 

My Computer

System One

  • CPU
    AMD Athlon 64 X2 Socket AM2 6000+
    Motherboard
    ASUS M2N-E Socket AM2
    Memory
    OCZ 4G (4x1024) PC2-6400 Gold XTC
    Graphics Card(s)
    EVGA Geforce 9800GTX+ 512mb PCI-e 2.0
    Sound Card
    Onboard
    Monitor(s) Displays
    LG 20.1" LCD Widescreen Monitor (Black) (2ms response, 3000:1 Contrast)
    Screen Resolution
    1600x1080
    Hard Drives
    Western Digital 500GB Hard Drive
    Western Digital 20GB (SWAP)
    PSU
    OCZ GameXStream 600W
    Case
    Mutan Mods Acrylic ATX Mid-Tower
    Cooling
    Thermaltake Spin-Q CPU cooler
    Keyboard
    Windows black USB
    Mouse
    Logitech Mx310
    Internet Speed
    Rogers Hi-Speed
    Other Info
    Icemat Siberia Headset
Yeah to bad Tuneup Utilities is not a free program and only a trial version though. :(
 

My Computers

System One System Two

  • Operating System
    Windows 10 Pro 64-bit
    Manufacturer/Model
    Custom
    CPU
    Intel i7-8700K 5 GHz
    Motherboard
    ASUS ROG Maximus XI Formula Z390
    Memory
    64 GB (4x16GB) G.SKILL TridentZ RGB DDR4 3600 MHz (F4-3600C18D-32GTZR)
    Graphics Card(s)
    ASUS ROG-STRIX-GTX1080TI-O11G-GAMING
    Sound Card
    Integrated Digital Audio (S/PDIF)
    Monitor(s) Displays
    2 x Samsung Odyssey G7 27"
    Screen Resolution
    2560x1440
    Hard Drives
    1TB Samsung 990 PRO M.2,
    4TB Samsung 990 PRO PRO M.2,
    8TB WD MyCloudEX2Ultra NAS
    PSU
    Seasonic Prime Titanium 850W
    Case
    Thermaltake Core P3
    Cooling
    Corsair Hydro H115i
    Keyboard
    Logitech wireless K800
    Mouse
    Logitech MX Master 3
    Internet Speed
    1 Gb/s Download and 35 Mb/s Upload
    Other Info
    Logitech Z625 speaker system,
    Logitech BRIO 4K Pro webcam,
    HP Color LaserJet Pro MFP M477fdn,
    APC SMART-UPS RT 1000 XL - SURT1000XLI,
    Galaxy S23 Plus phone
  • Operating System
    Windows 10 Pro
    Manufacturer/Model
    HP Envy Y0F94AV
    CPU
    i7-7500U @ 2.70 GHz
    Memory
    16 GB DDR4-2133
    Graphics card(s)
    NVIDIA GeForce 940MX
    Sound Card
    Conexant ISST Audio
    Monitor(s) Displays
    17.3" UHD IPS touch
    Screen Resolution
    3480 x 2160
    Hard Drives
    512 GB M.2 SSD
Its refusing to accept the mui generation, because in Sytem32/Boot the en-US is not reognised, its looking for en-GB, the system is refusing to let me change it to GB.
Is there a CMD work around.?
 

My Computer

System One

  • CPU
    INTEL QUAD 6600
    Motherboard
    Gigabyte EP35-DS4
    Memory
    4 gb
    Graphics Card(s)
    GeForce 8800gt
    Monitor(s) Displays
    24" ACER
    Screen Resolution
    1440 X 900
    Hard Drives
    500 GB
    320GB
    PSU
    700WATT
    Cooling
    ARCTIC
    Internet Speed
    Av.MTH, Download 8.27, Upoad 0.91
Hello Wysiwyg.

I suppose that you could make a backup copy of the C:\Windows\System32\Boot\en-GB\winload.exe.mui file, then take ownership of the C:\Windows\System32\Boot\en-GB\winload.exe.mui file. Afterwards copy and paste the winload.exe.mui file generated by the program for it to work. If it does not work, then take ownership of the now copied winload.exe.mui file, and replace it with the backup.

Hope this helps,
Shawn
 

My Computers

System One System Two

  • Operating System
    Windows 10 Pro 64-bit
    Manufacturer/Model
    Custom
    CPU
    Intel i7-8700K 5 GHz
    Motherboard
    ASUS ROG Maximus XI Formula Z390
    Memory
    64 GB (4x16GB) G.SKILL TridentZ RGB DDR4 3600 MHz (F4-3600C18D-32GTZR)
    Graphics Card(s)
    ASUS ROG-STRIX-GTX1080TI-O11G-GAMING
    Sound Card
    Integrated Digital Audio (S/PDIF)
    Monitor(s) Displays
    2 x Samsung Odyssey G7 27"
    Screen Resolution
    2560x1440
    Hard Drives
    1TB Samsung 990 PRO M.2,
    4TB Samsung 990 PRO PRO M.2,
    8TB WD MyCloudEX2Ultra NAS
    PSU
    Seasonic Prime Titanium 850W
    Case
    Thermaltake Core P3
    Cooling
    Corsair Hydro H115i
    Keyboard
    Logitech wireless K800
    Mouse
    Logitech MX Master 3
    Internet Speed
    1 Gb/s Download and 35 Mb/s Upload
    Other Info
    Logitech Z625 speaker system,
    Logitech BRIO 4K Pro webcam,
    HP Color LaserJet Pro MFP M477fdn,
    APC SMART-UPS RT 1000 XL - SURT1000XLI,
    Galaxy S23 Plus phone
  • Operating System
    Windows 10 Pro
    Manufacturer/Model
    HP Envy Y0F94AV
    CPU
    i7-7500U @ 2.70 GHz
    Memory
    16 GB DDR4-2133
    Graphics card(s)
    NVIDIA GeForce 940MX
    Sound Card
    Conexant ISST Audio
    Monitor(s) Displays
    17.3" UHD IPS touch
    Screen Resolution
    3480 x 2160
    Hard Drives
    512 GB M.2 SSD
cant change.it say cant generate.....
Said:Could not find a part of the path C:\Windows\System32\Boot\en-MY\winload.exe.mui
 

Attachments

  • Untitled.jpg
    Untitled.jpg
    144.4 KB · Views: 325

My Computer

Hello 901212, and welcome to Vista Forums.

Did you run the program as an administrator? If you did, then you might send feedback to the program's website to see if they can determine if it may be a bug. :(

Shawn
 

My Computers

System One System Two

  • Operating System
    Windows 10 Pro 64-bit
    Manufacturer/Model
    Custom
    CPU
    Intel i7-8700K 5 GHz
    Motherboard
    ASUS ROG Maximus XI Formula Z390
    Memory
    64 GB (4x16GB) G.SKILL TridentZ RGB DDR4 3600 MHz (F4-3600C18D-32GTZR)
    Graphics Card(s)
    ASUS ROG-STRIX-GTX1080TI-O11G-GAMING
    Sound Card
    Integrated Digital Audio (S/PDIF)
    Monitor(s) Displays
    2 x Samsung Odyssey G7 27"
    Screen Resolution
    2560x1440
    Hard Drives
    1TB Samsung 990 PRO M.2,
    4TB Samsung 990 PRO PRO M.2,
    8TB WD MyCloudEX2Ultra NAS
    PSU
    Seasonic Prime Titanium 850W
    Case
    Thermaltake Core P3
    Cooling
    Corsair Hydro H115i
    Keyboard
    Logitech wireless K800
    Mouse
    Logitech MX Master 3
    Internet Speed
    1 Gb/s Download and 35 Mb/s Upload
    Other Info
    Logitech Z625 speaker system,
    Logitech BRIO 4K Pro webcam,
    HP Color LaserJet Pro MFP M477fdn,
    APC SMART-UPS RT 1000 XL - SURT1000XLI,
    Galaxy S23 Plus phone
  • Operating System
    Windows 10 Pro
    Manufacturer/Model
    HP Envy Y0F94AV
    CPU
    i7-7500U @ 2.70 GHz
    Memory
    16 GB DDR4-2133
    Graphics card(s)
    NVIDIA GeForce 940MX
    Sound Card
    Conexant ISST Audio
    Monitor(s) Displays
    17.3" UHD IPS touch
    Screen Resolution
    3480 x 2160
    Hard Drives
    512 GB M.2 SSD
Back
Top