How To Perform a Repair Installation For Vista
This will allow you to repair your Vista installation and keep all of your personal user account files, settings, and programs. You will be performing a Upgrade Install from within your currently running Vista.
You will have to use the exact same Vista installation media type that you currently have installed.
You will have to use the exact same Vista installation media type that you currently have installed.
- You will not be able to do a upgrade install in Safe Mode.
- You must have Retail Full or Upgrade Vista installation DVD to do this. Some people have had problems with a Full version letting them do a upgrade install though.
- A OEM (retail version) Vista installation DVD that you buy at a store and does not come with the computer are usually the same as a regular retail (full or upgrade) Vista installation DVD, but have a OEM license (product key number) instead of a retail license (product key number).
- If you have a OEM Recovery Vista installation DVD that came preinstalled with your OEM brand computer instead, then it will most likely only be a clone of the hard drive with Vista allowing you to only do a clean install with it instead. These OEM computers often have a Recovery D:\ partition that does the same thing as the OEM Recovery Vista installation DVD.
- If you have a Anytime Upgrade Vista installation DVD, then you will not be able to do this.
- The Vista installation DVD that you use to do the repair (upgrade) install must be the same or newer version of Vista with the Windows Updates and SP level than what you currently have installed. If the DVD is a older version, then you cannot do a repair (upgrade) install with it.
- IF YOU HAVE THE VISTA SP1 INSTALLED:
- This will not work if you have SP1 installed unless your Vista installation DVD includes the SP1, or you create a Vista SP1 slipstream installation DVD (See below). When the SP1 is installed, it will give Vista a newer version number than what is on the original Vista installation DVD.
- You can only do a Upgrade install if the currently installed Vista is the same or older version than what is on the Vista installation DVD.
- To create a Vista SP1 slipstream installation DVD to use to do a Repair (upgrade) install, see: How to Create a Vista SP1 Slipstream Installation DVD. Note that this does not always work to use for a Repair install.
- Another option is to uninstall the Vista SP1, then run the Repair install and install the SP1 again afterwards. To uninstall the SP1, see: Microsoft Help and Support: How to uninstall Windows Vista SP1 as a troubleshooting step
- IF YOU HAVE THE VISTA SP2 INSTALLED:
- This will not work if you have SP1 and SP2 installed unless your Vista installation DVD includes SP2.
- To create a Vista SP2 slipstream installation DVD to use to do a Repair (upgrade) install, see: How to Slipstream Vista SP2. Note that this does not always work to use for a Repair install.
- Be sure to backup any important data you have, just in case something goes wrong during installation. You may need to reinstall some of your drivers. You do not want to do this if you are dual booting with XP and Vista was not installed as the primary boot drive. It can cause XP to not startup anymore.
If you are have installation error problems, then see:
- Windows Help and Support: KB935806 Troubleshooting Stop error messages that may occur when you try to install Windows Vista
- Windows Help and Support: KB929777 Error message when you try to install Windows Vista on a computer that uses more than 3 GB of RAM: "STOP 0x0000000A"
If you changed the default location of the Program Files or Programs Files (x86) folder, then you will need to change it back to the C: drive, and change any shortcuts that pointed to the other location to also point to the C: drive before doing a repair install.
ITEMS THAT WILL BE RESET TO DEFAULT:
ITEMS THAT WILL BE RESET TO DEFAULT:
- Computer Sound Event Scheme
- Vista Services
- Visual Effects Options
- Windows Mail - To Save and Restore your messages and settings, see the section: How to Backup and Reset Windows Mail
- Device Drivers - Be sure to have these handy to reinstall. They do not always remain after the repair (upgrade) install.
Here's How:
- If Vista is still not working properly afterwards, then a Clean Install would be recommended.
- You may need to reinstall some of your drivers after the Repair (upgrade) install.
- You will not be able to do a upgrade install in Safe Mode.
1. While logged in Vista as an administrator, insert the Vista installation DVD into the DVD drive, or connect a Vista installation USB thumb/key drive.
WARNING: Do not boot the computer and run the Vista installation DVD from boot. A upgrade install will not work this way.
If you do not have a Vista with SP1 installation DVD/USB, then you can download an official Vista with SP1 ISO file here: Microsoft: Vista Direct Download Links, and use Windows 7 USB-DVD Download Tool to create a bootable DVD or USB flash drive with the ISO to do the repair install.
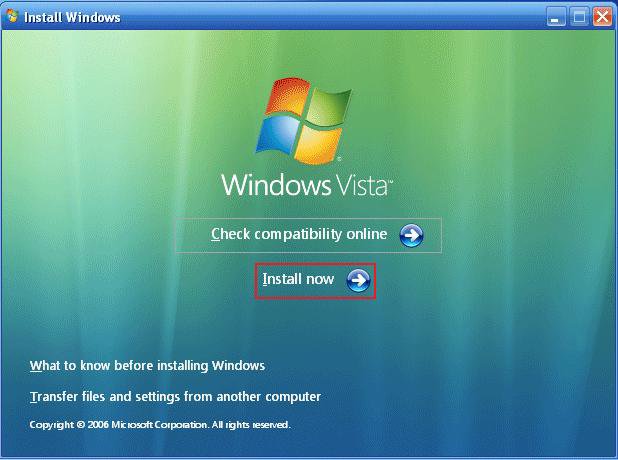
2. Click on Install Now to start the upgrade. (See screenshot below)
NOTE: If AutoPlay does not load the Vista setup screen, then open your DVD drive in Computer and click on the Setup file.
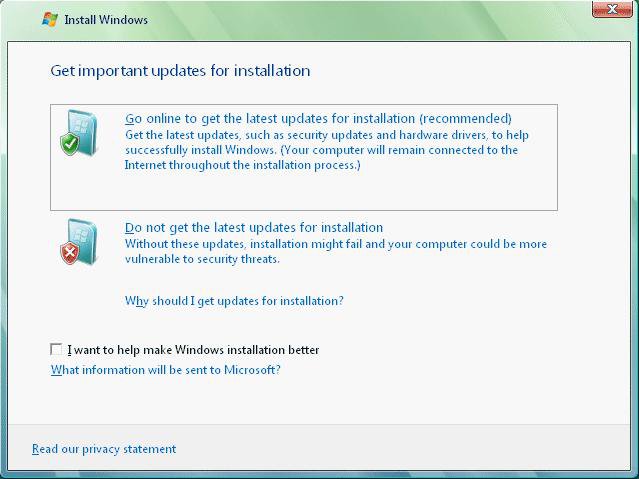
3. If you want Vista to check for updates during the installation, then click on that to select it. (See screenshot below)NOTE: It will install faster if you select Do not get the latest updates for installation. You can install them later through Windows Update.
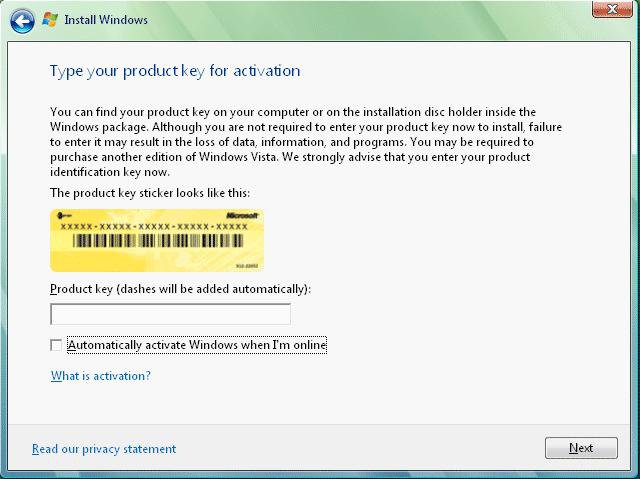
4. Do not type in a product key. (See screenshot below)WARNING: If you do type in the same activated product key that you already have installed, then you can end up in Reduced Functionality Mode.
5. Leave the Automatically activate Windows when I'm online box unchecked.
6. Click on Next.
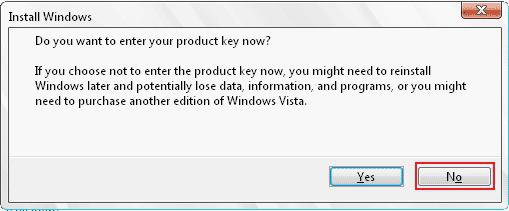
7. Click on the No button for the Do you want to enter your product key now? prompt. (See screenshot below)
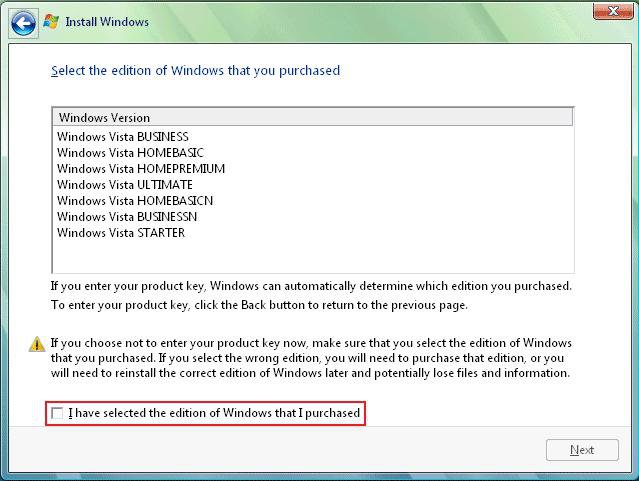
8. Select which edition of Vista you have. (See screenshot below)9. Check the I have selected the edition of Windows that I purchased box and click on Next. (See screenshot below)
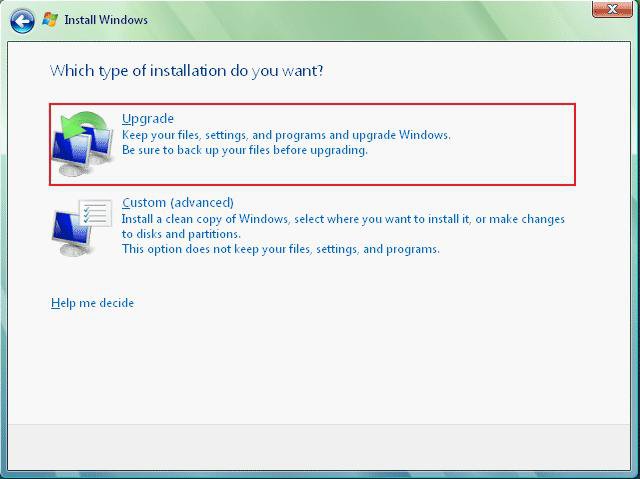
10. Click on the Upgrade option. (See screenshot below)
11. Follow any instructions left until Vista is through installing and has rebooted to the final welcome screen on the Vista desktop.12. Remove the Vista installation DVD.
13. Check to see if any files are missing. If so look in the bolded files shown in step 14 below to see if they are in there. You can then just copy them back.
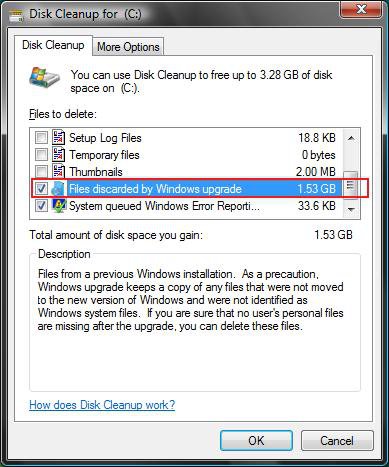
14. Run Disk Cleanup.
A) If listed, check Files discarded by Windows upgrade. (See screenshot below)
NOTE: These will be the leftover upgrade files, C:\Windows.old, C:\$INPLACE.~TR and C:\$WINDOWS.~Q, that did not get copied over. If any personal username files are missing, it would be in these folders.
B) Click on OK to delete it.
15. Now all you need to do is to activate Vista.
A) Right click on Computer (Start Menu) and click on Properties, or open the Control Panel (Classic View) and click on the System icon.
B) Scroll down a bit and click on: Activate Windows Now. (See screenshot below)
That's it,
Shawn
Related Tutorials
- How to Do a Clean Install of Vista with a Upgrade Version
- How to Do a Clean Install with a Full Version of Vista
- How to Repair and Verify the Integrity of Vista System Files with System File Checker
- How to Extract Files from the Vista Installation DVD
- How to Use the Memory Diagnostics Tool in Vista
- How to Do a Startup Repair in Vista
- How to Reset a User Account Password in Vista
- How to Generate a System Health Report in Vista
- How to Troubleshoot the Computer with Reliability Monitor in Vista
- How to Run Check Disk at Startup in Vista
- How to Do a System Restore in Vista
- How to Use the DirectX Diagnostic Tool in Vista
- How to Fix a Crashing Internet Explorer in Vista
- How to Get Out of Reduced Functionality Mode in Vista
- How to Restore Previous Versions of a File and Folder in Vista
- How to Start Vista in Safe Mode
- Cannot Rename or Move a File or Folder in Vista Fix
- How to Create a Vista Recovery Disc
- How to Create a Vista SP1 Slipstream Installation DVD
- How to Slipstream Vista SP2
- How to Restore Missing Default Start Menu Shortcuts in Vista
- How to Restore TrustedInstaller as Owner of a File in Vista
- How to Do a Custom Installation of Vista

