Vista SP1 Slipstream Installation DVD

How to Create a Vista SP1 Slipstream Installation DVD

information   Information
This will show you how to create a Vista installation DVD with the Vista SP1 slipstreamed into it for any 32 and 64 bit version of Vista you want. This DVD will allow you to do a clean install of Vista with the SP1 all at once instead of installing Vista first then the SP1.
Note   Note
This Vista SP1 slipstream installation DVD will also allow you to run a Repair install on Vista with SP1 installed now. Before, you could not use a normal Vista installation DVD ro run a Repair install on Vista with SP1 installed since Vista with SP1 was a new version than what was on the Vista DVD.
Tip   Tip
If you have a Dell OEM computer, then see this link to help you possibly create a sliptream installation DVD from your Dell installation disc.
warning   Warning
You can only make a 64-bit Vista DVD in a installed 64-bit Vista, and only a 32-bit Vista DVD in a installed 32-bit Vista.


REQUIREMENTS:
Microsoft has issued a note to users, of “v-Lited” Windows Vista SP1 installs, having issues upgrading to SP2. Their advice? Reinstall Windows with genuine media. For more on this, see: Short: vLite screws up Windows Vista SP1 upgrade path - Within Windows


Here's How:
Note   Note
You will need to temporarily disable your antivirus program before you start this to prevent possible interference to the vLite program below. This program is safe, but could be mistaken as not by some antivirus programs and prevent you from creating the SP1 slipstream DVD.

1. Copy the Vista Installation DVD Contents to the Desktop
A) Place the retail or OEM (not Recovery) Vista installation DVD into the DVD drive.​
NOTE: If AutoPlay or the Vista install window pops-up, just close it.​
B) Open the Start Menu and click on Computer.​
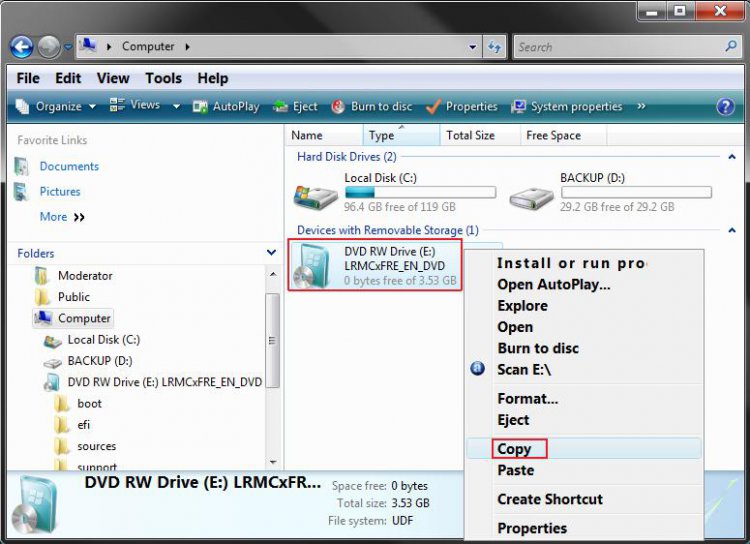
C) Right click on the DVD drive in Computer with the Vista installation DVD and click on Copy. (See screenshot below)​
Step1.jpg

D) Right click on a empty space on the desktop and click on Paste.​
NOTE: This may take a few minutes to finish copying all of the Vista installation DVD contents to the folder on the desktop.​

2. Download the SP1 Standalone Installer to the Desktop
NOTE: See Requirements at the top of the tutorial for the download links. You will need to select the same 32 bit or 64 bit version of the SP1 as the Vista installation DVD from step 1.​
A) Download and save the SP1 standalone installer to the desktop.​

3. Download and Install the vLite Program
NOTE: See Requirements at the top of the tutorial for the download link.​
A) Right click on the vLite program shortcut and click Run as Administrator.​
B) Click on Allow.​
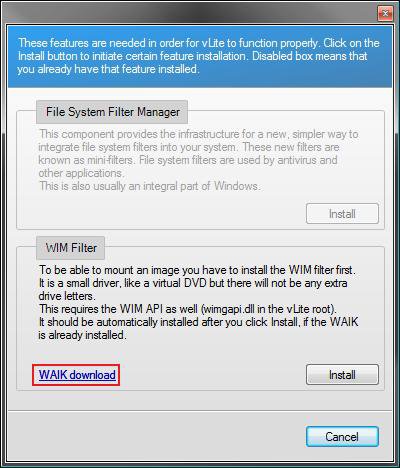
C) If this window pops-up, then click on the Install button(s) for the missing features needed by vLite. (See screenshot below)​
NOTE: If you see the WAIK Download link, then you will need to click on the Install button to download the 1.34GB ISO WAIK file first. Next, follow the instructions at the download link:​
  • Click the Download button on this page to start the download.
  • Click on Save, and save the .iso file to your desktop.
  • Burn the saved .iso file to a DVD. You can use ISO Recorder to do this. This link will show you how to use ISO Recorder.
  • Run the DVD to install WAIK.
WARNING: There is a glitch in the vLite 1.2 version where you may receive an error about WAIK when trying to run vLite. WAIK is not always properly recognized in Vista 32 bit. You may need to manually copy and paste the wimgapi.dll file from WAIK into the root vLite folder (main folder) in C:\Programs for it to work properly.​
Step2.jpg


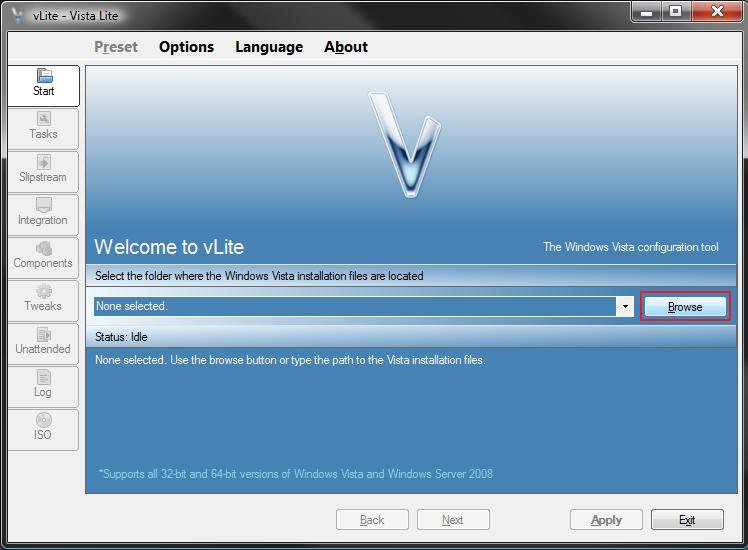
4. Click on the Browse button. (See screenshot below)​
Step3.jpg

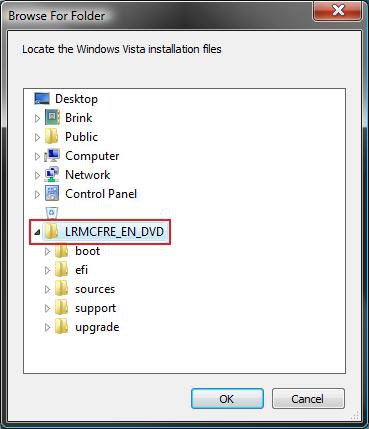
5. Click on the Vista folder (created from step 1) on the desktop and click on the LRMCFRE_EN_DVD folder, then click OK. (See screenshot below)​
NOTE: You may have a different name than LRMCFRE_EN_DVD based on your type of Vista installation DVD, but it will be the one right under Vista.​
Step4.jpg

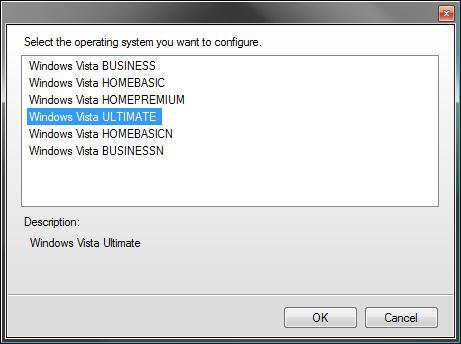
6. Click on the Vista edition that you want to use for the Vista SP1 slipstream DVD to highlight it and click OK. (See screenshot below)​
NOTE: You can only have one Vista edition per slipstream DVD. If you want to have more than one Vista edition, then you must repeat this tutorial for each individual Vista edition for their own DVD.​
Step5.jpg

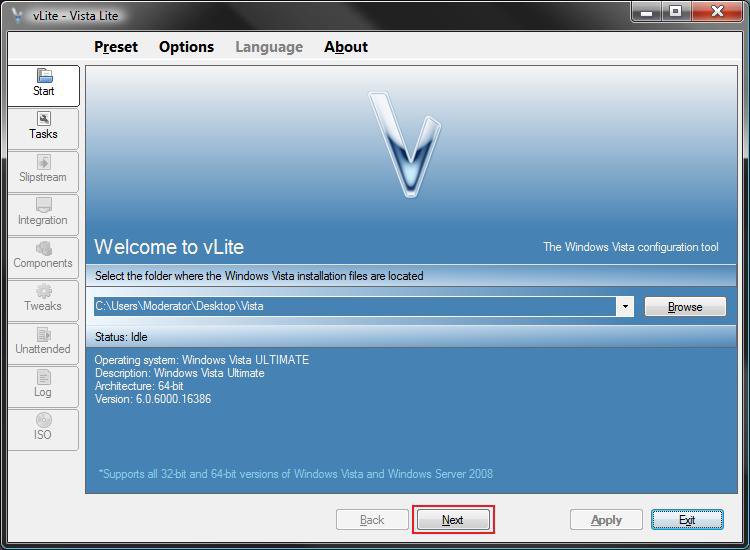
7. Click on the Next button. (See screenshot below)​
Step6.jpg

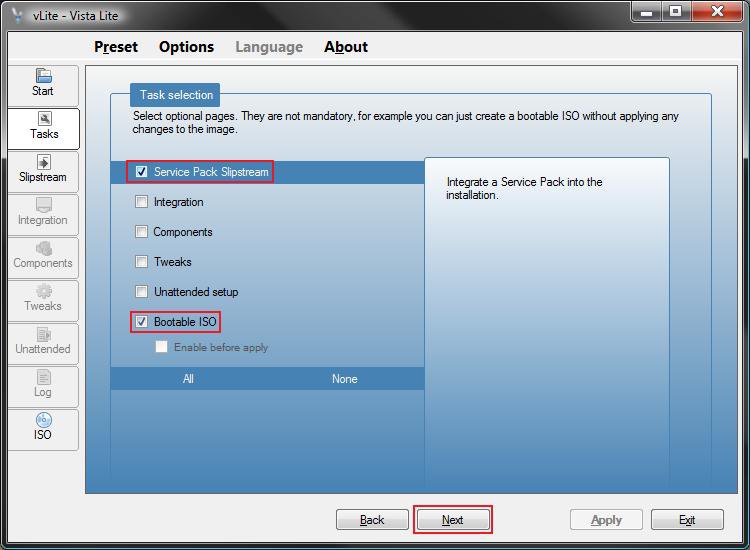
8. Check both the Service Pack Slipstream and Bootable ISO boxes and click on the Next button. (See screenshot below)​
Step7.jpg

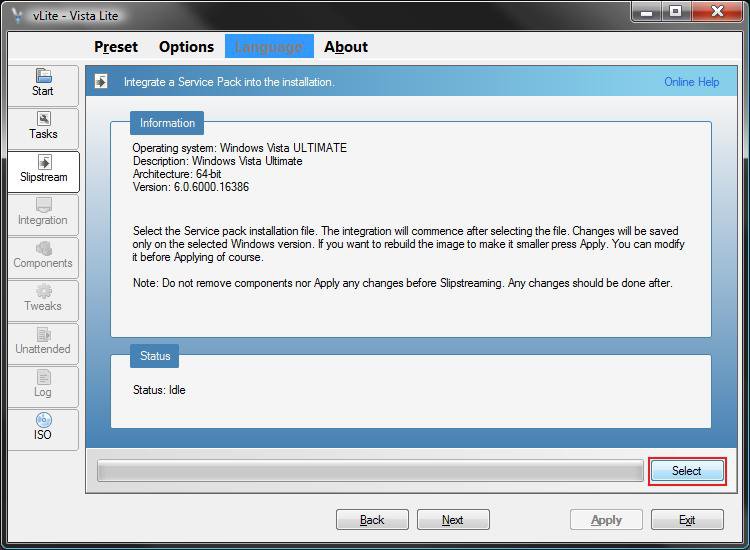
9. Click on the Select button. (See screenshot below)​
Step8.jpg

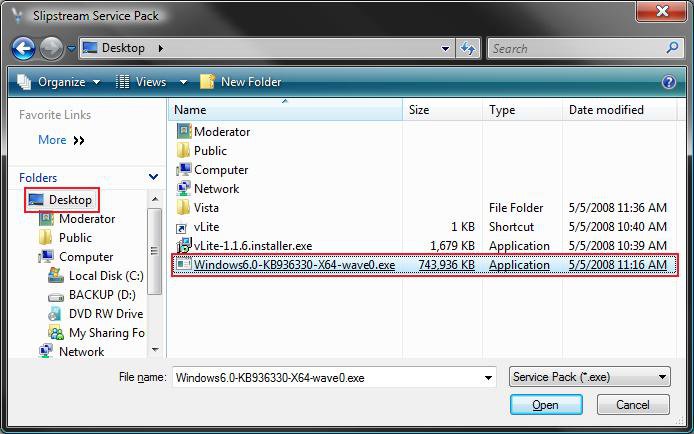
10. Select the SP1 standalone program (from step 2) on the desktop and click on the Open button. (See screenshot below)​
Step9.jpg

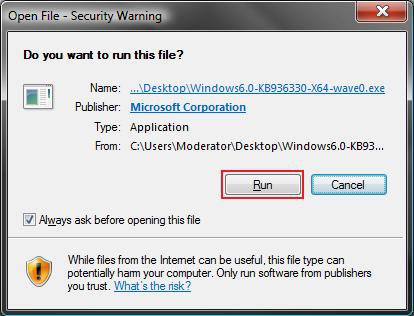
11. Click on Run when this window pops-up in a few seconds. (See screenshot below)​
NOTE: This runs the SP1 installer program for the vLite program only. It will not install the SP1 on your computer.​
Step10.jpg

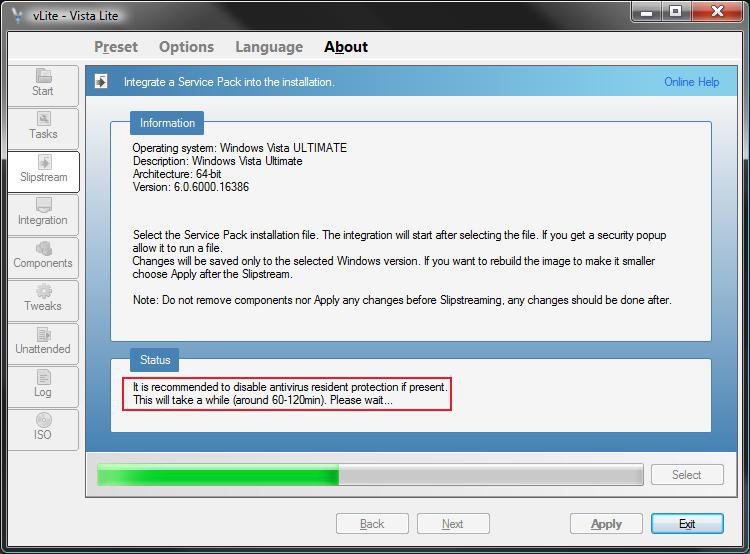
12. This will take around 60 to 120 minutes or so to complete this part. Some older slower systems may take a bit longer. (See screenshot below)​
Enjoy your break. ;)
NOTE: In the Status box, you will see Preparing first, Extracting second, Integrating third, then this below until it is finished with this part. It will seem like it is stuck about 60% of the way, but it is not.​
Step11.jpg

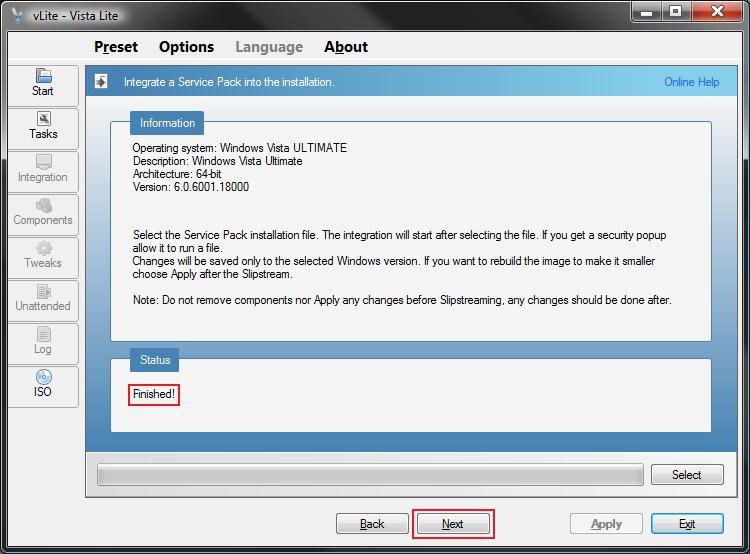
13. When Finished, click on Next. (See screenshot below)​
NOTE: If this fails, then verify that you are using the same 32 bit or 64 bit versions of the Vista SP1 and Vista Installation DVD files. If they are not the same, it will fail.​
Step12.jpg

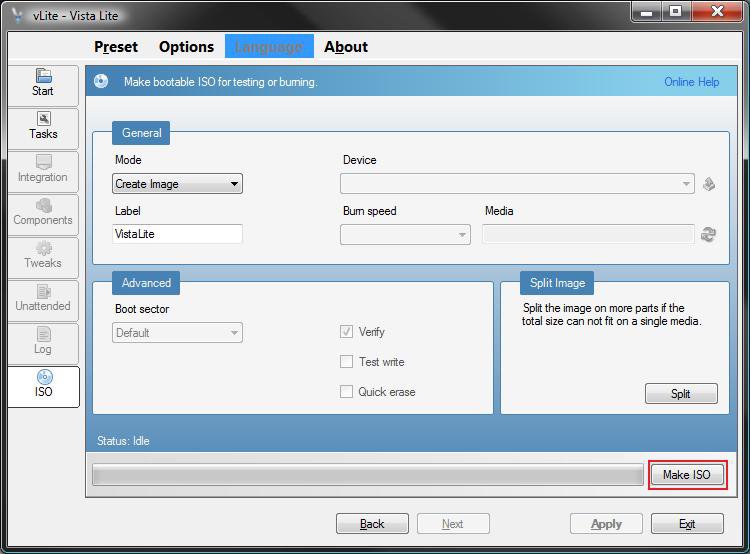
14. Under the General section, make sure that Create Image is selected and click on the Make ISO button. (See screenshot below)​
Step13.jpg

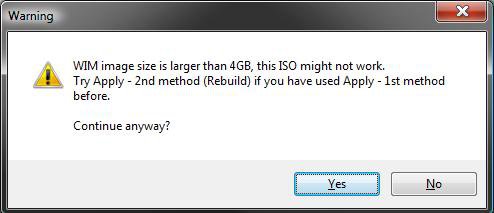
15. If the Created Image is over 4 GB
A) If this window pops-up on you with a similar message after you click on the Make ISO button (from step 14), then click on No and continue to step 16. (See screenshot below)​
NOTE: If you do not get the option to make the ISO image smaller, then see:
B) If not, then go to step 19 and skip steps 16, 17, and 18.​
Step14.jpg


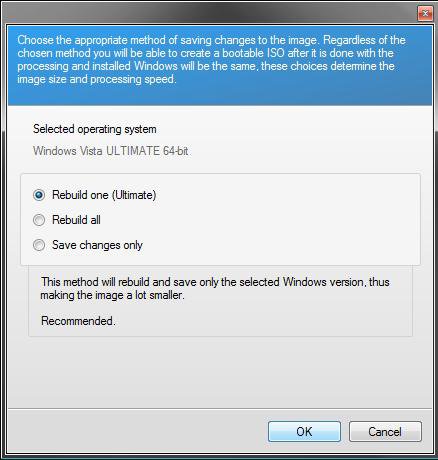
16. Dot Rebuild one (Vista edition from step 5) and click OK. (See screenshot below)​
Step15.jpg

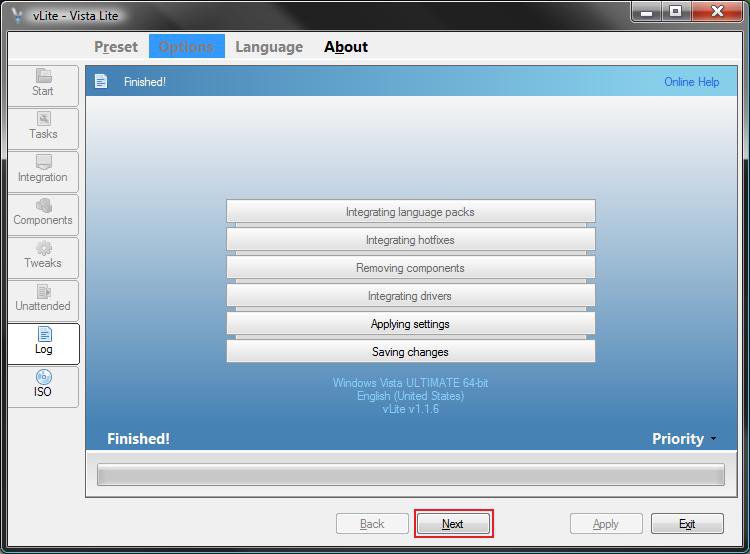
17. When finished, click on the Next button. (See screenshot below)​
NOTE: This will take a little bit to finish.​
Step16.jpg

18. Under the General section, make sure that Create Image is selected and click on the Make ISO button. (See screenshot below)​
NOTE: After the Vista and SP1 image file has been rebuilt to make it smaller, you will return to the same screen in step 14.​
Step13.jpg

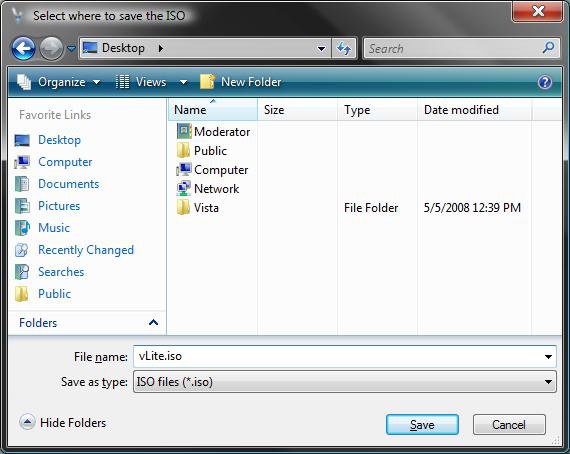
19. Select the Desktop and click on the Save button. (See screenshot below)​
NOTE: This is where the ISO file will be saved when it is finished being created.​
Step17.jpg

20. When it is finished creating the ISO file, place a blank unformated DVD into the DVD drive.​
NOTE: If AutoPlay pops-up asking you to format the DVD, just close it.​
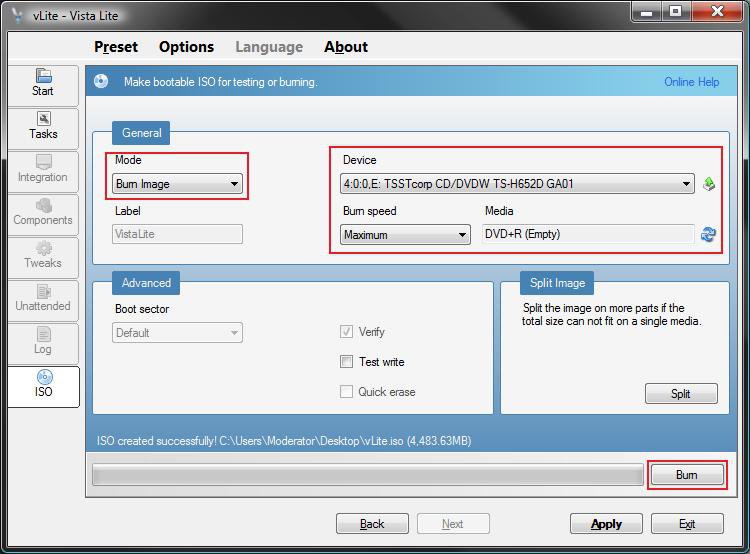
21. Under the General section, make sure that Burn Image is selected and that you have your DVD drive selected under Device. Click on the Burn button. (See screenshot below)​
Step18.jpg

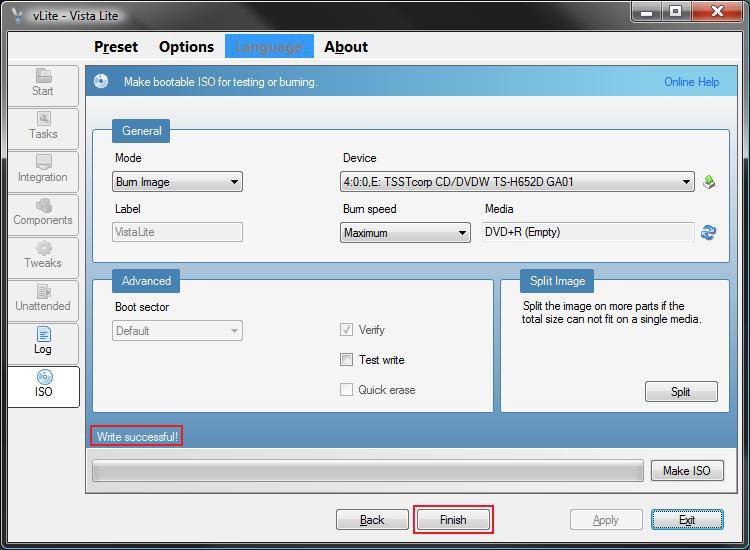
22. When it is finished making the Vista SP1 Slipstream Installation DVD it will say Write Successful, then click on the Finish or Exit button. (See screenshot below)​
NOTE: It will take a few minutes to finish this. When you click Finish, it will close vLite.​
Step19.jpg

23. Remove your new Vista SP1 Slipstream Installation DVD from the DVD drive.​
NOTE: You will use this DVD the same way you did the retail Vista installation DVD.​
24. Do not forget to enable your antivirus program again.​
That's it, your done. Finally. LOL ;)
Shawn


Attachments

  • thumb_vista_install_logo.jpg
    thumb_vista_install_logo.jpg
    2.7 KB · Views: 390
Last edited by a moderator:
Hi Diogenes,

Not sure what you are saying, do you a screen a bit like this ?

View attachment 10345

SIW2


Hey SIW2,
Thanks for the quick reply. I do get a screen like that, but when I select "Home Premium," then the "slipstream" button/option is removed from the left side and "slipstream" is no longer an option under tasks. Again, this only happens when I select Home Premium, and no other versions.

Thanks again.
 

My Computer

Hi,

What kind of dvd is that- an M$ Retail, or system builder, or a Dell?

SIW2
 

My Computers

System One System Two

  • Operating System
    Vista
    CPU
    Intel E8400
    Motherboard
    ASRock1333-GLAN R2.0
    Memory
    4gb DDR2 800
    Graphics Card(s)
    nvidia 9500GT 1gb
  • Operating System
    win7/vista
    CPU
    intel i5-8400
    Motherboard
    gigabyte b365m ds3h
    Memory
    ballistix 2x8gb 3200
Try closing vlite, then re open it, Click the Options tab - make sure everything is unticked.

Pick up the Vista files and see if it works this time.

SIW2
 

My Computers

System One System Two

  • Operating System
    Vista
    CPU
    Intel E8400
    Motherboard
    ASRock1333-GLAN R2.0
    Memory
    4gb DDR2 800
    Graphics Card(s)
    nvidia 9500GT 1gb
  • Operating System
    win7/vista
    CPU
    intel i5-8400
    Motherboard
    gigabyte b365m ds3h
    Memory
    ballistix 2x8gb 3200
Question : Is it possible to slipstream a Vista Business SP2 Installer from :
i. Vista Business DVD without SP1
ii. slipstream-ed Vista Business DVD SP1
iii. Vista Home Premium DVD SP1

sorry for if reposting, didn't had time to read through whole thing

Another Question :
at Step 3. C)


is it possible if I use WinRAR and un-zip it then use the installer from the un-zipped folder ? this is because the DVD ISO file burned says the Win....CAB file is corrupt or the (something, not sure) is unreadable ...

update: even the unzipped folder installer says the same error "the cabinet file 'WinPE.cab' is corrupt or cannot be used"...
I think i will download again and hope it works
 

My Computer

System One

  • Manufacturer/Model
    Asus
    CPU
    Athlon 64 X2 3800+ / Core 2 Duo E8200
    Motherboard
    M2NPV-VM / P5K Premium/WiFi-AP
    Memory
    4.00 / 2.00 GB
    Graphics Card(s)
    nVidia 6150 (Built-in) / Asus EAH3650
    Sound Card
    (Built-in thing) / (Built-in thing)
    Monitor(s) Displays
    Samsung SyncMater 943BWX / 732Nplus
    Screen Resolution
    1440x900 / 1280x1024
    Hard Drives
    Seagate Barracuda 7200.9 160 / 250 GB
    PSU
    PowerLogic Magnum 250
    Case
    PowerLogic Azzura 2000
    Cooling
    None
    Keyboard
    Microsoft Wired Desktop 500
    Mouse
    Microsoft Wired Desktop 500
    Internet Speed
    Streamyx Combo 512 Kbps
Shawn,

Thank you or your great effort. But unfortunately for me it did not work. I have a Dell OEM Install DVD and Vista Ultimate 32bit. (The system came with SP1 already installed.) Your point # 8 did not come up as described: there was no Check-mark box with "Service Pack Slipstream" I could choose and process. What went wrong?
 

My Computer

Hello Umberto, and welcome to Vista Forums.

Since SP1 is already included in your Vista installation DVD, it will not be there in step 8 to add it to the slipstream. Did it allow you to create the slipstream DVD?

Shawn
 

My Computers

System One System Two

  • Operating System
    Windows 10 Pro 64-bit
    Manufacturer/Model
    Custom
    CPU
    Intel i7-8700K 5 GHz
    Motherboard
    ASUS ROG Maximus XI Formula Z390
    Memory
    64 GB (4x16GB) G.SKILL TridentZ RGB DDR4 3600 MHz (F4-3600C18D-32GTZR)
    Graphics Card(s)
    ASUS ROG-STRIX-GTX1080TI-O11G-GAMING
    Sound Card
    Integrated Digital Audio (S/PDIF)
    Monitor(s) Displays
    2 x Samsung Odyssey G7 27"
    Screen Resolution
    2560x1440
    Hard Drives
    1TB Samsung 990 PRO M.2,
    4TB Samsung 990 PRO PRO M.2,
    8TB WD MyCloudEX2Ultra NAS
    PSU
    Seasonic Prime Titanium 850W
    Case
    Thermaltake Core P3
    Cooling
    Corsair Hydro H115i
    Keyboard
    Logitech wireless K800
    Mouse
    Logitech MX Master 3
    Internet Speed
    1 Gb/s Download and 35 Mb/s Upload
    Other Info
    Logitech Z625 speaker system,
    Logitech BRIO 4K Pro webcam,
    HP Color LaserJet Pro MFP M477fdn,
    APC SMART-UPS RT 1000 XL - SURT1000XLI,
    Galaxy S23 Plus phone
  • Operating System
    Windows 10 Pro
    Manufacturer/Model
    HP Envy Y0F94AV
    CPU
    i7-7500U @ 2.70 GHz
    Memory
    16 GB DDR4-2133
    Graphics card(s)
    NVIDIA GeForce 940MX
    Sound Card
    Conexant ISST Audio
    Monitor(s) Displays
    17.3" UHD IPS touch
    Screen Resolution
    3480 x 2160
    Hard Drives
    512 GB M.2 SSD
Hi Shawn,
Thank you for your reply! To complete my information: I have a Dell "Reinstallation" DVD, where the main folder is named "Vista SP1 Ultimate". To your question: I don't know whether I got a Slipstream, but I think I did not. I only could choose and create a "Bootable ISO". The result was a "vLite.iso", which contains exact the same as the original Dell DVD. What I hoped to achieve from this Slipstream was access to a tcpmon.ini and a settings.ini, which strangly are both corrupted on my system and cannot be repaired. And the Dell DVD does not have this two files. As I understand they are only created during the process of installation. But also a "repair" installation did not renew them and a total new installation I reserve as last option.
 

My Computer

Yeah, the "vLite.iso" will basically just be a clone of your Dell SP1 DVD since this tutorial was made to create a SP1 slipstream from a non SP1 installation DVD. ;)

Other than a clean reinstall, you might see if doing a System Restore using a restore point dated before the problem may fix them for you.
 

My Computers

System One System Two

  • Operating System
    Windows 10 Pro 64-bit
    Manufacturer/Model
    Custom
    CPU
    Intel i7-8700K 5 GHz
    Motherboard
    ASUS ROG Maximus XI Formula Z390
    Memory
    64 GB (4x16GB) G.SKILL TridentZ RGB DDR4 3600 MHz (F4-3600C18D-32GTZR)
    Graphics Card(s)
    ASUS ROG-STRIX-GTX1080TI-O11G-GAMING
    Sound Card
    Integrated Digital Audio (S/PDIF)
    Monitor(s) Displays
    2 x Samsung Odyssey G7 27"
    Screen Resolution
    2560x1440
    Hard Drives
    1TB Samsung 990 PRO M.2,
    4TB Samsung 990 PRO PRO M.2,
    8TB WD MyCloudEX2Ultra NAS
    PSU
    Seasonic Prime Titanium 850W
    Case
    Thermaltake Core P3
    Cooling
    Corsair Hydro H115i
    Keyboard
    Logitech wireless K800
    Mouse
    Logitech MX Master 3
    Internet Speed
    1 Gb/s Download and 35 Mb/s Upload
    Other Info
    Logitech Z625 speaker system,
    Logitech BRIO 4K Pro webcam,
    HP Color LaserJet Pro MFP M477fdn,
    APC SMART-UPS RT 1000 XL - SURT1000XLI,
    Galaxy S23 Plus phone
  • Operating System
    Windows 10 Pro
    Manufacturer/Model
    HP Envy Y0F94AV
    CPU
    i7-7500U @ 2.70 GHz
    Memory
    16 GB DDR4-2133
    Graphics card(s)
    NVIDIA GeForce 940MX
    Sound Card
    Conexant ISST Audio
    Monitor(s) Displays
    17.3" UHD IPS touch
    Screen Resolution
    3480 x 2160
    Hard Drives
    512 GB M.2 SSD
You're welcome Umberto. :)
 

My Computers

System One System Two

  • Operating System
    Windows 10 Pro 64-bit
    Manufacturer/Model
    Custom
    CPU
    Intel i7-8700K 5 GHz
    Motherboard
    ASUS ROG Maximus XI Formula Z390
    Memory
    64 GB (4x16GB) G.SKILL TridentZ RGB DDR4 3600 MHz (F4-3600C18D-32GTZR)
    Graphics Card(s)
    ASUS ROG-STRIX-GTX1080TI-O11G-GAMING
    Sound Card
    Integrated Digital Audio (S/PDIF)
    Monitor(s) Displays
    2 x Samsung Odyssey G7 27"
    Screen Resolution
    2560x1440
    Hard Drives
    1TB Samsung 990 PRO M.2,
    4TB Samsung 990 PRO PRO M.2,
    8TB WD MyCloudEX2Ultra NAS
    PSU
    Seasonic Prime Titanium 850W
    Case
    Thermaltake Core P3
    Cooling
    Corsair Hydro H115i
    Keyboard
    Logitech wireless K800
    Mouse
    Logitech MX Master 3
    Internet Speed
    1 Gb/s Download and 35 Mb/s Upload
    Other Info
    Logitech Z625 speaker system,
    Logitech BRIO 4K Pro webcam,
    HP Color LaserJet Pro MFP M477fdn,
    APC SMART-UPS RT 1000 XL - SURT1000XLI,
    Galaxy S23 Plus phone
  • Operating System
    Windows 10 Pro
    Manufacturer/Model
    HP Envy Y0F94AV
    CPU
    i7-7500U @ 2.70 GHz
    Memory
    16 GB DDR4-2133
    Graphics card(s)
    NVIDIA GeForce 940MX
    Sound Card
    Conexant ISST Audio
    Monitor(s) Displays
    17.3" UHD IPS touch
    Screen Resolution
    3480 x 2160
    Hard Drives
    512 GB M.2 SSD
download finished finally, i noticed that sometimes when nearing 85% done, my WAIK download turns into NO RESUME SUPPORT.
also, i installed it by unzipping it, no need to burn it
not only that, if i download using firefox or using a download manager (such as my current Free Download Manager) that doesn't pop out a pop-up window when running a downloaded item, it will skip step 11.
now, i just have to test it out now.

BTW, under step 20, there's a slight typo where 'the' is typed as 'th'

update: hopeless... the CAB file from the Vista Business DVD installer is problematic ... corrupted ...
 
Last edited:

My Computer

System One

  • Manufacturer/Model
    Asus
    CPU
    Athlon 64 X2 3800+ / Core 2 Duo E8200
    Motherboard
    M2NPV-VM / P5K Premium/WiFi-AP
    Memory
    4.00 / 2.00 GB
    Graphics Card(s)
    nVidia 6150 (Built-in) / Asus EAH3650
    Sound Card
    (Built-in thing) / (Built-in thing)
    Monitor(s) Displays
    Samsung SyncMater 943BWX / 732Nplus
    Screen Resolution
    1440x900 / 1280x1024
    Hard Drives
    Seagate Barracuda 7200.9 160 / 250 GB
    PSU
    PowerLogic Magnum 250
    Case
    PowerLogic Azzura 2000
    Cooling
    None
    Keyboard
    Microsoft Wired Desktop 500
    Mouse
    Microsoft Wired Desktop 500
    Internet Speed
    Streamyx Combo 512 Kbps
Question : Is it possible to slipstream a Vista Business SP2 Installer from :
i. Vista Business DVD without SP1
ii. slipstream-ed Vista Business DVD SP1
iii. Vista Home Premium DVD SP1

sorry for if reposting, didn't had time to read through whole thing

Another Question :
at Step 3. C)


is it possible if I use WinRAR and un-zip it then use the installer from the un-zipped folder ? this is because the DVD ISO file burned says the Win....CAB file is corrupt or the (something, not sure) is unreadable ...

update: even the unzipped folder installer says the same error "the cabinet file 'WinPE.cab' is corrupt or cannot be used"...
I think i will download again and hope it works

download finished finally, i noticed that sometimes when nearing 85% done, my WAIK download turns into NO RESUME SUPPORT.
also, i installed it by unzipping it, no need to burn it
not only that, if i download using firefox or using a download manager (such as my current Free Download Manager) that doesn't pop out a pop-up window when running a downloaded item, it will skip step 11.
now, i just have to test it out now.

BTW, under step 20, there's a slight typo where 'the' is typed as 'th'

update: hopeless... the CAB file from the Vista Business DVD installer is problematic ... corrupted ...

Sorry Zhang,

Yes, you should be able to slipstream SP2 using the same method here using those type of Vista installation DVDs.

Thank you, the typo has been corrected. :)

I hope the next round you not have a corrupted CAB file.

Shawn
 

My Computers

System One System Two

  • Operating System
    Windows 10 Pro 64-bit
    Manufacturer/Model
    Custom
    CPU
    Intel i7-8700K 5 GHz
    Motherboard
    ASUS ROG Maximus XI Formula Z390
    Memory
    64 GB (4x16GB) G.SKILL TridentZ RGB DDR4 3600 MHz (F4-3600C18D-32GTZR)
    Graphics Card(s)
    ASUS ROG-STRIX-GTX1080TI-O11G-GAMING
    Sound Card
    Integrated Digital Audio (S/PDIF)
    Monitor(s) Displays
    2 x Samsung Odyssey G7 27"
    Screen Resolution
    2560x1440
    Hard Drives
    1TB Samsung 990 PRO M.2,
    4TB Samsung 990 PRO PRO M.2,
    8TB WD MyCloudEX2Ultra NAS
    PSU
    Seasonic Prime Titanium 850W
    Case
    Thermaltake Core P3
    Cooling
    Corsair Hydro H115i
    Keyboard
    Logitech wireless K800
    Mouse
    Logitech MX Master 3
    Internet Speed
    1 Gb/s Download and 35 Mb/s Upload
    Other Info
    Logitech Z625 speaker system,
    Logitech BRIO 4K Pro webcam,
    HP Color LaserJet Pro MFP M477fdn,
    APC SMART-UPS RT 1000 XL - SURT1000XLI,
    Galaxy S23 Plus phone
  • Operating System
    Windows 10 Pro
    Manufacturer/Model
    HP Envy Y0F94AV
    CPU
    i7-7500U @ 2.70 GHz
    Memory
    16 GB DDR4-2133
    Graphics card(s)
    NVIDIA GeForce 940MX
    Sound Card
    Conexant ISST Audio
    Monitor(s) Displays
    17.3" UHD IPS touch
    Screen Resolution
    3480 x 2160
    Hard Drives
    512 GB M.2 SSD
thanks for your help, Brink
great guide BTW :geek:
 

My Computer

System One

  • Manufacturer/Model
    Asus
    CPU
    Athlon 64 X2 3800+ / Core 2 Duo E8200
    Motherboard
    M2NPV-VM / P5K Premium/WiFi-AP
    Memory
    4.00 / 2.00 GB
    Graphics Card(s)
    nVidia 6150 (Built-in) / Asus EAH3650
    Sound Card
    (Built-in thing) / (Built-in thing)
    Monitor(s) Displays
    Samsung SyncMater 943BWX / 732Nplus
    Screen Resolution
    1440x900 / 1280x1024
    Hard Drives
    Seagate Barracuda 7200.9 160 / 250 GB
    PSU
    PowerLogic Magnum 250
    Case
    PowerLogic Azzura 2000
    Cooling
    None
    Keyboard
    Microsoft Wired Desktop 500
    Mouse
    Microsoft Wired Desktop 500
    Internet Speed
    Streamyx Combo 512 Kbps
You're welcome Zhang.
 

My Computers

System One System Two

  • Operating System
    Windows 10 Pro 64-bit
    Manufacturer/Model
    Custom
    CPU
    Intel i7-8700K 5 GHz
    Motherboard
    ASUS ROG Maximus XI Formula Z390
    Memory
    64 GB (4x16GB) G.SKILL TridentZ RGB DDR4 3600 MHz (F4-3600C18D-32GTZR)
    Graphics Card(s)
    ASUS ROG-STRIX-GTX1080TI-O11G-GAMING
    Sound Card
    Integrated Digital Audio (S/PDIF)
    Monitor(s) Displays
    2 x Samsung Odyssey G7 27"
    Screen Resolution
    2560x1440
    Hard Drives
    1TB Samsung 990 PRO M.2,
    4TB Samsung 990 PRO PRO M.2,
    8TB WD MyCloudEX2Ultra NAS
    PSU
    Seasonic Prime Titanium 850W
    Case
    Thermaltake Core P3
    Cooling
    Corsair Hydro H115i
    Keyboard
    Logitech wireless K800
    Mouse
    Logitech MX Master 3
    Internet Speed
    1 Gb/s Download and 35 Mb/s Upload
    Other Info
    Logitech Z625 speaker system,
    Logitech BRIO 4K Pro webcam,
    HP Color LaserJet Pro MFP M477fdn,
    APC SMART-UPS RT 1000 XL - SURT1000XLI,
    Galaxy S23 Plus phone
  • Operating System
    Windows 10 Pro
    Manufacturer/Model
    HP Envy Y0F94AV
    CPU
    i7-7500U @ 2.70 GHz
    Memory
    16 GB DDR4-2133
    Graphics card(s)
    NVIDIA GeForce 940MX
    Sound Card
    Conexant ISST Audio
    Monitor(s) Displays
    17.3" UHD IPS touch
    Screen Resolution
    3480 x 2160
    Hard Drives
    512 GB M.2 SSD
Hi tonyolson,

More than likely, however it may require an update to vLite to enable it to recognise SP2. If so, this may not happen until SP2 is officially released as a finished product.
 

My Computer

System One

  • Manufacturer/Model
    Dwarf Dwf/11/2012 r09/2013
    CPU
    Intel Core-i5-3570K 4-core @ 3.4GHz (Ivy Bridge) (OC 4.2GHz)
    Motherboard
    ASRock Z77 Extreme4-M
    Memory
    4 x 4GB DDR3-1600 Corsair Vengeance CMZ8GX3M2A1600C9B (16GB)
    Graphics Card(s)
    MSI GeForce GTX770 Gaming OC 2GB
    Sound Card
    Realtek High Definition on board solution (ALC 898)
    Monitor(s) Displays
    ViewSonic VA1912w Widescreen
    Screen Resolution
    1440x900
    Hard Drives
    OCZ Agility 3 120GB SATA III x2 (RAID 0)
    Samsung HD501LJ 500GB SATA II x2
    Hitachi HDS721010CLA332 1TB SATA II
    Iomega 1.5TB Ext USB 2.0
    WD 2.0TB Ext USB 3.0
    PSU
    XFX Pro Series 850W Semi-Modular
    Case
    Gigabyte IF233
    Cooling
    1 x 120mm Front Inlet 1 x 120mm Rear Exhaust
    Keyboard
    Microsoft Comfort Curve Keyboard 3000 (USB)
    Mouse
    Microsoft Comfort Mouse 3000 for Business (USB)
    Internet Speed
    NetGear DG834Gv3 ADSL Modem/Router (Ethernet) ~4.0 Mb/s (O2)
    Other Info
    Optical Drive: HL-DT-ST BD-RE BH10LS30 SATA Bluray
    Lexmark S305 Printer/Scanner/Copier (USB)
    WEI Score: 8.1/8.1/8.5/8.5/8.25
    Asus Eee PC 1011PX Netbook (Windows 7 x86 Starter)
I've installed my successfully slipstreamed Vista SP1 but now want to do an in-place upgrade to correct some problems but setup tells me that the upgrade option is disabled and cannot be started, and that I have to upgrade to a version that is more recent than the version I am currently running. Is there a workaround for this?

Thanks.
 

My Computer

Back
Top