How to Fix Most Problems with Vista Windows Mail
Windows Mail is a new version of Outlook Express with a new name for Vista. Windows Mail only supports POP3 and IMAP E-mail accounts not Web Site based accounts (EX: Hotmail or Yahoo) unless they are the paid versions with the POP3 option. Below are some solutions to the most common issues. For more information, see: www.oehelp.com/
For a list of error code numbers and their description for Windows Mail and Windows Live Mail, see: Microsoft Help and Support: Windows Mail and Windows Live Mail error codes
 PROBLEM ONE
Do the section below for the folder that you have the stuck undeletable message in to remove it. The To Reset Windows Mail section will get rid of a stuck message in any folder.
This is the usual error message that you will get:
Unknown error has occurred, Windows Mail encountered an unexpected problem while displaying this message. Check your computer for low memory or low disk space and try again.
Unknown error has occurred, Windows Mail encountered an unexpected problem while displaying this message. Check your computer for low memory or low disk space and try again.
 First
First 
For more information on this, see: OETips #3 : Turn off email scanning in your antivirus software
1. Make sure your antivirus or any other security programs have all of their email scanning options turned off. The emailscaning option is a redundant feature.
NOTE: These scanning options can corrupt Windows Mail entire message folder, or the entire message store, when it attempts to remove a message it thinks contains a potential virus. You will still be protected against infection with the antivirus program's system protection. These email scans can also cause problems with opening attachments in Windows Mail to.
2. Check the program's website for a update and install it, then install the KB941090 Update in the SECOND section below to.
3. If step 2 does not help, then you may need to uninstall the program completely until they have a update that will allow it to work properly with Windows Mail.
NOTE: Older versions of Norton, McAfee, and Trend may need to be uninstalled. They have had problems working properly with Windows Mail, and simply turning off the email scanning options will not always be sufficient. If Norton does not uninstall cleanly, then you will need to use the Norton Removal Tool. If McAfee does not uninstall cleanly, then you will need to use the MCPR Removal Tool (step 2 at link).
4. If this still does not help, then your email account has been corrupted.
A) Delete your current email account. (Click on Tools, Accounts in Windows Mail)
WARNING: Be sure to backup (Export) any email messages you want to keep. See this tutorial for how: How to Backup and Restore Messages in Windows Mail
B) Close and reopen Windows Mail.
C) Add the email account again. (Click Tools, Accounts, Add, E-mail)
5. Some Free Alternative Antivirus Programs:
NOTE: These work with Vista 32 bit (x86) or 64 bit (x64) with no problems, but will need to have their email scanning options turned off as well.
(Do a Custom install and do not install the email scanning option.)
(Do a Custom install and do not install the email scanning option.)
 Second
- The KB941090 Update will work on all Windows Mail mailbox folders for removing a stuck undeletable message. I would recommend to install it first instead of doing the manual solutions below.
- The KB941090 Update is already included in Vista SP1 and SP2.
- If you are unable to install the KB941090 update from steps 2A or 2B, then you can try the Workaround in the link in the Note for step 3 below or try manually deleting the message(s) using the Manual section below.
The KB941090 update will just fix this for now. To help prevent this from happening again, read the First section above.
1. Close Windows Mail if open.
2. Download the Microsoft Help and Support: KB941090 Update Download Package for your 32 bit (x86) or 64 bit (x64) version of Vista.
NOTE: To see what bit version you have of Vista, open the Control Panel (Classic View) and click the System icon, or right click Computer in the Start Menu and click Properties. You will see the bit version under the System type section.
A) Update for Windows Vista 32 bit (x86) (KB941090) < Click To Download
B) Update for Windows Vista 64 bit (x64) (KB941090) < Click To Download
3. Install it.
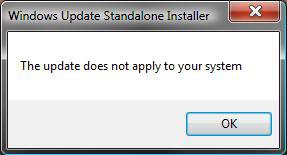
NOTE: If you get the The update does not apply to your system message (See screenshot below), then check to make sure that you downloaded the correct 32 bit or 64 bit version for your computer. If you have the correct version, then you already have it installed since the Vista SP1 and SP2 does include this update in it. You can try the Manual methods below, or the Workaround section in the link Microsoft Help and Support: KB941090 to fix this problem.
4. Reopen Windows Mail and check to see if the stuck message is gone, or that it can be deleted now.
NOTE: If you still cannot delete them, then restart the computer and try again.
How to Remove a Stuck Message in the Deleted Items Folder Manually :
NOTE: This sometimes may slowly delete them one by one in the Deleted Items.
OPTION ONE:
1. Click on another folder other than the Deleted Items folder.
2. Right click Deleted Items folder or click Edit at top.
3. Click Empty 'Deleted Items' folder.
4. Click Yes for confirmation prompt.
5. Repeat until the messages are all gone.
OPTION TWO:
1. Click on Deleted Items folder to open it.
2. Click on a message to delete and click on the red X icon on the toolbar.
NOTE: You can repeat this one by one for each message you want deleted, or press Ctrl+A, or clicking on Edit - Select All, and click the red X to select and delete all messages.
How to Remove a Stuck Message in the Junk E-mail Folder Manually :
NOTE: This sometimes may slowly delete them one by one in the Junk E-mail folder.
OPTION ONE:
1. Click on another folder other than the Junk E-mail folder.
2. Right click Junk E-mail folder.
3. Click Empty 'Junk E-mail' folder.
4. Click Yes for confirmation prompt.
5. Repeat until the messages are all gone.
6. You should now be able to delete them in the Deleted Items folder.
OPTION TWO:
1. Click on Junk E-mail folder to open it.
2. Click on a message to delete and click on the red X icon on the toolbar.
NOTE: You can repeat this one by one for each message you want deleted, or press Ctrl+A, or clicking on Edit - Select All, and click the red X to select and delete all messages.
 Third
Third 
NOTE: WMUtil is a small utility to allow users to compact and repair the Windows Mail database in Windows Vista.
The Windows Mail database periodically needs compacting and defragmenting to function with maximal performance. Currently there is no manual method to compact the database in Windows Mail, unless one tinkers with the values set at Tools | Options | Advanced | Maintenance. WMUtil allows the user to manually compact the database to remove any wasted space from it.
Occasionally the database becomes corrupted as indicated for example by the inability of being able to delete messages from various folders. The Windows Mail database has a built-in repair feature that can sometimes fix such problems. Windows Mail provides no access to this feature, so clicking on the Repair button will manually run the repair feature on the database. Clicking on the Clear Outbox button will remove references in the database to phantom outbox messages.
1. Download and install WMutil, then just follow that site's instructions step by step for the "program operation".
 Fourth
NOTE: Sometimes a email will get stuck at your email provider's online website access where you can alternatively access your email other than from your computer.
1. Log in to you online email access for the account that you have in Windows Mail that has a stuck message.
2. See if you can resend or delete the stuck message here.
 Fifth
Fifth 
NOTE: If you are not comfortable doing the steps in this tutorial, continue to have problems with Windows Mail even after this, or just tired of messing with Windows Mail, then I would recommend for you to switch (upgrade) to the free:
Windows Live Mail :
To Read About It see:
NOTE: It supports Pop3, IMAP, HTTP website (EX: Hotmail) email, and is a lot more stable. Plus, WLM will minimize to a tray bar icon, checks spelling as you type messages, and has a separate Inbox for each email account. WLM will automatically import Windows Mail messages, accounts, and settings into it. Contacts will have to be manually imported from within WLM. (Tools, Contacts, File, Import, Address book for current Windows User.) To see the Menu bar, press ALT+M and check "Show all menus".
For 32 bit and 64 bit Vista: Windows Live Suite Downloads
OR
Mozilla Thunderbird : http://www.mozilla.com/en-US/thunderbird/
 PROBLEM TWO
This fixes all mailbox folders, message, or account corruption problems in Windows Mail. Contacts will not be affected.
If you have created any stationery, then you will need to back it up and add it back manually later. Windows Mails stores stationery by default at: C:\Users\(User Name)\AppData\Local\Microsoft\Windows Mail\Stationery unless you have manually saved it somewhere else. This is a hidden System file location. For how to see it, see OPTION TWO here: How to Hide or Show Hidden Files and Folders in Vista . You can see more about stationery here: How to Use and Create Stationery in Windows Mail
 Option One
NOTE: If you do not have or want any email messages to be backed up, then skip this part. You will lose all messages not backed up. To restore, see step 13 in the OPTION FOUR section below.
1. For how, see: How to Backup and Restore Messages in Windows Mail
 Option Two
NOTE: If you do not want to back up your account(s) or it is corrupted, then skip this part. You will lose all accounts not backed up. To restore, see step 12 in the OPTION FOUR section below.
1. Create a new folder named Accounts in C:\Users\(username)\Documents.
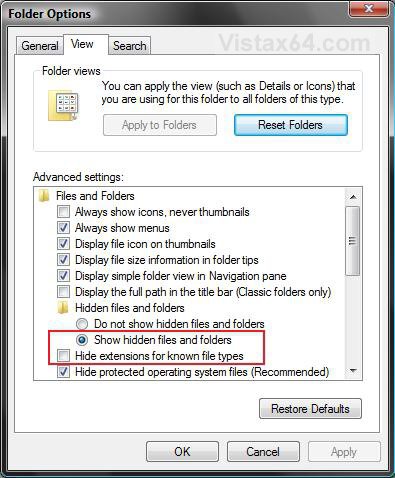
2. Open Folder Options and click View tab.
NOTE: Folder Options is in Control Panel (click Classic View) or Tools menu in a Explorer window.
A) Check Show Hidden files and folders.
B) Uncheck Hide extensions for known file types.
C) Click on OK to apply and close Folder Options.
3. Go to:
Code:
C:\Users\(username)\AppData\Local\Microsoft\Windows Mail\Local Folders
4. In Local Folders, right click the account{whatever #'s}.oeaccount file and click on Copy.
5. Go to C:\Users\(username)\Documents\Accounts and right click on a empty area and click Paste.
NOTE: If you have multiple accounts, repeat steps 4 to 5 for each account.
6. Close both windows.
NOTE: Your email account information is now backed up in:
Code:
C:\Users\(username)\Documents\Accounts
 Option Three
NOTE: These settings are stored in the registry. To restore, see step 14 in the OPTION FOUR section below.
1. Open the Start Menu.
2. In the white line (Start Search) area, type regedit and press Enter.
3. If prompted, click on Continue in the UAC prompt.
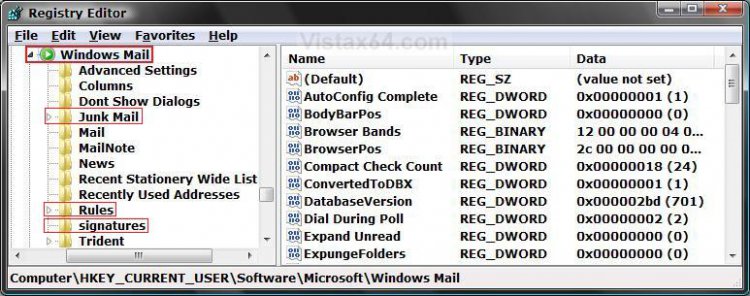
4. In regedit, go to: (See screenshot below)
Code:
HKEY_CURRENT_USER\Software\Microsoft\Windows Mail
5. To Backup All Of Windows Mail Settings -
WARNING: If your Windows Mail is corrupted or not working properly, then skip backing this up. Only backup the individual ONLY backups (steps 6, 7, or 8) instead.
NOTE: If you do this step, then skip steps 6, 7, and 8. They are all included in this one.
A) In the left pane, right click on Windows Mail and click on Export.
B) Go to step 9.
6. To Only Backup Junk Mail Settings -
NOTE: This includes your Safe and Block Senders Lists.
A) In the left pane, right click on Junk Mail and click on Export.
B) Go to step 9.
7. To Only Backup Message Rules Settings -
A) In the left pane, right click on Rules and click on Export.
B) Go to step 9.
8. To Only Backup Signatures -
A) In the left pane, right click on signatures and click on Export.
B) Go to step 9.
9. Type in a name, Windows Mail Settings as an example, and Save the .reg file to the Desktop.
NOTE: This Windows Mail Settings.reg file is your backup.
10. Repeat steps 6 to 9 for doing individual backups only.
NOTE: If you did step 5, then you do not need to do steps 6 to 8. They are all included in step 5.
 Option Four
NOTE: If you are just restoring your Windows Mail settings and messages to a new Vista install or user account, then you can skip the Reset part and go to step 12 below to restore from the backups above.
1. Close Windows Mail if open.
2. Press Ctrl + Shift + Esc keys together to open Task manager.
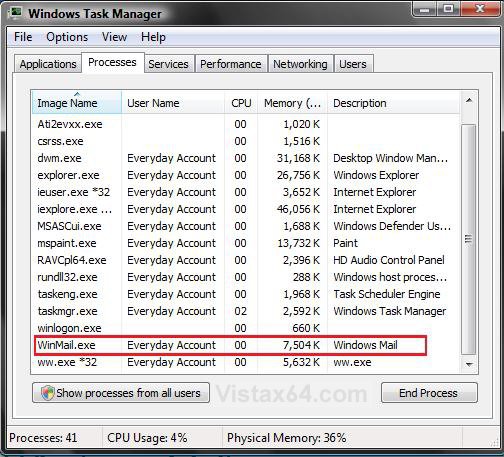
3. Click on the Processes tab. (See screenshot below)
4. If WinMail.exe is listed, then: (See screenshot above)
NOTE: If WinMail.exe is not listed, then close Task Manager and go to step 5.
A) Click on WinMail.exe to highlight it and click End Process button.
NOTE: If you have more than one WinMail.exe listed, then repeat this for each one.
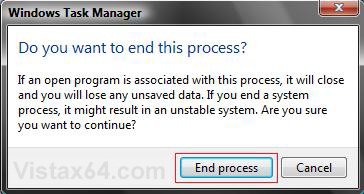
B) Click on End process button for the confirmation prompt. (See screenshot below)
C) Close Task Manager.
5. Open the Start Menu.
A) In the white line (Start Search) area, type regedit and press Enter.
B) Click on the Continue button in the UAC prompt.
C) In regedit, go to: (See screenshot below)
Code:
HKEY_CURRENT_USER\Software\Microsoft\Windows Mail
D) In the left pane, right click on Windows Mail and click on Delete.
E) Click on Yes to confirm the deletion. (See screenshot below)
F) Close Regedit.
6. Open Folder Options and click on the View tab. (See screenshot below)
NOTE: Folder Options is in Control Panel (click Classic View) or Tools menu in a Explorer window.
A) Check (dot) Show hidden files and folders.
NOTE: For more on this, See: How to Hide or Show Hidden Files and Folders in Vista
B) Uncheck Hide extensions for known file types.
C) Click on OK to apply and close Folder Options.
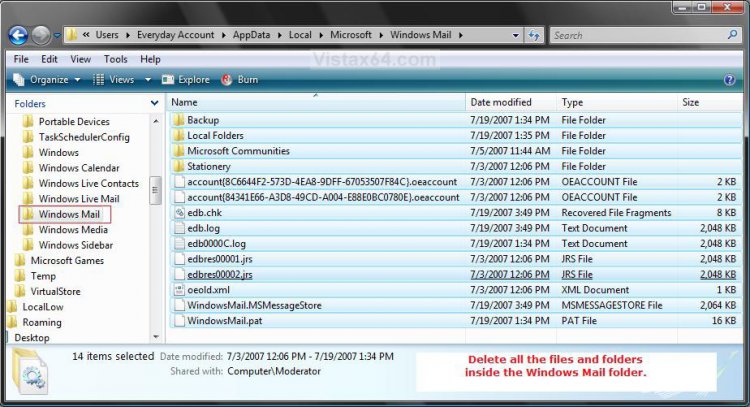
7. Open a Windows Explorer window and go to the folder: (See screenshot below)
Code:
C:\Users\(username)\AppData\Local\Microsoft\Windows Mail
8. Open the Windows Mail folder and Delete all the contents (files and folders) inside the folder. (See screenshot below)
WARNING: Do not delete the Windows Mail folder itself.
9. Close this window.
10. Restart the computer.
11. When Vista is done restarting, open Windows Mail and then close Windows Mail again when it is finished opening.
NOTE: This, steps 10 and 11, will now rebuild Windows Mail and it's registry settings to a clean state.
12. To Restore Your Account(s) Back
NOTE: If you skipped backing up your account(s) in Option Two above, then see * below.
A) Close Windows Mail if still open.
B) Go to:
Code:
C:\Users\(username)\Documents\Accounts
C) Right click the account{whatever #'s}.oeaccount file and click Copy.
D) Go to:
Code:
C:\Users\(username)\AppData\Local\Microsoft\Windows Mail\Local Folders
E) In Local Folders, right click on a empty area and click Paste.
NOTE: Repeat steps B to D if you have multiple accounts for each account{whatever #'s}.oeaccount file.
* If you skipped backing up your account, then:
- Click on Tools in the main Windows Mail screen.
- Click on Accounts
- Click on Add
- Choose E-mail
- Enter your email account information from your email provider.
13. To Restore Your E-mail Messages Back
NOTE: If you skipped backing up your messages above, then skip this step your messages have been deleted.
A) For how, see: How to Backup and Restore Messages in Windows Mail
14. To Restore the Windows Mail Settings Back
A) Right click on the Windows Mail Settings.reg backup file (on Desktop) and click Merge.
NOTE: If you backed up a individual setting, then do the same for it's .reg file.
B) Click on the Run button for Security Warning pop-up.
C) Click on Continue (UAC), Yes, and then OK when prompted.
15. Open Windows Mail.
16. Verify everything is working and copied over ok, then delete the backups if you like.
I hope this helps everyone,
Shawn
Related Tutorials
- How to Fix Multiple Browser Windows Opening When You Click On a MailTo Link in Vista
- How to Fix a Slow Windows Mail
- How to Add the Bcc Recipient to the Windows Mail Compose Message Window
- How to Fix the Spell Checking Language Error, and How To Add the Language List Back
- How to Add a Tray Icon for Windows Mail
- How to Enable Always Check Spelling Before Sending Message in Windows Mail
- How to Edit a Word in the Spell Checker Custom Dictionary in Windows Mail
- How to Add Back and Set Windows Mail Default Associations
- How to Create and Use a Contact Group in Vista
- How to Enable or Disable Windows Mail Splash Screen
- How to Backup and Restore Messages in Windows Mail
- How to Create and Setup a Signature in Windows Mail
- How to Use and Create Stationery in Windows Mail
- How to Remove a Single Address or Reset the Entire List of Recently Used Addresses in Windows Mail
- How to Enable or Disable Windows Mail in Vista
- How to Add or Remove a Custom Windows Mail Title Name in Vista
- How to Create a New E-mail Message Shortcut in Vista
- How to Create a New E-mail to a Common Contact Shortcut in Vista
- How to Restore the Missing "New Contact" and "New Contact Group" Button in Vista Contacts Folder
- How to Restore or Remove Windows Mail from Default Programs
Attachments
Last edited by a moderator:

